Doggy DVR Alarm Sensor

2014-01-05-13.22.20

[Martin] lives in a small village about 25km from his job in a major city. Occasionally his home alarm system will trip and he will rush home to make sure everything is okay. So he decided to buy a DVR system instead… and he turned his dog’s collar into one of the main sensors.

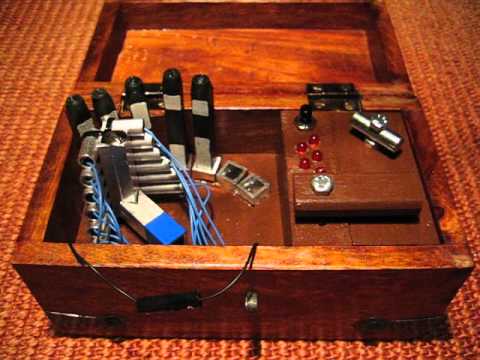
As you may know, DVR’s also have sensor inputs in addition to loads of video cameras. These can be very handy to tell you other things that a small video clip will not, such as moisture, humidity, temperature etc. [Martin’s] DVR has 8 sensor inputs which he has configured to be the normally open type of sensors. By using a Sharp 817 optocoupler and a Funky v3 wireless module he made one of the sensor inputs wireless.

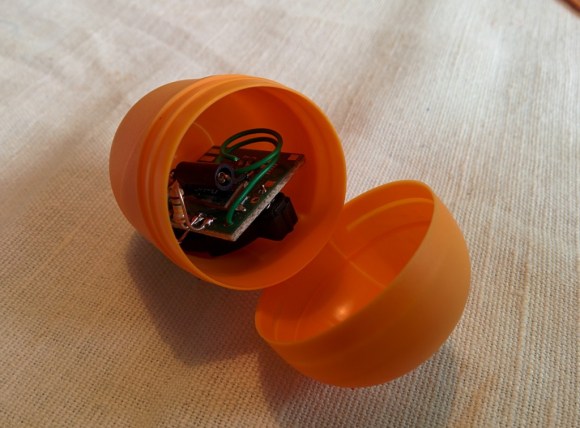
On the other end of the Funky wireless setup is a Kinder Surprise shell attached to his dog’s collar. In addition to the wireless module, it also contains a rudimentary 2-axis shock sensor consisting of a small spring that floats over a metal pin — when moved violently (when the dog is running about) it makes contact and [Martin’s] DVR alerts him by email and sends him pictures from the system.

He suspects he’ll be getting lots of pictures of the dog getting spooked by cats wandering by.

The Berkeley Tricorder Is Now Open Source!

[Reza Naima] has just released the designs for his Berkeley Tricorder for the public to use. He’s been designing it since 2007 as his thesis work for his PhD, and since he’s done now (Congrats!), he decided to let it grow by making it open source!

We covered it almost 7 years ago now when it was in its first prototype form, and it has come a long way since then. The latest version features an electromyogram (EMG), an electrocardiograph (ECG), a bioimpedance spectrometer, a pulse oximeter, an accelerometer, and all the data is recorded to a micro SD card or sent via bluetooth to a tablet or smart phone for data visualization.

He’s released it in hopes that other researchers can utilize the hardware in their own research, hopefully springing up a community of people interested in non-invasive health monitoring. With any luck, the development of the Berkeley Tricorder will continue, and maybe some day, can truly live up to its name!

Unfortunately there’s no new video showing off the latest iteration, but we’ve attached the original video after the break, which gives a good narrative on the device by [Reza] himself.

Continue reading “The Berkeley Tricorder Is Now Open Source!”

Ninja-Drillpress-Skills Produced This Glow Plug Extruder

step5_5e1

Still looking to make your own 3D printer? Don’t have many tools or a big budget? Well, [Adam Kemp] has just the hack for you — a DIY extruder that can be made with only a drill press and a few hand tools.

First, a little background. [Adam] loves the nitty gritty side of 3D printing, so he’s managed to build his own printer almost completely out of recycled parts from printers, scanners, etc. Unfortunately, there’s not much of an option when it comes to the extruder. Almost all designs online feature 3D printed parts. Not wanting to admit defeat, he came up with this clever glow plug extruder design.

As you can imagine, it requires a lot of drilling, and it would be a heck of a lot easier on a mill — but that’s not the point here. He even goes into detail on how to hob the extruder feed wheel using nothing but a tap, a drill press, some skateboard bearings, and a few washers and nuts. The entire guide is great, so if you want to feel like MacGyver for a few hours and you need a good extruder, try it out! 

To see the extruder in action, stick around after the break.

Continue reading “Ninja-Drillpress-Skills Produced This Glow Plug Extruder”

Arcade Briefcase (the Briefcade)

20131109_134118

[Travis Reynolds] is part of an arcade club at work — the only problem? He’s the only one with an arcade machine, so they always end up at his place. So he decided to make his own portable, arcade briefcase to take to the office.

It all started with a quick trip to Goodwill where he found a beautiful maroon briefcase from the 80’s, for only $5! He then took apart a spare LCD monitor he had sitting around, and it worked incredibly well in his favor. He was able to reuse the LCD’s internal mounting brackets to secure it to the briefcase, and the video cables were just long enough to reach the Raspberry Pi.

The next problem he faced was the joystick height. He picked a Sanwa style joystick which is fairly small, but even that was too tall for the briefcase. So unfortunately, he needs to remove the ball of the joystick before closing the case. After testing out the proposed button layout, he cut a plywood mounting plate to hold everything in place. A bit of black spray paint later plus a power connector through the side of the case, and it’s complete!

He’s running Shea Silverman’s PiMame, which has an easy to use menu, quick setup, and great support. It’s an awesome project, and very well documented in case you’re itching to do something similar — I know we are!

Of course, if you have the space, a coffee table arcade machine is pretty sweet too…

[Thanks Brendan!]

Key Cutting With A CNC Mill

key2_zpsc260d079

Keys cost like what, $2 to copy at a locksmith? But where’s the fun in that? Here’s an easy way to cut your own keys using a CNC mill!

[Bolsterman] now “works” for a real estate company that rents out various properties. Whenever someone moves out, the locks need to be changed ASAP. They use Schlage locks, which can be re-keyed to any pin combination. New keys are typically cut with a punch or a key cutting machine — he actually had one years ago, but got rid of it. Not wanting to buy a new one for his new job at the real estate company, he decided to see how hard it would be to turn his small desktop CNC into his own personal key cutting machine.

All it took for [Bolsterman] to turn his mill into a key cutting machine was a 3/8th 90° countersink bit with the end ground to a flat approximately 0.055″ across (0.035″ is the width of a factory key, but a bit of leeway makes it easier to make the key). Then you simply zero the mill off of the shoulder of the key, and using the handy Schlage pin chart (included in the original link), cut the grooves!

To automate all of this, [Torrie Fischer] created a python script for generating the GCode  for keys based on [Bolsterman’s] technique — it’s hosted over at Noisebridge’s Wiki — check it out!

But if all that seems like too much effort, you could just print a new key instead…

3D Acoustic Manipulation: Seemingly-Unreal Levitation Using Soundwaves

Wow. [Yoichi Ochiai], [Takayuki Hoshi] and [Jun Rekimoto] are researchers from the University of Tokyo and the Nagoya Institute of Technology, and they have just learned how to airbend.

Using a series of standing ultrasound waves, it is possible to suspend small particles at the sound pressure nodes. The acoustic axis of the ultrasound beam is parallel to gravity, which also allows the objects to be manipulated along the fixed axis by varying the phase or frequencies of the sound. By adding a second ultrasound beam perpendicular to the first it is possible to localize the pressure node, or focal point, and levitate small objects around a 2D plane.

In their demonstrations they float foam particles, a resistor, an LED, they show off the waves using a piece of dry ice, and even manage to float a small screw.

Sound like crazy talk? Just watch the video.

Continue reading “3D Acoustic Manipulation: Seemingly-Unreal Levitation Using Soundwaves”

Myst(ery) Box

Anyone remember the game Myst? Well, [Michael] and his girlfriend have been playing quite a bit of it lately, so for her birthday, he decided to make her something inspired from it.

For those unaware of the classic that is the Myst series, it is a set of games that started back in 1993 where you assume the role of the Stranger who gets to explore other planets (called Ages) to solve various logical and mechanical puzzles.

Anyway, [Michael] got his girlfriend tickets to visit GC319QK (a geocache site requiring diving) — since the gift is a relatively small token, it was logical for [Michael] to make a fancy box for it — and that’s exactly what he did. It’s a peculiar little wooden box with LEDs, a button, a latch, an unplugged wire, different rods and strange looking sensors — and it is a very clever little puzzle.

We could explain to you how it works (with the Arduino, phototransistors and maybe the source code), but instead we think you’ll enjoy watching [Michael’s] video of it.

Continue reading “Myst(ery) Box”