In this episode of the Hackaday Podcast, editors Elliot Williams and Tom Nardi start out with a warning about potentially radioactive shrimp entering the American food supply via Walmart, and things only get weirder from there. The extra spicy shrimp discussion makes a perfect segue into an overview of a pair of atomic One Hertz Challenge entries, after which they’ll go over the latest generation of 3D printer filament, using an old Android smartphone as a low-power Linux server, some tips for creating better schematics, and Lorde’s specification-bending transparent CD. Finally, you’ll hear about how the nature of digital ownership influences the hardware we use, and on the other side of the coin, how open source firmware like QMK lets you build input devices on your terms.
Check out the links below if you want to follow along, and as always, tell us what you think about this episode in the comments!
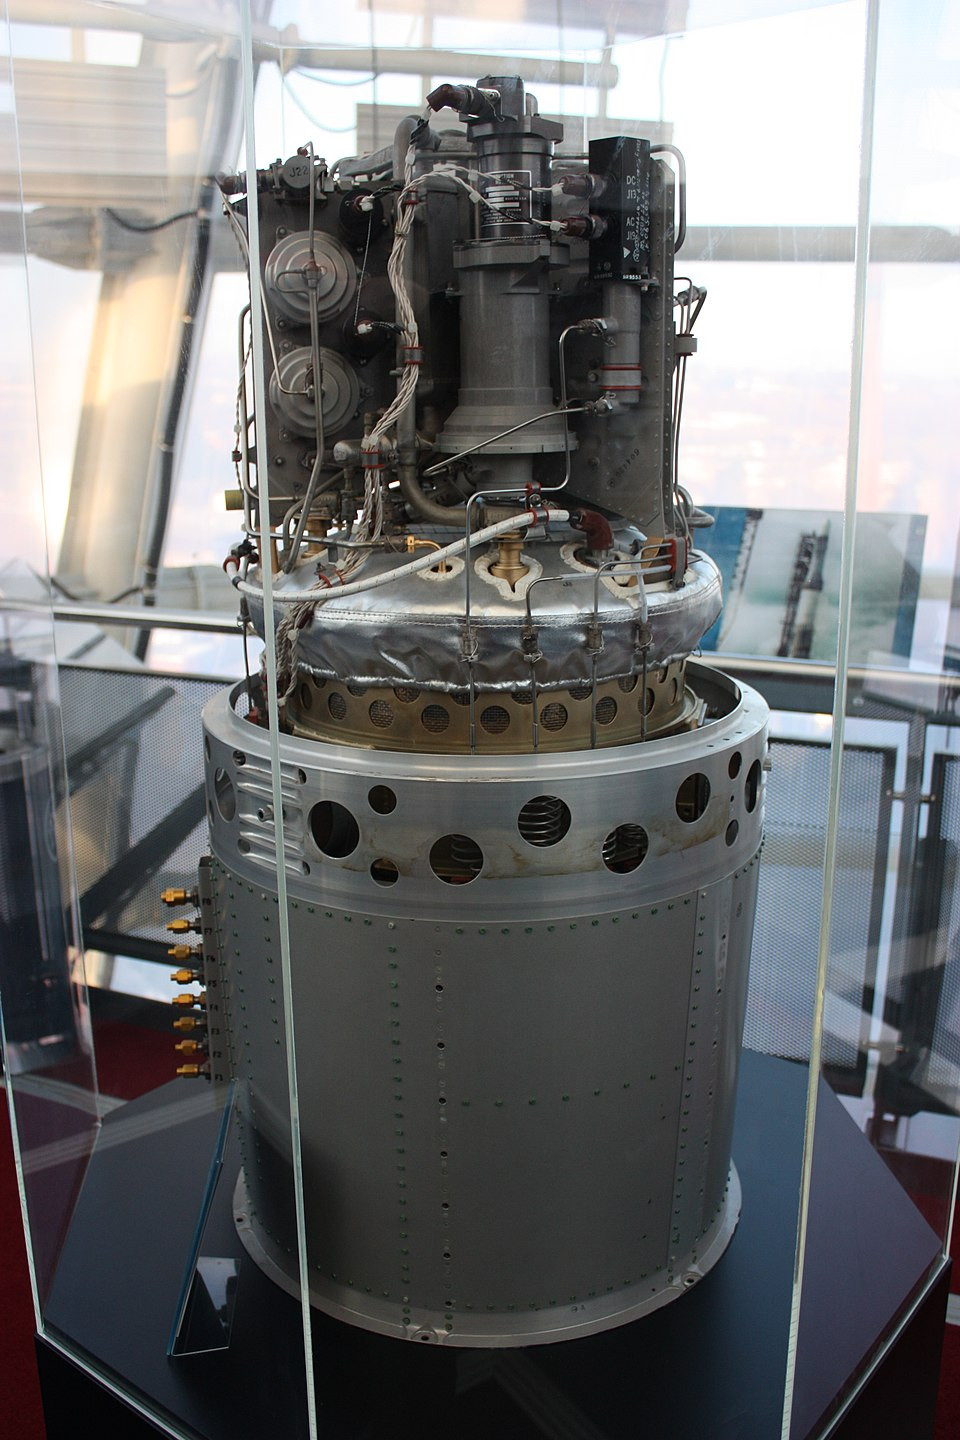
Given all the incredible technology developed or improved during the Apollo program, it’s impossible to pick out just one piece of hardware that made humanity’s first crewed landing on another celestial body possible. But if you had to make a list of the top ten most important pieces of gear stacked on top of the Saturn V back in 1969, the fuel cell would have to place pretty high up there.
Apollo fuel cell. Credit: James Humphreys
Smaller and lighter than batteries of the era, each of the three alkaline fuel cells (AFCs) used in the Apollo Service Module could produce up to 2,300 watts of power when fed liquid hydrogen and liquid oxygen, the latter of which the spacecraft needed to bring along anyway for its life support system. The best part was, as a byproduct of the reaction, the fuel cells produced drinkable water.
The AFC was about as perfectly suited to human spaceflight as you could get, so when NASA was designing the Space Shuttle a few years later, it’s no surprise that they decided to make them the vehicle’s primary electrical power source. While each Orbiter did have backup batteries for emergency purposes, the fuel cells were responsible for powering the vehicle from a few minutes before launch all the way to landing. There was no Plan B. If an issue came up with the fuel cells, the mission would be cut short and the crew would head back home — an event that actually did happen a few times during the Shuttle’s 30 year career.
This might seem like an incredible amount of faith for NASA to put into such a new technology, but in reality, fuel cells weren’t really all that new even then. The space agency first tested their suitability for crewed spacecraft during the later Gemini missions in 1965, and Francis Thomas Bacon developed the core technology all the way back in 1932.
So one has to ask…if fuel cell technology is nearly 100 years old, and was reliable and capable enough to send astronauts to the Moon back in 1960s, why don’t we see them used more today?
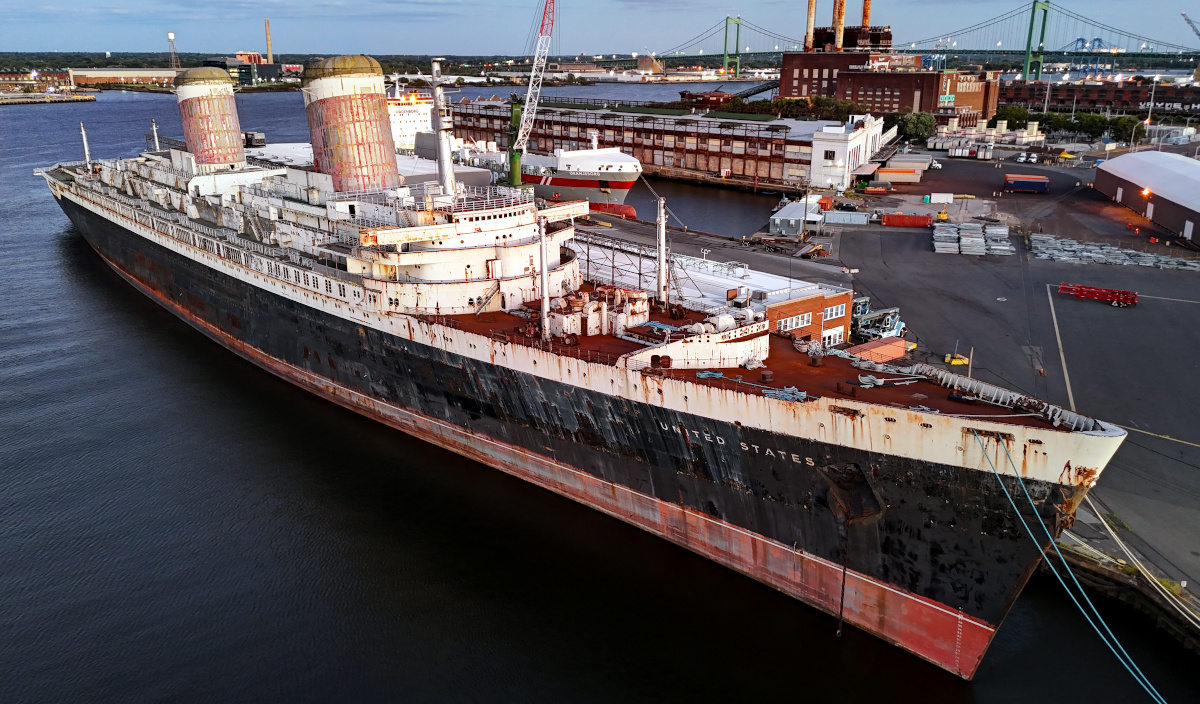
When we last brought you word of the SS United States, the future of the storied vessel was unclear. Since 1996, the 990 foot (302 meter) ship — the largest ocean liner ever to be constructed in the United States — had been wasting away at Pier 82 in Philadelphia. While the SS United States Conservancy was formed in 2009 to support the ship financially and attempt to redevelop it into a tourist attraction, their limited funding meant little could be done to restore or even maintain it. In January of 2024, frustrated by the lack of progress, the owners of the pier took the Conservancy to court and began the process of evicting the once-great liner.
SS United States docked at Pier 82 in Philadelphia
It was hoped that a last-minute investor might appear, allowing the Conservancy to move the ship to a new home. But unfortunately, the only offer that came in wasn’t quite what fans of the vessel had in mind: Florida’s Okaloosa County offered $1 million to purchase the ship so they could sink it and turn it into the world’s largest artificial reef.
The Conservancy originally considered it a contingency offer, stating that they would only accept it if no other options to save the ship presented themselves. But by October of 2024, with time running out, they accepted Okaloosa’s offer as a more preferable fate for the United States than being scrapped.
It at least means the ship will remain intact — acting not only as an important refuge for aquatic life, but as a destination for recreational divers for decades to come. The Conservancy has also announced plans to open a museum in Okaloosa, where artifacts from the ship will be on display.
As is tradition, we’ve reserved 100 tickets priced at $148 (plus fees) for what we like to call the True-Believers. Those are the folks that are willing to sign up even without knowing who will be speaking or what this year’s badge looks like. Once those are sold out, the regular admission tickets will cost $296 (plus fees). We might be slightly biased, but even at full price, we like to think Supercon is a screaming deal.
Those who join us in Pasadena, California from October 31st through November 2nd can look forward to a weekend of talks, workshops, demos, and badge hacking. But what’s more, you’ll experience the unique sense of camaraderie that’s produced when you pack hundreds of hardware hackers into an alleyway and ply them with as much caffeine as they can handle. Some treat it like a normal hacker con, others as a social experiment, but nobody thinks of it as anything less than a fantastic time.
We’re still working closely with our friends at Supplyframe, DigiKey, and Framework to put together a full itinerary for Supercon 2025, so stay tuned over the coming weeks as things are finalized. But in the meantime, we’ve got a couple new additions this year that we’re pretty excited about.
It should come as no surprise that the hacker community has embraced the Meshtastic project. It’s got a little bit of everything we hold dear: high quality open source software, fantastic documentation, a roll-your-own hardware ethos, and just a dash of counterculture. An off-grid communications network cobbled together from cheap parts, some of which being strategically hidden within the urban sprawl by rogue operators, certainly sounds like the sort of thing you’d read about it in a William Gibson novel.
But while the DIY nature of Meshtastic is one of its most endearing features for folks like us, it can also be seen as one of its weak spots. Right now, the guidance for those looking to get started is to pick a compatible microcontroller development board, 3D print a case for it, screw on an antenna from AliExpress, flash your creation with the latest firmware, and then spend some quality time with the documentation and configuration tools to actually get it on the air. No great challenge for the average Hackaday reader, but a big ask for the weekend adventurer that’s just looking for a way to keep in touch with their friends while camping.
Quality hardware that offers a turn-key experience will be critical to elevating Meshtastic from a hobbyist’s pastime to something that could actually be fielded for applications such as search and rescue. Plus, let’s be honest, even those of us who like to put together our own gadgets can appreciate a more consumer-oriented piece of hardware from time to time. Especially if that hardware happens to be open source and designed to empower the user rather than hold them back.
Enter the Hacker Pager from exploitee.rs. As the name implies, it’s still very much a device intended for hackers — a piece of hardware designed for the halls of DEF CON rather than trekking through the wilderness. But it’s also an important step towards a new generation of Meshtastic hardware that meets the high standard of quality set by the software itself.
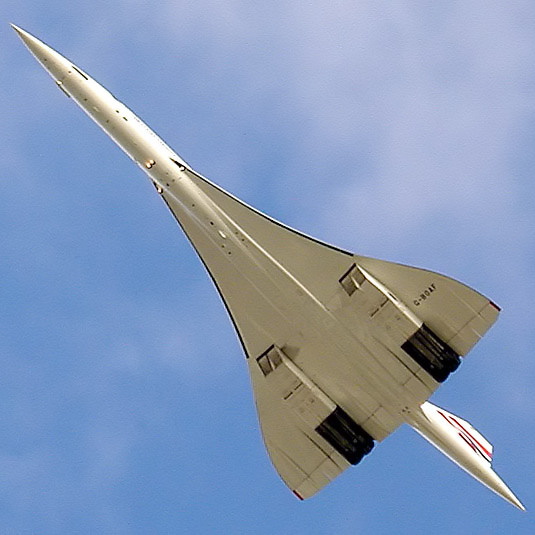
After World War II, as early supersonic military aircraft were pushing the boundaries of flight, it seemed like a foregone conclusion that commercial aircraft would eventually fly faster than sound as the technology became better understood and more affordable. Indeed, by the 1960s the United States, Britain, France, and the Soviet Union all had plans to develop commercial transport aircraft capable flight beyond Mach 1 in various stages of development.
Concorde on its final flight
Yet today, the few examples of supersonic transport (SST) planes that actually ended up being built are in museums, and flight above Mach 1 is essentially the sole domain of the military. There’s an argument to be made that it’s one of the few areas of technological advancement where the state-of-the-art not only stopped moving forward, but actually slid backwards.
But that might finally be changing, at least in the United States. Both NASA and the private sector have been working towards a new generation of supersonic aircraft that address the key issues that plagued their predecessors, and a recent push by the White House aims to undo the regulatory roadblocks that have been on the books for more than fifty years.
Join Hackaday Editors Elliot Williams and Tom Nardi as they talk about their favorite hacks and stories from the previous week. They’ll start things off with a small Supercon update, and go right into fusion reactors, AI surgeons, planned obsolescence, and robotic cats and dogs. They’ll also go over several entries from the ongoing 2025 One Hertz Challenge, an ambitious flight simulator restoration project, old school lightning detectors, and how Blu-ray won the battle against HD DVD but lost the war against streaming. Stick around to the end to hear an incredible story about a clandestine machine shop in a WWII prisoner of war camp, and the valiant fight to restore communications with the Lunar Trailblazer spacecraft.
Check out the links below if you want to follow along, and as always, tell us what you think about this episode in the comments!
Download in DRM-free MP3 and add it to your collection.