Hexed Home Assistant Monitors 3D Printers

You can babysit your 3D printer 100% of the time, or you can cross your fingers and hope it all works. Some monitor their printers using webcams, but [Simit] has a more stylish method of keeping tabs on six 3D printers.

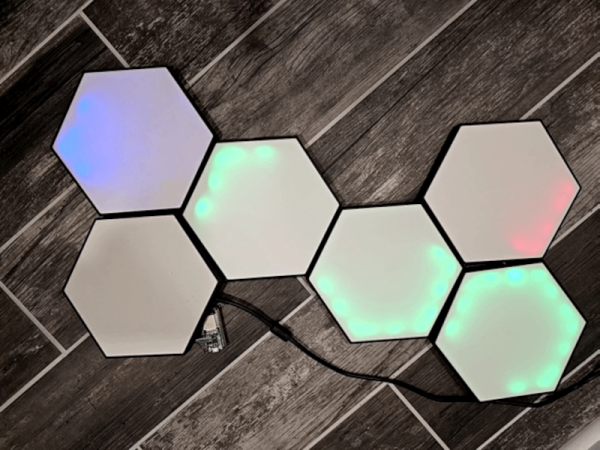
The idea is to use a 3D printed hex LED display found online. Adding an ESP32 and Home Assistant allows remote control of the display. The printers use Klipper and can report their status using an API called Moonraker. Each hexagon shows the status of one printer. You can tell if the printer is online, paused, printing, or in other states based on the color and amount of LEDs lit. For example, a hex turns totally green when printing is complete.

Once you have a web API and some network-controlled LEDs, it is relatively straightforward to link it together with Home Automation. Of course, you could do it other ways, too, but if you already have Home Automation running for other reasons, why not?

We have seen other ways to do this, of course. If you need an easy monitor, the eyes have it. If you don’t use Klipper, OctoPrint can pull a similar stunt.

3D Printing Blueprints And Other Wall Art

Today if you want to reproduce a big schematic or a mechanical drawing, you just ask it to print or plot from the CAD model. But back in the day, you drew on big sheets at a drafting table. How do you make copies? Sure, there were a few large-format copiers, but they were expensive. A more common method was to use a heliographic copier which, often but not always, resulted in a blueprint — that is a blue page with white lines or vice versa. These days, you are more likely to see a blueprint as an artistic wall hanging, and since [Basement Creations] wanted some, he figured out how to make them with a 3D printer.

These prints aren’t really blueprints. They use the printer as a plotter and deposit white ink on a blue page. In the video below, he shows a number of ways to use a printer to create interesting wall art, even if you want it to be bigger than the print bed. Some of the wall art uses multiple 3D printed parts, and others use the printer as a plotter.

Continue reading “3D Printing Blueprints And Other Wall Art”

Inside A Current Probe

[The Signal Path] had two Tektronix AC/DC current probes that didn’t work. Of course, that’s a great excuse to tear them open and try to get at least one working. You can see how it went in the video below. The symptoms differed between the two units, and along the way, the theory behind these probes needs some exploration.

The basic idea is simple, but, of course, the devil is in the details. A simple transformer doesn’t work well at high frequencies and won’t work at all at DC. The solution is to use a hall effect sensor to measure DC and also to feed it back to cancel coil saturation.

Continue reading “Inside A Current Probe”

Cornering The Antenna Market

Sometimes antennas can seem like black magic. However, when you see things like a dish antenna, it sort of makes sense, right? Just like a mirror focuses light, the parabola of a dish focuses RF energy. But [IMSAI Guy] shows another common-sense antenna arrangement: a corner reflector dipole. He had built one years ago and decided to do a bit of research and make another one.

In a clever use of copper-clad board, he was able to make a reasonable reflector by soldering together three boards and an RF connector. A single wire makes the “driven element,” and by bending it to just the right position, you can change the characteristic impedance for matching.

The antenna, in this case, is essentially a quarter-wave antenna with a ground plane and reflector arrangement. After the obligatory chalk talk, he breaks out the vector network analyzer and shows how well it matches. He didn’t, however, measure the gain or directional selectivity due to the reflector.

Intuitively, you’d think this kind of antenna would be good for direction finding purposes. In fact, hams that use handy talkies for direction finding often use their bodies to block signals, much like these reflectors should.

The [IMSAI Guy] reflector is pretty small, but you can easily make bigger ones. Using PCB material for antennas isn’t anything new, either, but we still enjoyed this simple corner reflector build.

Continue reading “Cornering The Antenna Market”

Two Stage Refrigerator Is Chill

Every time we check in with [Hyperspace Pirate] he’s trying to make things cold. Really cold. His recent two-part video shows a propane vapor compression system that can go down to -37° C as well as a two-stage system using homemade ethylene that can get to -83° C. He’s trying to get to -100°, so he’s close, and we have no doubt he’ll get there.

The video explains that using two different refrigerants makes the design more practical. At the low temperatures involved, you have to deal with compressor oil freezing. There is a lot of theory required to design an efficient cooler and a lot of know-how required to make gas-tight connections with all the different materials involved.

Using propane in both stages did provide a little additional cooling. But using ethylene in the second stage didn’t work as expected. There were two issues to work through. Part of it was the average temperature of the system, and also, the homemade ethylene needed purification. The ethylene purification setup was almost as complex as the main system and also reminded us, for some reason, of the movie Darkstar. It didn’t work as well as he wanted, which means we have to wait for part two to see it all actually working.

We’ve seen this same guy make dry ice. He’s also tried to make liquid nitrogen, too.

Continue reading “Two Stage Refrigerator Is Chill”

Modern CO2 Laser Reviewed

If you’ve got a laser cutter, it is highly probable that it uses a laser diode. But more expensive machines use a carbon dioxide laser tube along with mirrors. There was a time when these lasers came in two flavors: very expensive and amazing or moderately expensive and cheaply made. However, we are seeing that even the moderately expensive machines are now becoming quite advanced. [Chad] reviews a 55-watt xTool P2. At around $5,000, it is still a little spendy for a home shop, but it does have pretty amazing features. We can only hope some less expensive diode lasers will adopt some of these features.

[Chad’s] video that you can see below attempts to recreate some of the amazing things xTool did on their product introduction live stream. He was able to recreate most, but not all of the results. In some cases, he was also able to do better.

Continue reading “Modern CO2 Laser Reviewed”

Zippy Plastic Welding

Plastic welding isn’t a new idea. But a recent video from [The Maker] shows an interesting twist. Given a broken piece of plastic, he secures it together with tape, machines out a channel around the cracks, and then melts zip ties into the channels. Honestly, although he mentions plastic welding and soldering, we aren’t sure this isn’t just simple gluing, but it did give us some ideas. Watch the video below and you’ll probably get the same ideas.

The ingenuity here isn’t necessarily using hot plastic to glue together two pieces — that’s just a hot glue gun, after all. Rather, it occurred to us that the key here was machining out the places where significant amounts of the hot plastic could bond the two pieces together. He cut the channels with a rotary tool, buffed them, and used a hot knife to give them some internal texture. But with a 3D printer, you could build these channels into parts that were made to interlock.

Continue reading “Zippy Plastic Welding”