Origami Gripper Is Great For Soft And Heavy Objects

Robotic arms are fascinating devices, capable of immense speed and precision when carrying out their tasks. They’re also capable of carrying great loads, and a full-sized industrial robot in operation at maximum pace is a sight to behold. However, while it’s simple to design grippers to move strong metal objects, picking up delicate or soft objects can be much harder. A team at MIT CSAIL have been working on a solution to this problem, which they call the Origami gripper.

The gripper is highly capable at lifting objects with complex shapes.

The gripper consists of a flexible, folding skeleton surrounded by an airtight skin. When vacuum is applied, the skeleton contracts around the object to be picked up. The gripper is capable of grasping objects sized up to 70% of its diameter, and over 100 times its weight.

Fabrication of the device involved the creation of 3D printed molds to produce the silicone rubber skeleton. Combined with precise lasercutting and advanced layering techniques, this created a part that can self-fold itself into shape under the right conditions. The structure was inspired by a “magic ball” origami design. The outer skin is remarkably simple in comparison – consisting of a regular latex balloon.

The team show off the gripper performing some impressive feats, with the robot able to pick up objects of all shapes, sizes, and weights without damage. The paper is available to read for the full story on the device. The use of vacuum for delicate gripping tasks is something we’ve seen before, too.



Vintage Atari Becomes Modern Keyboard

The modern keyboard enthusiast is blessed with innumerable choices when it comes to typing hardware. There are keyboards designed specifically for gaming, fast typing, ergonomics, and all manner of other criteria. [iot4c] undertook their own build for no other reason than nostalgia – which sounds plenty fun to us.

An Arduino Leonardo is pressed into service for this hack. With its USB HID capabilities, it’s perfectly suited for custom keyboard builds. It’s built into a working Atari 65XE computer, and connected to the keyboard matrix. The Keypad and Keyboard libraries are pressed into service to turn keypresses on the 80s keyboard into easily digseted USB data.

There’s plenty of room inside the computer for the added hardware, with the USB cable neatly sneaked out the rear. [iot4c] notes that everything still works and the added hardware does not cause any problems, as long as it’s not used as a computer and a keyboard at the same time.

It’s possible to do a similar hack on the Commodore 64, too. If you’re doing tricky keyboard builds yourself, you know where to send ’em.

Building A Magnetic Loop Antenna

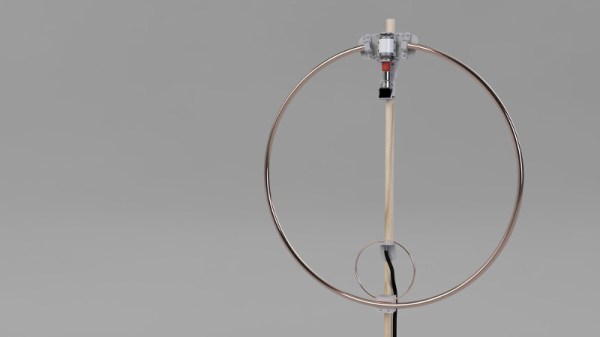
Antennas come in many shapes and sizes, with a variety of characteristics making them more or less suitable for various applications. The average hacker with only a middling exposure to RF may be familiar with trace antennas, yagis and dipoles, but there’s a whole load more out there. [Eric Sorensen] is going down the path less travelled, undertaking the build of a self-tuning magnetic loop antenna. 

[Eric]’s build is designed to operate at 100W on the 20 meter band, and this influences the specifications of the antenna. Particularly critical in the magnetic loop design is the voltage across the tuning capacitor; in this design, it comes out at approximately 4 kilovolts. This necessitates the careful choice of parts that can handle these voltages. In this case, a vacuum variable capacitor is used, rated to a peak current of 57 amps and a peak voltage of 5 kilovolts.

The magnetic loop design leads to antenna which is tuned to a very narrow frequency range, giving good selectivity. However, it also requires retuning quite often in order to stay on-band. [Eric] is implementing a self-tuning system to solve this, with a controller using a motor to actuate the tuning capacitor to maintain the antenna at its proper operating point.

If you’re unfamiliar with magnetic loop builds, [Eric]’s project serves as a great introduction to both the electrical and mechanical considerations inherent in such a design. We’ve seen even more obscure designs though – like these antennas applied with advanced spray techniques.


A Lasercut ATX Case For Your Next Desktop Rig

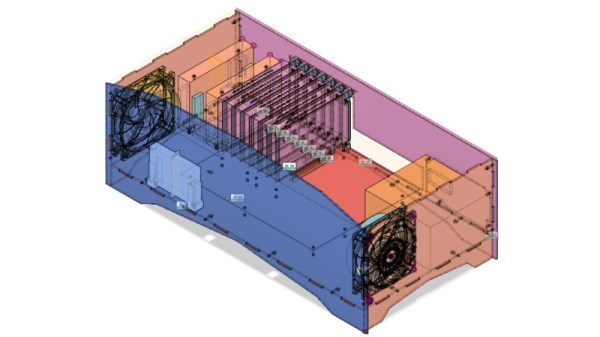
Case modding exploded in the late 1990s, as computer enthusiasts the world over grew tired of the beige box and took matters into their own hands. The movement began with custom paints and finishes on existing cases, with competitions and bragging rights then taking over to further push the state of the art. It’s one thing to mod a case, however, and another to build one entirely from scratch. [Wesley]’s lasercut case build is an excellent example of the latter.

The build is designed for the ATX form factor, making it suitable for regular desktop computer parts. There are provisions for 3.5 and 2.5 inch drives, as well as a standard ATX PSU and provisions for case fans. The large lasercut panels are supplemented by some 3D printed parts, and the usual metric M3 hardware used with the ATX standard.

It’s a tidy build you can replicate yourself, with the parts available on Thingiverse for your making pleasure. [Wesley]’s build is resplendent in orange, but we’d also love to see an all-transparent build with blinding LED light effects. If you build it, you know where to send it.

Of course, if you’re looking for something more compact, you could always build the whole computer inside the power supply. 

The Enlightenment Turns Light And Noise Into Sound

We’re all familiar with the subtle sounds of electrical equipment present in daily life. There’s the high-pitched whine of a CRT, the mains hum of a poorly isolated audio amplifier, and the wailing screams of inductors. Typically these sounds go unnoticed unless something is malfunctioning or otherwise wrong. However, Quiet Ensemble decided to capture these noises and turned them into a performance they call The Enlightenment.

The basic setup consists of a series of lights, most of which are theatrical in nature. There are spotlights, a series of neons, and even a few bright strobes. Copper coils are used to pick up the stray electrical noises generated by these lights in operation. These noises are then fed to mixers, amplifiers, and other audio equipment to allow the performers to control the audio as they wish.

The end result is a mechanical, and at times, brutal soundscape that wouldn’t sound out of place on the Homeworld soundtrack. Flashing strobes contribute rhythm while the rest of the lights lend their droning and whining to fill out the ensemble.

If it’s a little too niche for your tastes, the Triforium may be more to your liking. Video after the break.

Continue reading “The Enlightenment Turns Light And Noise Into Sound” →

Tweetbot Expresses Twitter Emotions

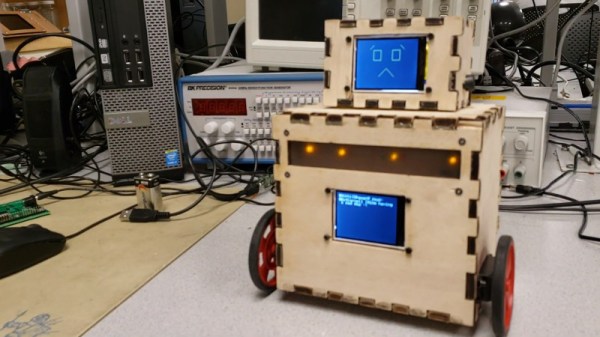
When reading textual communications, it can be difficult to accurately acertain emotional intent. Individual humans can be better or worse at this, with sometimes hilarious results when it goes wrong. Regardless, there’s nothing a human can do that a machine won’t eventually do better. For just this purpose, Tweetbot is here to emotionally react to Twitter so you don’t have to.

The ‘bot receives tweets over a bluetooth link, handled by a PIC32, which also displays them on a small TFT screen. The PIC then analyses the tweet for emotional content before sending the result to a second PIC32, which displays emotes on a second TFT screen, creating the robot’s face. Varying LEDs are also flashed depending on the emotion detected – green for positive emotions, yellow for sadness, and red for anger.

The final bot is capable of demonstrating 8 unique emotional states, far exceeding the typical Facebook commenter who can only express unbridled outrage. With the ‘bot packing displays, multiple microcontrollers, and even motor drives, we imagine the team learned a great deal in the development of the project.

The project was the product of [Bruce Land]’s ECE 4760 course, which has shown us plenty of great hacks in the past – Bike Sonar being one of our favorites. Video after the break.

Continue reading “Tweetbot Expresses Twitter Emotions” →

A Soap Film Photography How-To

Blowing bubbles is a pastime enjoyed by young and old alike. The pleasant motion and swirling colors of the bubbles can be remarkably relaxing. With the right tools and techniques, it’s possible to take striking photos of these soap film phenomena, and that’s exactly what [Eric] and [Travis] did.

Adding sugar to the soap solution increases the resilience of the film significantly. With enough added, the film no longer pops, but instead breaks and fails in interesting ways.

After beginning with a robotic arm and a computer fan blowing bubbles, the project moved towards a simple stepper motor setup. A thin frame is lowered into a solution of soapy water, then brought back up by the stepper motor. The resulting soap film is held in front of a black background and carefully lit with a softbox light.

Lens selection is critical for this sort of work – in this case, a TS-E 50mm Macro f/2.8 lens was the order of the day. [Eric] shares other tips for taking great shots, such as adding sugar to the solution to make the soap film last longer, and using a modified speaker to help “paint” the surface of the films.

The resulting images are beautiful examples of the art, showing vibrant colors from the interference patterns created by the light. [Eric] has done a great job of clearly documenting the development process and the final results, making it possible for others to recreate the project elsewhere.

We’ve seen other soapy projects before, like this automatic bubble blowing machine. Video after the break.

Continue reading “A Soap Film Photography How-To” →