Building An Inductive Loop Vehicle Detector

[Trax] was asked by a friend to build a device that could detect the presence of a car in front of his garage gate for it to open automatically. After searching the web for such a project and trying many of them, he decided to build his own detector based on an induction loop. As you may have guessed, this kind of detector works by detecting an inductance change in a wire loop (aka coil) buried in the road. Having a car pass several inches on top of it produces such an effect.

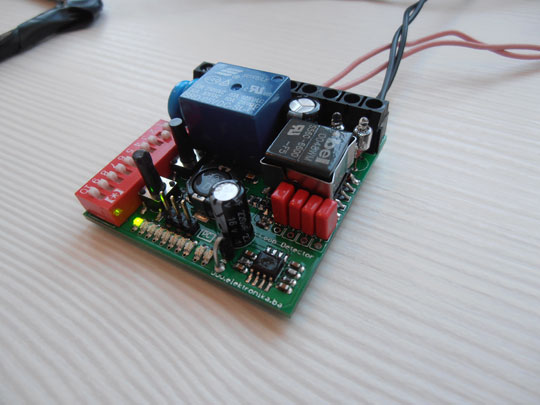
[Trax]’s write-up shows a very well thought and professional design. All the detector parameters can be adjusted using DIP switches and buttons: detection type (presence/pulse), signal filtering, main frequency and sensitivity. The wire loop is isolated from the main sensor electronics using a 1:1 isolation transformer and a Colpitts oscillator is used to drive the latter. Moreover, gas discharge tubes are also used for lightning protection.

The change in inductance translates to a change in resonant frequency which is later detected by the main microcontroller. The board is 24V AC powered and a diode bridge + LM2596 SMPS step-down converter are in charge of generating the required +5V in an efficient way.

As if this was not enough, [Trax] also made a PC-based tool that can change other platform settings using a serial connection. All the resources can be downloaded from his website and a few videos are embedded after the break.

Continue reading “Building An Inductive Loop Vehicle Detector”

Hackaday Links: October 27, 2013

hackaday-links-chain

[Kyle] came across a project which he thinks is “simply elegant”. If you don’t already have a PCB vice, here’s an easy way to build one of your own.

This one’s so good but alas it’s not a hack. Check out the slideshow tour at UC Boulder’s Fiske Planetarium. You get a really cool look at the hardware that makes the dome and projector such a great experience. [via Reddit]

Here’s a schematic and a couple of snapshots of [Trax’s] CAN bus hacking rig. He plans on doing a tutorial but decided to share this link after reading the first part of our own CAN hacking series.

These strings of LEDs bump to the tunes. [Alex] is using GrooveShark as a frequency analyzer, then pushing commands via Node.js to the Arduino controlling the lights. It’s all planned for the back porch during his Halloween party.

We remember drilling holes in the 3.5″ floppy discs (we even made a wood jig for this) to double their capacity. A similar blast from the past was to punch a notch in the larger 5.25″ versions to make them double-sided.

If you’re trying to learn about FFT [Ronald] highly recommends this website. We didn’t do too much poking around because it’s kind of strange. But if you do get sucked in and have fun with it leave a comment to let others know it’s worth their attention.

We suppose that using 39 Raspberry Pi boards and their camera modules isn’t the worst way to build a huge 3D model capture rig. The results certainly are impressive. [Thanks Wouter]

Fail Of The Week: GPS Module Design

GPS is really fun to play with in your projects. But when [Trax] decided to build a GPS chip into his design the fun ended abruptly. Above you can see the section of the board devoted to the hardware. Unfortunately this PCB fails to provide any GPS location data whatsoever.

Continue reading “Fail Of The Week: GPS Module Design”

PIC LC Meter Improvements Add Li-Ion Battery And Charging Circuitry

[Trax] needed an LC meter and decided to use a tried-and-true design to build his own. The only problem was that he didn’t want to be tied to a bench supply or power outlet, which meant a bit of auxiliary design was in order. What he came up with is the battery-powered LC meter you see above.

The core of the original [Phil Rice] design remains the same, with slight modifications to drive a different model of character LCD. The code is mostly unchanged, but some calibration routines became necessary after [Marko] noticed bugs in the behavior after power cycling. Now the device will perform what amounts to a hardware reset about 700ms after powering on or changing between inductance and capacitance measuring functions. The project box is quite small, and to get everything to fit [Marko] sourced the Lithium Ion battery from a Bluetooth headset. He needs 5V for the LCD screen so he used a TPS61222 boost converter. To top off the battery he’s included a MAX1811 single-cell Li-ion charger, which has a couple of status LEDs visible through the case as seen above.

[Thanks Marko]

GSM-to-Skype Bridge Lets You Lose Those Roaming Fees

Here’s the scenario: you’re going to be traveling somewhere and you’ll be charged roaming fees if you use your cellphone. But there is free WiFi available in this place. You can save yourself money by leaving your SIM card at home and using a GSM-to-Skype bridge to take calls on your phone via WiFi.

[Trax] is using a USB GSM modem to take cellphone calls on a PC. He leaves his sim card in this modem so that it can make and receive calls and text messages through your normal telephone number. For some reason, the USB connection only provides control of this modem and doesn’t pass bi-directional audio. To make this happen, he built an audio interface cable using two transformers and a few passive components to connect the modem to the computer’s audio card.

On the software side of things, an application written in Delphi 7 manages the modem, the audio stream, and the Skype application. When a call is incoming it sets up a Skype connection with your handset via the Internet, passing along the caller ID data in the process. If you choose to answer the Skype session the application will pick up the GSM call and you’ll be connected. It works the same way when placing an outgoing call.

This seems easier to manage than a rig that physically pushes a cellphone’s buttons via the Internet.

[Thanks Mure]

Automatic Telephone Recorder

[James Bond] types and those suffering from a hefty dose of paranoia can now record all telephone conversations. [Trax] built this module that monitors the phone line and starts recording when a handset is picked up. A computer does the actual recording, triggered by the microcontroller via a USB connection.

We like the use of an old PCB for a faceplate, we’ve certainly got some duds of our own sitting around. The three cords are a bit confusing though. One for the phone line, one for the USB, but what does the third do? Is it an audio-out connection?

We’ve asked [Trax] to post a schematic and source code if possible so that might clear up the mystery.

Update: [Trax] let us know that there is a red button with white lettering at the bottom labeled “download”. This contains schematic, code, pcb layout, and PC software. We just missed it the first time around.

Single Tube Nixie Clock

[youtube=http://www.youtube.com/watch?v=a-7QAWshEXo]

This single tube nixie clock cought our eye today. After receiving an IN-8 tube from a friend, [Trax] wanted to find some project to show it off.  He decided on an art piece that doubles as a clock. Tastefully mounted in a simple wooden box with a pretty inlay, the tube is lit from below with a green LED that pulses every second. A single button, located on the back, out of view is pressed to request the time. You can see the time being displayed on the video above. To see the guts and read about how he’s using the PIC16F84’s built in clock to keep track of time, check out his site. Even though this is a Nixie, it reminds us of the Decatron kitchen timer we saw recently.

[via Hacked Gadgets]