Fumik: An Arduino Wall Drawing Robot Jellyfish

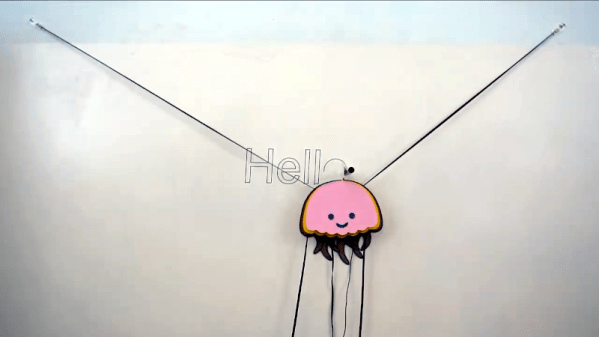
If you’ve ever wanted to build a large format plotter but didn’t have the floor space, maybe put it up against the wall and make it cute. That’s the idea behind Fumik, the wall-drawing robot. As you might expect, the little device is just a motion base with a pen. We hope there’s paper against the wall since not everyone wants computer-generated art on their drywall.

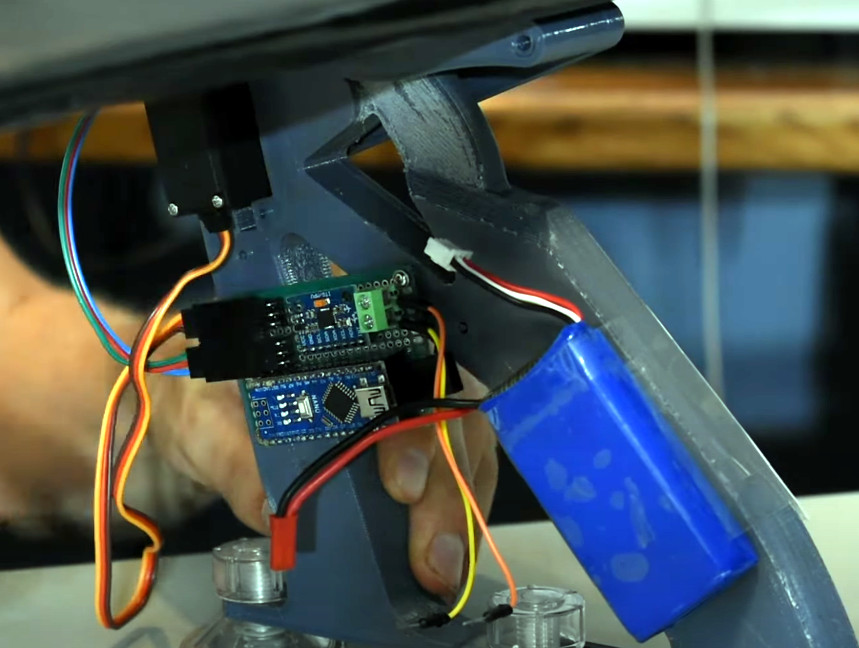
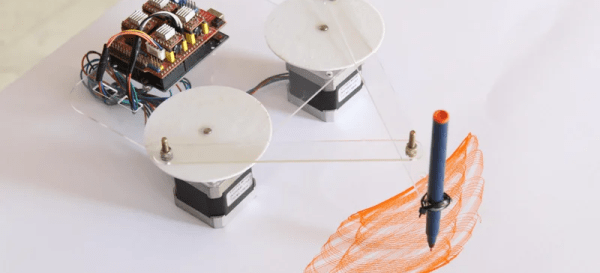
The maximum size is apparently 5 m wide by 3 m tall, plenty of room to express yourself. The controller is an Arduino Mega, and stepper motors with a CNC shield drive the whole assembly. Interestingly, the motor and electronics are all onboard the jellyfish itself, rather than the wall.

The device only holds one pen at a time, but you can draw with one color and then manually change the pen. The files on GitHub are good, but you’ll need to intuit some of the mechanics from the videos. However, since it uses off-the-shelf hardware, it should be pretty easy to figure it out. This looks like a cheap and cheerful wall plotter, and the results speak for themselves.

We have seen similar wall plotters. More than once, even.

Continue reading “Fumik: An Arduino Wall Drawing Robot Jellyfish”

A USB interface connected to a Psion Organiser II

Arduino Nano Adds USB Interface To The Psion Organiser II

Introduced in 1984, the Psion Organiser series defined the first generation of electronic organizers or PDAs (personal digital assistants). Even though these devices are now over 30 years old, the Psion Organiser scene is alive and well: with new hardware and software is still being developed by enthusiasts the world over.

A USB interface connected to a Psion Organiser II
The Organiser II, with its brand-new USB interface

One of those enthusiasts is [James Stanley], who designed and built a USB interface for the Psion Organiser II. Although a “CommsLink” module providing an RS-232 port was available back in the day, it’s become hard to find, inspiring [James] to design a completely new module based on an Arduino Nano. Hooking it up to the Psion’s data bus was a simple matter of wiring up the eight data lines to the Nano’s GPIO ports. A set of series resistors served to prevent bus contention without having to add glue logic.

Getting the software working was a bit more difficult: the Organiser’s native OPL programming language doesn’t allow the user to directly access the expansion port’s memory address, so [James] had to write a routine in HD6303 machine code to perform the read, then call that routine from OPL to display the result on the screen. Currently, the routine only supports reading data from the Arduino, but extending it to a bidirectional interface should be possible too.

Finally, [James] designed and 3D printed a neat enclosure for the Arduino-USB interface, which makes it look almost as sleek as the original CommsLink module. Perhaps with a bit of further development, this could turn into another way to connect old Psions to the internet. We’ve also featured a new type of Datapak to enhance the Organiser’s memory. Continue reading “Arduino Nano Adds USB Interface To The Psion Organiser II”

Arduino Activated Automotive Aerodynamic Apparatus Is… (Spoiler Alert!)

Sometimes a great hack is great for no other reason than that it’s fun, and [Michael Rechtin]’s DIY Active Aero Spoiler and Air Brake certainly qualifies as a fun hack. This is a mod designed to live in a world where looks are everything, stickers add horsepower, and a good sound system is more important than good wheel alignment. Why is that? Because like the switch that exists only to activate the mechanism that turns it off, the DIY Active Aero Spoiler and Air Brake seen below is almost completely useless. So to understand its allure, we must understand its inspiration.

For a few decades now, luxury sports car manufacturers have been adding active aerodynamic components to their vehicles. For example, several Porsche models feature adaptive spoilers that adjust to driving conditions. Super cars such as the Bugatti Veyron have spoilers that flip up at high angles during braking to increase drag and reduce braking distance. All of these features are sadly missing from the average two or four door family-car-turned-wannabe-track-fiend. Until now!

[Michael] has created a new active spoiler for every mall-bound muffler-challenged hand me down. The build starts with a CNC cut foam wing which is covered with fiberglass, Bondo (an automotive necessity) and some faux carbon fiber for that go-fast feel. An Arduino, IMU, two servos, and a battery pack detect deceleration and automatically increase the spoiler angle just like the big boys, but without needing any integration into the vehicles systems. Or bolts, for that matter.

It’s unlikely that the braking force is enough to slow down the vehicle though, given that it’s not enough to pop the suction cups holding it to the trunk lid. But does it have the “wow” factor that it was designed to induce? Spoiler Alert: It does!

As it turns out, this isn’t the first adjustable spoiler featured here at Hackaday, and this adjustable spoiler on a car that’s made for actual racing is quite interesting.

Continue reading “Arduino Activated Automotive Aerodynamic Apparatus Is… (Spoiler Alert!)”

Arduino Meets Quantum Computer

Quantum computers aren’t quite ready for the home lab, but since there are ways to connect to some over the Internet, you can experiment with them more easily than you might think. [Norbert] decided to interface a giant quantum computer to an ordinary Arduino. Why? Well, that isn’t necessarily clear, but then again, why not? He explains basic quantum computing and shows his setup in the video below.

Using the IBM quantum computer and the open source Qiskit makes it relatively easy, with the Python code he’s using on the PC acting as a link between the Arduino and the IBM computer. Of course, you can also use simulation instead of using the real hardware, and for such a simple project it probably doesn’t matter.

Granted, the demo is pretty trivial, lighting an LED with the state of qubit. But the technique might be useful if you wanted to, say, gather information from the real world into a quantum computer. You have to start somewhere.

We’ve looked at quantum computers before. They tell us it is the next big thing, so we want to be prepared. Qiskit is one of several options available today to make it easier.

Continue reading “Arduino Meets Quantum Computer”

Arduino IDE Creates Bootable X86 Floppy Disks

Arguably the biggest advantage of the Arduino ecosystem is how easy it is to get your code running. Type a few lines into the IDE, hit the button, and in a few seconds you’re seeing an LED blink or some text get echoed back over the serial port. But what if that same ease of use didn’t have to be limited to microcontrollers? What if you could use the Arduino IDE to create computer software?

That’s exactly what boot2duino, a project developed by [Jean THOMAS] hopes to accomplish. As you might have guessed from the name, the code you write in the Arduino is turned into a bootable floppy disk image that you can stick into an old PC. After a few seconds of beeping and grinding your “Hello World” should pop up on the monitor, and you’ve got yourself the world’s biggest Arduino.

A minimal x86 Arduino sketch.

Now to be clear, this isn’t some kind of minimal Linux environment that boots up and runs a compiled C program. [Jean] has created an Arduino core that provides basic functionality on x86 hardware. Your code has full control over the computer, and there’s no operating system overhead to contend with. As demonstrated in a series of videos, programs written with boot2duino can display text, read from the keyboard, and play tones over the PC’s speaker.

The documentation for boot2duino says the project serves no practical purpose, but we’re not so sure. While the feature set is minimal, the low overhead means you could theoretically press truly ancient PCs into service. There’s certainly an appeal to being able to write your code on a modern OS and effortlessly deploy it on a retrocomputer, from somewhat modernized versions of early computer games to more practical applications. If any readers end up exploring this concept a bit further, be sure to let us know how it goes.

Continue reading “Arduino IDE Creates Bootable X86 Floppy Disks”

Miniature Space Invaders game

Arduino And An OLED Make This Space Invaders Cabinet Tiny

For as simple as it appears now, Space Invaders was one machine from the Golden Age of video games that always seemed to have a long line waiting for a chance to lose a couple of quarters. And by way of celebrating the seminal game’s influence, [Nick Cranch] has executed what might just be the world’s smallest Space Invaders replica.

It appears that this started mainly as an exercise in what’s possible with what’s on hand, which included a couple of quite small OLED displays. For the build photos it looks like there’s an Arduino Nano running the show; [Nick] relates that the chosen hardware proved challenging, and that he had to hack the driver library to make it work. Once he got a working game, [Nick] didn’t rest on his laurels. Rather, he went the extra mile and built a miniature cabinet to house everything in.

The video quality below may be poor, but it’s more than enough to see how much work he put into detailing the cabinet. The graphics of the original US release of the game cabinet are accurately represented, right down to the art on the front glass. The cabinet itself is made from 1.5 mm plywood which he cut by hand. It even looks like he recreated the original scheme of cellophane overlays on the monochrome screen to add a little color to the game. Nice touch!

We really appreciate the attention to detail here, with our only quibble being no schematics or code being posted. Hopefully, we’ll see those later, but for now, this looks like a fun project and a nice trip down memory lane. But if you think it’s too small, no worries — we’ve got a much, much bigger version of the game too.

Continue reading “Arduino And An OLED Make This Space Invaders Cabinet Tiny”

Arduino Drives Faux Spirograph

The holidays always remind us of our favorite toys from when we were kids. Johnny Astro, an Erector set, and — of course — a Spirograph. [CraftDiaries] has an Arduino machine that isn’t quite a Spirograph, but it sure reminds us of one. The Arduino drives two stepper motors that connect to a pen that can create some interesting patterns.

The build uses a few parts that were laser cut, but they don’t look like they’d be hard to fabricate using conventional means or even 3D printing. The author even mentions you could make them out of cardboard or foamboard if you wanted to.

Continue reading “Arduino Drives Faux Spirograph”