A 3D-Printed Nixie Clock Powered By An Arduino Runs This Robot

While it is hard to tell with a photo, this robot looks more like a model of an old- fashioned clock than anything resembling a Nixie tube. It’s the kind of project that could have been created by anyone with a little bit of Arduino tinkering experience. In this case, the 3D printer used by the Nixie clock project is a Prusa i3 (which is the same printer used to make the original Nixie tubes).

The Nixie clock project was started by a couple of students from the University of Washington who were bored one day and decided to have a go at creating their own timepiece. After a few prototypes and tinkering around with the code , they came up with a design for the clock that was more functional than ornate.

The result is a great example of how one can create a functional and aesthetically pleasing project with a little bit of free time.

Confused yet? You should be.

If you’ve read this far then you’re probably scratching your head and wondering what has come over Hackaday. Should you not have already guessed, the paragraphs above were generated by an AI — in this case Transformer — while the header image came by the popular DALL-E Mini, now rebranded as Craiyon. Both of them were given the most Hackaday title we could think of, “A 3D-Printed Nixie Clock Powered By An Arduino Runs This Robot“, and told to get on with it. This exercise was sparked by curiosity following the viral success of AI generators, which posed the question of whether an AI could make a passable stab at a Hackaday piece. Transformer runs on a prompt model in which the operator is given a choice of several sentence fragments so the text reflects those choices, but the act of choosing could equally have followed any of the options.

The text is both reassuring as a Hackaday writer because it doesn’t manage to convey anything useful, and also slightly shocking because from just that single prompt it’s created meaningful and clear sentences which on another day might have flowed from a Hackaday keyboard as part of a real article. It’s likely that we’ve found our way into whatever corpus trained its model and it’s also likely that subject matter so Hackaday-targeted would cause it to zero in on that part of its source material, but despite that it’s unnerving to realise that a computer somewhere might just have your number. For now though, Hackaday remains safe at the keyboards of a group of meatbags.

We’ve considered the potential for AI garbage before, when we looked at GitHub Copilot.

Blinking An Arduino LED, In Julia

The Julia programming language is a horrible fit for a no-frills microcontroller like the ATMega328p that lies within the classic Arduino, but that didn’t stop [Sukera] from trying, and succeeding.

All of the features that make Julia a cool programming language for your big computer make it an awful choice for the Arduino. It’s designed for interactivity, is dynamically typed, and leans heavily on its garbage collection; each of these features alone would tax the Mega to the breaking point. But in its favor, it is a compiled language that is based on LLVM, and LLVM has an AVR backend for C. Should just be a simple matter of stubbing out some of the overhead, recompiling LLVM to add an AVR target for Julia, and then fixing up all the other loose ends, right?

Well, it turns out it almost was. Leaning heavily on the flexibility of LLVM, [Sukera] manages to turn off all the language features that aren’t needed, and after some small hurdles like the usual problems with volatile and atomic variables, manages to blink an LED slowly. Huzzah. We love [Sukera’s] wry “Now THAT is what I call two days well spent!” after it’s all done, but seriously, this is the first time we’ve every seen even super-rudimentary Julia code running on an 8-bit microcontroller, so there are definitely some kudos due here.

By the time that Julia is wedged into the AVR, a lot of what makes it appealing on the big computers is missing on the micro, so we don’t really see people picking it over straight C, which has a much more developed ecosystem. But still, it’s great to see what it takes to get a language designed around a runtime and garbage collection up and running on our favorite mini micro.

Thanks [Joel] for the tip!

This Arduino Pen Plotter Is Built For Speed

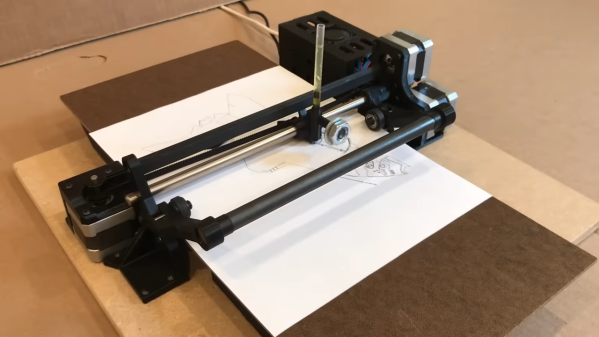
We see a lot of simple pen plotter projects around here, and while we appreciate them one and all, most of them are a little on the slow side. That’s OK — a glacial pace is sometimes all that’s needed, as long as it gets the job done. But there’s nothing wrong with putting the pedal to the metal, so to speak. And that’s exactly what this super-fast Arduino-based plotter is all about.

As the story goes, [IV Projects] felt the need for speed after building an earlier pen plotter project that worked, but failed to excite. With the additional goal of keeping the plotter easy to build with cheap parts, the design centers on a “grit roller drive” for the Y-axis — the one that actually moves the paper back and forth. And move it does, using Dremel tool sanding drums on a lightweight shaft to maximize acceleration. In fact, all the moving parts are kept as lightweight as possible, and the results really show — the three steppers really sing when this plotter is in action.

There are some really clever details in [IV Projects]’ design. We particularly like the way the pen lift mechanism works, and the surprise appearance of a clothespin spring as a belt tensioner was a real treat. Judging by the pile of rejected prototype parts, it took quite a bit of work to get this design right. If you’d like to build your own, STLs are available for the printed parts.

If you’re interested in what the other end of the speed scale looks like, check out this bare-minimum pen plotter.

Continue reading “This Arduino Pen Plotter Is Built For Speed”

Arduino And Git: Two Views

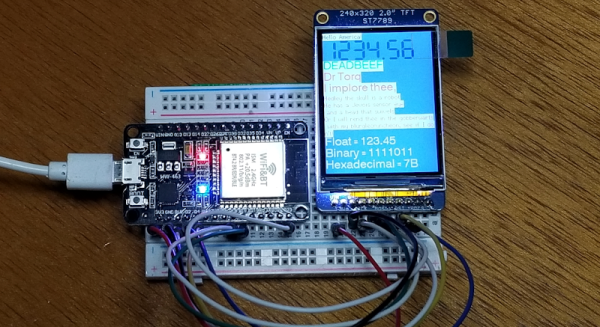
You can’t do much development without running into Git, the version control management system. Part of that is because so much code lives on GitHub which uses Git, although you don’t need to know anything about that if all you want to do is download code. [Dr. Torq] has a good primer on using Git with the Arduino IDE, if you need to get your toes wet.

You might think if you develop by yourself you don’t need something like Git. However, using a version control system is a great convenience, especially if you use it correctly. There’s a bug out in the field? What version of the firmware? You can immediately get a copy of the source code at that point in time using Git. A feature is broken? It is very easy to see exactly what changed. So even if you don’t work in a team, there are advantages to having source code under control.

Continue reading “Arduino And Git: Two Views”

DIY Arduino Based EV Charger Saves Money, Looks Pro

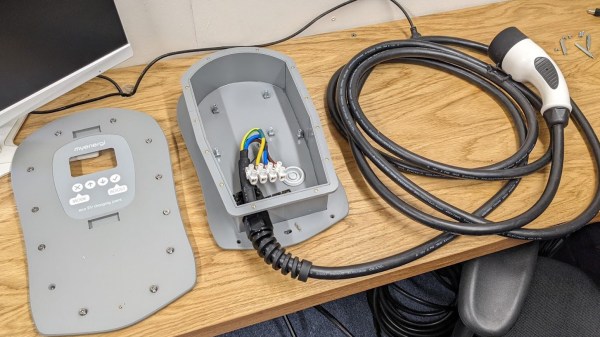
Electric vehicles (EVs) are something of a hot topic, and most of the hacks we’ve featured regarding them center on conversions from Internal Combustion to Electric. These are all fine, and we hope to see plenty more of them in the future. There’s another aspect that doesn’t get covered as often: How to charge electric vehicles- especially commercially produced EV’s rather than the DIY kind. This is the kind of project that [fotherby] has taken on: A 7.2 kW EV charger for his Kia.

Faced with spending £900 (about $1100 USD) for a commercial unit installed by a qualified electrician, [fotherby] decided to do some research. The project wasn’t outside his scope, and he gave himself a head start by finding a commercial enclosure and cable that was originally just a showroom unit with no innards.

An Arduino Pro Mini provides the brains for the charger, and the source code and all the needed information to build your own like charger is on GitHub. What’s outstanding about the guide though is the deep dive into how these chargers work, and how straightforward they really are without being simplistic.

Dealing with mains power and the installation of such a serious piece of kit means that there are inherent risks for the DIYer, and [fotherby] addresses these admirably by including a ground fault detection circuit. The result is that if there is a ground fault of any kind, it will shut down the entire circuit at speeds and levels that are below the threshold that can harm humans. [fotherby] backs this up by testing the circuit thoroughly and documenting the results, showing that the charger meets commercial standards. Still, this isn’t a first-time project for the EV enthusiast, so we feel compelled to say “Don’t Try This At Home” even though that’s exactly what’s on display.

In the end, several hundred quid were saved, and the DIY charger does the job just as well as the commercial unit. A great hack indeed! And while these aren’t common, we did cover another Open Source EV charger about a year ago that you might like to check out as well.

Continue reading “DIY Arduino Based EV Charger Saves Money, Looks Pro”

A handheld device to measure electromagnetic fields

Measuring Electromagnetic Fields With Just An Arduino And A Piece Of Wire

Electromagnetic interference problems can be a real headache to debug. If you need to prove what causes your WiFi to slow down or your digital TV signal to drop, then the ability to measure electromagnetic fields (EMF) can be a big help. Professional equipment is often very expensive, but building an EMF detector yourself is not even that difficult: just take a look at Arduino expert [Mirko Pavleski]’s convenient hand-held electromagnetic field detector.

The basic idea is quite simple: connect an antenna directly to an Arduino’s analog input and visualize the signal that it measures. Because the input of an ADC is high impedance, it is very sensitive to any stray currents that are picked up by the antenna. So sensitive in fact, that a resistor of a few mega-Ohms to ground is required to keep the sensor from triggering on any random kind of noise. [Mirko] made that resistance adjustable with a few knobs and switches so that the detector can be used in both quiet and noisy environments.

Making the whole device work reliably was an interesting exercise in electromagnetic engineering: in the first few iterations, the detector would trigger off its own LEDs and buzzer, trapping itself in a never-ending loop. [Mirko] solved this by encasing the Arduino inside a closed, grounded metal box with only the required wires sticking out. The antenna’s design was largely based on trial-and-error; the current setup with a 7 cm x 3 cm piece of aluminium sheet seemed to work well.

While this is not a calibrated professional-grade instrument, it should come in handy to find sources of interference, or even simply to locate hidden power cables. You can view this as a more advanced version of [Mirko]’s Junk Box EMF Detector; if you have a second Arduino lying around, you can use that one to generate interference instead. Continue reading “Measuring Electromagnetic Fields With Just An Arduino And A Piece Of Wire”

2022 Sci-Fi Contest: A Hand-Following Robot, Powered By Arduino

If there’s one thing audiences love in sci-fi, it’s a cute robot companion that follows the heroes around. If you want one of your own, starting with this build from [mircemk] could be just the ticket.

The build relies on the classic Arduino Uno microcontroller, which talks to a HC-SR04 ultrasonic sensor module and two infrared sensors in order to track a human target and follow it around. Drive is thanks to four DC gear motors, driven by a L293D motor driver, with a two-cell lithium battery providing power for everything onboard.

The robot works in a simple manner, following a hand placed in front of the robot’s sensors. First, the robot checks for the presence of an object in front using the ultrasonic sensor. If something is detected, the twin infrared sensors mounted left and right are used to guide the robot, following the hand.

It’s not a sophisticated algorithm, and it won’t really let your robot follow you down a crowded street. However, it’s a great project to learn on for beginners and could serve as a great entry into more advanced projects using face tracking or other techniques. Video after the break. Continue reading “2022 Sci-Fi Contest: A Hand-Following Robot, Powered By Arduino”