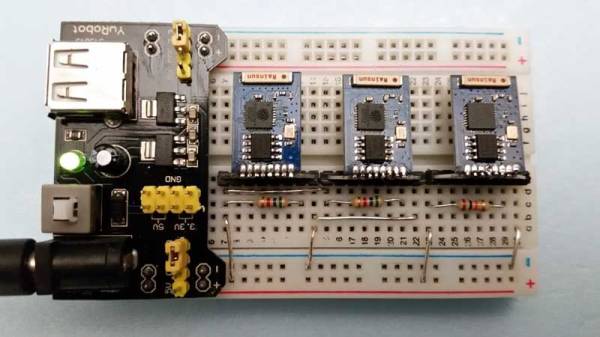
OctoPrint On Router

Dumpster Dive Results In 3D Print Server Project

3D Printers are super convenient when you need a part quickly. However, they can be seriously inconvenient if the 3D printer has to be tethered to your computer for the duration of the entire print. [Matt] purchased a Makerfarm i3v printer and has been using it a bunch. The only thing he wasn’t crazy about was having it occupy his computer while printing objects. Then one day [Matt] was dumpster diving (don’t roll your eyes, we all do it) and found a Netgear WNDR3700v1 WiFi router. This particular router has a USB port and it made [Matt] think, “can I use this to run my printer?

[Matt] started by checking out 3D print server software OctoPrint and found out that it was entirely written in Python. He had a feeling that he could get Python running on that found Netgear router. The first step was to install OpenWrt to the router and configure it as a client. That was straight forward and went well.  The router only had one USB port so a hub was necessary in order to connect a USB drive and the printer. The USB drive was necessary because the router itself did not have enough memory for OctoPrint. Installing OctoPrint to the router was a little complicated and took a bit of trial and error but [Matt] figured out the best method and documented that on his site for anyone interested in doing the same. So now, [Matt] can use his computer’s web browser to access OctoPrint on the Netgear router, start a print and go back to using his computer without fear of a failed print. OctoPrint and the router are now solely responsible for controlling the printer.

If you’re interested in more ways to remotely control your printer, check this out.

arduino server

Turn On Your Computer From Anywhere With An Arduino Server

Unless you live off-the-grid and have abundant free electricity, leaving your rig on while you go away on trips is hardly economic. So if you’re like [Josh Forwood] and you happen to use a remote desktop client all the time while on the road,  you might be interested in this little hack he threw together. It’s a remote Power-On-PC from anywhere device.

It’s actually incredibly simple. Just one Arduino. He’s piggybacking off of the excellent Teleduino software by [Nathan] who actually gave him a hand manipulating it for his purpose. The Arduino runs as a low-power server which allows [Josh] to access it via a secure website login. From there, he can send a WOL packet to his various computers to wake them up.

The system is working so well, he’s set it up with all his roommates’ computers as well, giving each their own login information on the Arduino’s page to allow them to access their own computer. Not a patient fellow, he also wanted a way to tell when his desktop would be ready to access…

Continue reading “Turn On Your Computer From Anywhere With An Arduino Server”

Brother Builds “Zerg-Berg” Coffee Table Media Server – 38(!) USB Drives

After [Travis]’s media server died a couple months ago, his brother [Nick] secretly plotted to replace it for Christmas. Admitting it to be an “asinine Rube Goldberg” arrangement, [Nick] wanted something custom and remarkable for his sibling. Rather than go the normal SATA route, 38 USB hot-swap laptop drives were clustered together inside a custom leather enclosure with a bronzed glass top.

[Nick] picked up 45 of the 500GB drives for only $350 and designed the project around those. He spent $1000 on matching metal docks for each of them, powered by $800 worth of PCIe quad independent USB controllers – no hubs. A $550 Xeon motherboard with 14 USB ports, 16GB of RAM, a basic video card and a 1000W power supply rounded out the electronics.

Under Windows 8.1 all drives are arranged in a single giant array under Storage Spaces, no raid.

Everything was built into a wood-framed coffee table wrapped in high-end leather that [Nick] spent 65 hours hand stitching himself. Fancy brass corner braces hold the frame square. All the wires were run underneath the table so the visible surfaces are clean and clear. The table structure is lifted up on legs made from half-inch square barstock bent into a hairpin and bolted to the underside.

All together [Travis]’s Zerg-Berg media server cost in the range of $4500. [Nick] intends it to be something that lasts him a very long time.

See the video below for [Nick]’s rationalization explanation of the hardware and methods chosen.

Continue reading “Brother Builds “Zerg-Berg” Coffee Table Media Server – 38(!) USB Drives”

Running A Web Server On The ESP8266

We’ve written lot about the ESP8266 lately, but people keep finding more awesome uses for this inexpensive module. [Martin] decided that using the ESP8266 with an external microcontroller was overkill, and decided to implement his project entirely on the module with a built-in web server.

[Martin] started out with the ESP8266 web server firmware developed by [sprite_tm]. This firmware provides a basic web server that supports multiple connections and simple CGI scripts right on the module. The web server firmware opens up a ton of possibilities with CGI scripting. When booting up in AP mode, you can even connect the ESP8266 to another access point right from the your browser.

[Martin] decided to connect a DHT22 temperature/humidity sensor to the module as a proof of concept. He used a DHT22 library written for the ESP8266 to read data from the sensor, and wrote a CGI script to display the data on a web page. [Martin] also added buttons to control a GPIO pin as a proof of concept. He posted his source code and a binary (see the end of his post) so you can try out his application and mod it for your own project.

file server

Antique Case For Custom File Server

Michigan Tech was throwing out a bunch of old electronic equipment, and [Evan] snagged quite a gem: a UHF signal generator built by Hewlett Packard circa 1955. He stripped all of the remaining electronics out of the case, but kept the slide-out trays and the front instrument panel to create this antique-looking file server.

The bottom tray was where the bulk of the electronics were housed, and since widespread adaptation of transistors for electronics wasn’t common at the time (the first silicon transistor wasn’t made until 1954), the original equipment was all vacuum tubes. This meant that there was just enough space for a motherboard, heat sink, and a couple of power supplies.

The hard drives are held in custom housings in the top portion of the case. The real magic, however, is with the front display panel. [Evan] was able to use the original meters, including a display for “megacycles” which is still technically accurate. The meters are driven by a USB-to-serial cable and a python script that runs on the server.

The antique case is a great touch for this robust file server. Make sure to put it in a prominent place, like next to your antique tube radio.

Examining Vintage Printer Server Hardward For Apple II

II-easy-print-reverse-engineering

Need to share a printer between several Apple II computers? Of course you don’t, but back in the day this would have been a really awesome piece of hardware to own. It’s a Pacemark iiEasy Print (we’re not sure on the capitalization of the name so talk amongst yourselves). It is an automatic buffer and switch that you can have now-a-days for just a couple of Hamiltons. [David] doesn’t mention where he “acquired” his specimen, but all the details about his adventures reverse engineering the card are shared in detail.

First off, we have to mention his unorthodox bench tools. To the untrained eye it would appear that he has attached the iiEasy Print to a Commodore 64; and that eye would be right. [David] says he uses the C64 something like an Arduino (if that’s even possible). The green card is plugged into the C64 memory bus, connecting to the DIP socket breakout board on the left and the chip select pins for most of the other IC’s on the original board. The gist of this setup is that it’s simple to use the “passthrough” DIP socket to monitor what the 6502-like processor is doing, while mapping the memory with the help of the chip select signals.

What did he learn from all this? Quite a lot but you might as well click that link above and hear it from his own mouth.

Can An 8 Node Raspberry Pi Cluster Web Server Survive Hackaday?

Plenty of folks have used their Raspberry Pi as a web server. [Steve] however is the first 8 node load balanced pi cluster server we’ve run into.  While we have seen pi clusters before, they’ve never been pressed into service as a public facing web server. [Steve] has created a really nice informative website about the Raspberry Pi, and Linux in general. As his page views have increased, he’s had to add nodes to the server. Currently [Steve] sees about 45,000 page views per month.

At first glance it would seem that the load balance system would be the weak link in the chain. However, [Steve] did realize that he needed more than an Pi to handle this task. He built the load balancer using an old PC with 512MB of RAM and a 2.7GHz x86 CPU. The most important thing about the balancer is dual network interfaces, one side facing the internet, the other facing the Pi cluster. The balancer isn’t a router though. Only HTTP requests are forwarded. The Pi nodes themselves live on their own sub net. Steve has run some basic testing with siege, however nothing beats a real world test. We figured a couple of links in from Hackaday would be enough to acid test the system.