Converted Car Lets Toddlers Tool Around

A few years ago, a professor at the University of Delaware started a project called Go Baby Go. It’s designed to bring fun and affordable mobility to small children with disabilities. The idea is to modify Power Wheels cars to make them easier for disabled kids to operate, and to teach as many people as possible how to do it in the process. The [South Eugene Robotics Team] is taking this a step further by replacing the steering wheel with a joystick that controls two motors with an Arduino Nano.

In the first instance you replace the foot pedal with a push button. The plans also call for a PVC frame, a high-backed seat, and a seat belt to make it safer. The end result is a fun ride the kid can control themselves that functions a lot like a power wheelchair, but is much more affordable. It has the added bonus of being a fun conversation piece for the other kids instead of a weird scary thing.

They also replace the front wheels with 5″ casters, because being able to spin around in circles is awesome. Their project shows how to do the entire conversion in great detail, starting with a standard ride-on car that comes with some assembly required. Motor past the break to check out a short demo with an extremely happy child tooling around in a fire truck.

If these kids get too wild, they’re gonna need traction control for these things.

Continue reading “Converted Car Lets Toddlers Tool Around”

Recreating Fast Oscilloscopes Is A Slow Process

If you want to do something you’ve never done before, there are two broadly-defined ways of approaching it: either you learn everything you can about it and try to do it right the first time, or you get in there and get your hands dirty, and work out the details along the way. There’s a lot to be said for living life by the seat of your pants. Just ask anyone who found inspiration in the 11th hour of a deadline, simply because they had no other choice.

Ted Yapo didn’t have a lot of high-speed design knowledge when he set out to build an open-source multi-GHz sampling oscilloscope, but he didn’t let that stop him. Fast forward a year or so, and Ted’s ready to build his third prototype armed with all the hands-on practical knowledge he’s gained from building the first two.

At the 2019 Hackaday Superconference, Ted gave a talk about his journey into the high-stakes world of high-speed design. It’s an inspiring talk, and Ted gives a good look into everything he’s learned in trying to build a sampling ‘scope. We think you’ll appreciate not only Ted’s work, but also the ease with which he explains it all.

Continue reading “Recreating Fast Oscilloscopes Is A Slow Process”

Rental Home Thermostat Gets Smart Upgrade Without Modifying The Dumb Controller

A problem facing those who live in rental properties comes with two prongs: that such properties rarely have up-to-date facilities such as heating controllers, and that landlords tend to take a dim view of tenants installing their own alternatives. [Andy] wanted to upgrade the heating controller in his home and was in this situation, so he came up with a smart controller add-on for the existing mechanical timer that does not irreversibly modify anything and is easily removable when he moves on.

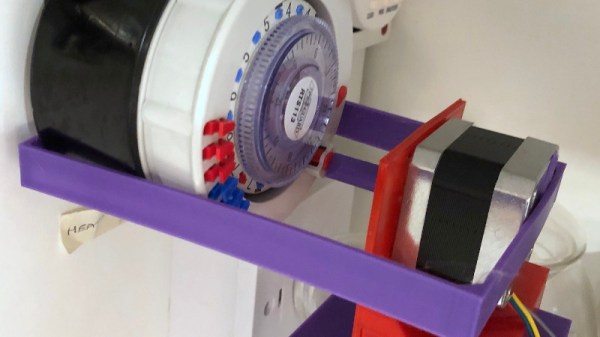
This sounds like an impossible task, but it’s one he’s done very well by mounting a stepper motor on a 3D-printed frame over the timer switch. It’s the type with a motorised ring onto which plastic fingers can be placed to flip a switch on or off; he’s simply removed the plastic fingers and designed a shaft extension for the motor that simulates their passing the switch. He can now turn his heating on and off at will from an ESP8266, in this case on an Adafruit Feather Huzzah.

Behind it all lies Adafruit IO with a custom dashboard — Hackaday’s [Sean Boyce] took this service for a trial run if you’d like his take on it’s features. For this project, Adafruit IO delivered exactly what [Andy] was after but still left a few teething troubles. The stepper needed to be told not to try to hold its position, and moving a stepper very slowly generated wait periods long enough to trigger the ESP’s watchdog timers. Adding in IFTTT gave him the ability to schedule, as well as Alexa control. All in all he’s replicated some commercial offerings with a lot less cost and all without annoying his landlord. You can see it in action in the video below the break.

Continue reading “Rental Home Thermostat Gets Smart Upgrade Without Modifying The Dumb Controller”

Array Of Useless Machines Is Useless

What’s the collective noun for a group of useless machines? A passel of useless machines? A failure? A waste? A 404?  Whatever you want to call it, [Martin Raynsford] has produced one here with this collection of 24 useless machines arranged into a 5 by 6 array. He produced it for an event at a hackerspace to amuse visitors, and it certainly seems to do the job in the video after the break.

[Martin] built the case by modifying the design of his Useless Machine kit, stretching out the case to hold multiple mechanisms. The original plan was to use a 6 by 6 matrix, but that wouldn’t fit into the laser cutter, so it ended up with 24 mechanisms in a 5 by 6 array. All of those are driven by 2 AAA batteries, and the mechanisms are efficient enough that it survived a full day of button flipping before it began to run out of juice.

Continue reading “Array Of Useless Machines Is Useless”

Building (And Testing) A DIY Air Purifier

Whether it’s the usual pollution of the city, or the fact that your corner of the globe happens to be on fire currently, poor air quality is a part of daily life for many people. One way of combating this issue is with a high quality HEPA filter in your home, but unfortunately that’s not something that everyone can afford to even has access to.

Which is why [Adam Kelly] decided to design this DIY HEPA air purifier that can be built for less than $100. That might still sound like a lot of money, but compared to the $500 sticker price he was seeing for the models recommended by health officials, it’s certainly a step in the right direction. Of course, it’s only a deal if it actually works, so a big part of the project has also been verifying the design’s ability to filter particles out of the air in a timely manner.

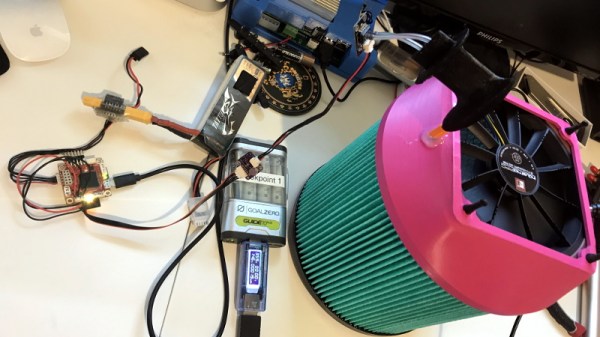
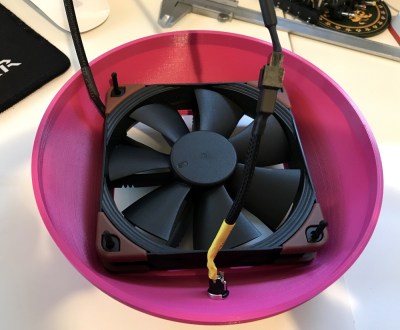
To build his purifier, [Adam] found a HEPA H13 rated replacement filter that was cheap and readily available, and started designing a low-cost way to pulling air through it. He eventually went with a 120 mm computer case fan coupled with a step-up converter that can produce 12 V from a standard USB port. Then he just needed to design a 3D printed “lid” which would position the fan so it draws air through the center of the filter.

In terms of testing, [Adam] wasn’t worried about the purifier’s ability to actually filter out smoke particles; unless the manufacturer lied about the capabilities of the filter itself, that part is a given. But he was curious about how effective the fan would be in terms of circulating air through a room.

By installing a pitot tube from one of his drones into the lid of the purifier, he determined the airflow in the center of the filter to be approximately 160 CFM. By his calculations, that means it should be able to circulate all the air in his 25 cubic meter office around 10 times per hour. That’s a promising start, but [Adam] says he’d still be interested in a more detailed analysis of the design’s performance by anyone who might have the equipment to do so.

As he lives in Australia, this project is more than just a passing fancy for [Adam]. He only has to look out the window to see that the air he’s breathing is filled with smoke from the raging bushfires. They say that necessity is the mother of invention, and breathable air is pretty high up on the list of human necessities. Our hat’s off to anyone who sees their fellow citizens suffering and tries to use their skills to come up with a solution.

Stylish Thermometer Is DIY Hardware Perfection

Over the last few years, we’ve seen a steady improvement in the sort of custom hardware a dedicated individual can produce. With affordable desktop 3D printers and PCB fabrication services, the line between store bought and home built can get very blurry. This slick MQTT-connected thermometer created by [Martin Cerny] is a perfect example.

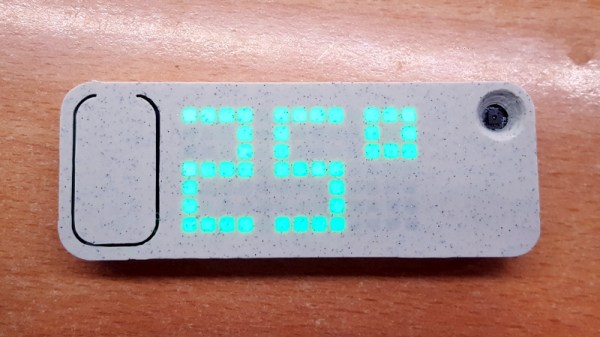
The case for the device, which [Martin] calls Temper, is printed in a stone-look PLA filament and has been carefully designed so that LEDs shining behind it illuminate perfect square “pixels” on the front. There’s a living hinge button on the left side, and on the right, an opening for the SHT30 temperature and humidity sensor. Some may say that the look of the sensor aperture could be improved with a printed grille, but there was likely a concern about reduced airflow.

Inside the case is a 13×7 array of SMD LEDs, a few 74HC595 shift registers, a TP4054 charging chip to keep the internal 250 mAh battery topped off via USB, and some passives to round out the party. The ESP-12E module that brings it all together and the battery are on the flip side of the PCB. At a press of the button, the display fires up for 5 seconds and Temper publishes temperature, humidity and battery percentage through MQTT. If you’re looking for more granular data, it can also be configured to publish regular updates at the cost of increased energy consumption.

The physical product is gorgeous on its own, but we’re happy to report that the firmware and documentation have been handled with a similar attention to detail. The project’s GitHub repo has a Wiki to help others build and configure their very own Temper, and the device’s web configuration portal is easily just as nice as anything you’d find in a piece of modern consumer electronics (if not moreso).

We’ve seen plenty of ESP8266-based environmental monitoring devices here at Hackaday, but we think this one really pushes the state-of-the-art forward. This is a device that wouldn’t be out of place on the shelf at a Big Box electronics retailer, and while [Martin] says he has no interest in building and selling them himself, we don’t doubt that folks out there will be spinning up their own Temper clones before too long.

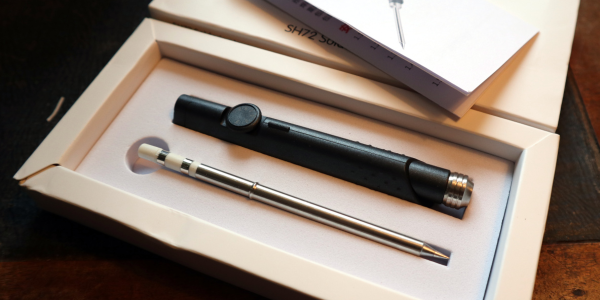
Review: SanErYiGo SH72 Soldering Iron

When the Miniware TS100 first emerged from China nearly three years ago, it redefined what we could expect from a soldering iron at an affordable price. The lightweight DC-powered temperature controlled iron brought usable power and advanced features in a diminutive package that was easy in the hand, a combination only previously found in much more expensive soldering stations. All this plus its hackability and accessible hardware made it an immediate hit within our community, and many of us have adopted it as our iron of choice.

A surprise has been that it has attracted no serious competitors of a similar type, with the only iron mentioned in the same breath as the TS100 being Miniware’s own USB-C powered TS80. Perhaps that is about to change though, as before Christmas I noticed a new Chinese iron with a very similar outline to the TS100. Has the favourite finally generated a knock-off product? I bought one to find out. Continue reading “Review: SanErYiGo SH72 Soldering Iron”