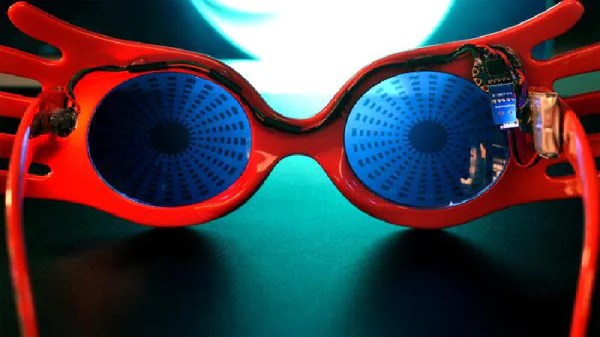
In the ever-popular world of Harry Potter, a pair of Spectrespecs are useful if you’re hunting for wrackspurts and nargles. While we’ve never spotted either of these creatures ourselves, if you’d like to go out on a hunt, [Laveréna]’s build might be for you.
To start with, you’ll need the frames for the Spectrespecs. [Laveréna] elected to source hers commercially, but you can 3D print them or even craft them by hand if you so desire. Then, a TinyLily microcontroller board is installed, with its small size allowing it to be tucked neatly out of sight in the top of the sunglasses. Two NeoPixels are then installed, with the TinyLily programmed to flash the LEDs in the requisite blue and red colors for easy identification of supernatural creatures.
Tools such as cheap microcontrollers designed for wearables and low-cost addressable LEDs are making advanced cosplay designs easier than ever. Whipping up custom blinkables no longer requires knowledge of advanced multiplexing techniques and how to properly drive high-power LEDs. Of course, LED wearables do still get properly advanced – like this skin-based 7-segment display. If you’ve got a glowable project of your own that you’re dying to share, be sure to let us know!
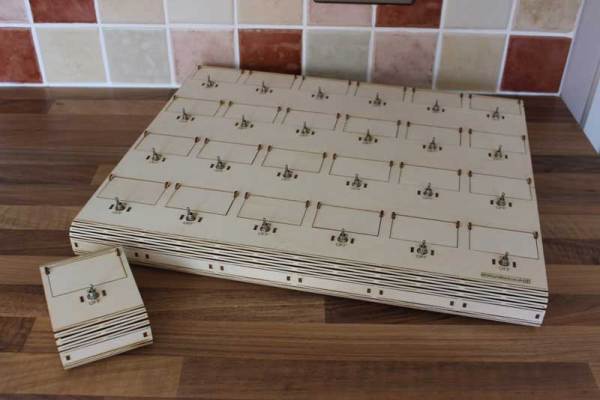
What’s the collective noun for a group of useless machines? A passel of useless machines? A failure? A waste? A 404? Whatever you want to call it, [Martin Raynsford] has produced one here with this collection of 24 useless machines arranged into a 5 by 6 array. He produced it for an event at a hackerspace to amuse visitors, and it certainly seems to do the job in the video after the break.
[Martin] built the case by modifying the design of his Useless Machine kit, stretching out the case to hold multiple mechanisms. The original plan was to use a 6 by 6 matrix, but that wouldn’t fit into the laser cutter, so it ended up with 24 mechanisms in a 5 by 6 array. All of those are driven by 2 AAA batteries, and the mechanisms are efficient enough that it survived a full day of button flipping before it began to run out of juice.
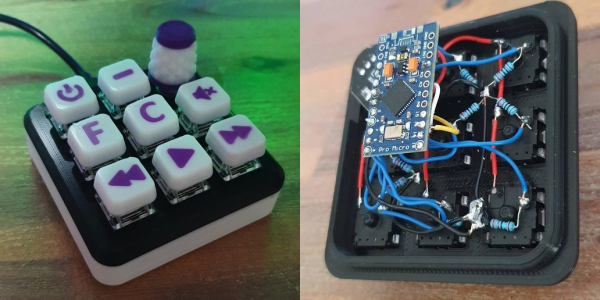
Media keyboards are nice in theory. But in practice they never have all the keys you want, and they almost always have a few you don’t. Sure, you could maybe reassign the ones you don’t use, but then the caps are wrong, and it’s a whole thing. So really, the only winning move is to make a micro macro keyboard as [littleSilvr] did to make all your shortcuts one-button accessible.
This lovely input has an Arduino Pro Micro for a brain, and Gateron browns for brawn. That knob there is a rotary encoder, not a potentiometer, because endless volume knob twiddling is just so much nicer. In case you’re wondering, those shortcuts open Fusion 360 and Cura, but we’re still not sure what the hyphen does.
Can we talk about those keycaps, though? [littleSilvr] used [Make Anything]’s process of of printing in multi-color with a single extruder. The technique involves building a vector for each color, each of which gets its own STL file. Then you add retraction as you go up through the layers, slow the print speed, change filament colors while the nozzle and bed are still warm, and voila, a vibrant canvas of colors.
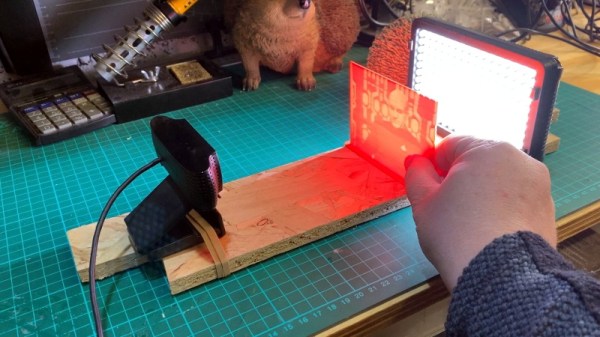
Lithophanes are nothing new, with examples going back to the 1800s. But they’ve become popular again thanks to the ease of which these pieces of artwork can be 3D printed. While the Internet would be more than happy to see somebody press a 3D image of their cat into a thin piece of translucent porcelain ready to have a light shone through it, that’s quite a bit harder than just firing up the Monoprice.
But since the machine is doing all the work for you, why stop at one? That’s precisely the sort of thinking that lead [The Mad Maker] to recreate animated GIFs with stop motion photography and a stack of printed lithophanes. Now all your favorite reaction memes can make the leap to the physical world…and then go right back into the computer.
The method here is pretty simple: [The Mad Maker] disassembles his favorite GIF to get the individual frame images, converts each one of those into a lithophane STL via an online tool, prints it out, photographs it, and then stitches all those photographs back into a new GIF. Given the incredibly time consuming nature of this process you’ll want to limit it to short animations, and even then, probably do only every 2nd or 3rd frame to preserve your sanity.
In the video after the break you can see the entire process, as well as check out the final result. While there weren’t really any technical hurdles to overcome in this project, we did like seeing how [The Mad Maker] experimented to find the ideal position for the backlight and camera. The wooden frame he came up with to hold everything in position should make subsequent meme conversions a lot easier, now he just needs to add a little color. Continue reading “3D Printed GIFs For Stop Motion Memes”→
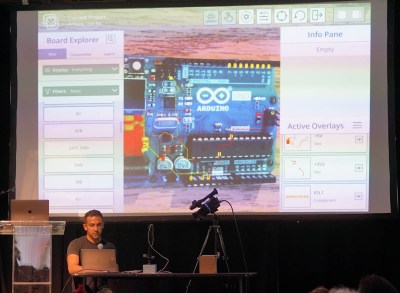
Mihir Shah has designed many a PCB in his time. However, when working through the development process, he grew tired of the messy, antiquated methods of communicating design data with his team. Annotating photos is slow and cumbersome, while sending board design files requires everyone to use the same software and be up to speed. Mihir thinks he has a much better solution by the name of InspectAR, it’s an augmented reality platform that lets you see inside the circuit board and beyond which he demoed during the 2019 Hackaday Superconference.
The InspectAR package makes it easy to visualise signals on the board.
The idea of InspectAR is to use augmented reality to help work with and debug electronics. It’s a powerful suite of tools that enable the live overlay of graphics on a video feed of a circuit board, enabling the user to quickly and effectively trace signals, identify components, and get an idea of what’s what. Usable with a smartphone or a webcam, the aim is to improve collaboration and communication between engineers by giving everyone a tool that can easily show them what’s going on, without requiring everyone involved to run a fully-fledged and expensive electronics design package.
The Supercon talk served to demonstrate some of the capabilities of InspectAR with an Arduino Uno. With a few clicks, different pins and signals can be highlighted on the board as Mihir twirls it between his fingers. Using ground as an example, Mihir first highlights the entire signal. This looks a little messy, with the large ground plane making it difficult to see exactly what’s going on. Using an example of needing a point to attach to for an oscilloscope probe, [Mihir] instead switches to pad-only mode, clearly revealing places where the user can find the signal on bare pads on the PCB. This kind of attention to detail shows the strong usability ethos behind the development of InspectAR, and we can already imagine finding it invaluable when working with unfamiliar boards. There’s also the possibility to highlight different components and display metadata — which should make finding assembly errors a cinch. It could also be useful for quickly bringing up datasheets on relevant chips where necessary.
Obviously, the electronic design space is a fragmented one, with plenty of competing software in the market. Whether you’re an Eagle diehard, Altium fanatic, or a KiCad fan, it’s possible to get things working with InspectAR. Mihir and the team are currently operating out of office space courtesy of Autodesk, who saw the value in the project and have supported its early steps. The software is available free for users to try, with several popular boards available to test. As a party piece for Supercon, our very own Hackaday badge is available if you’d like to give it a spin, along with several Arduino boards, too. We can’t wait to see what comes next, and fully expect to end up using InspectAR ourselves when hacking away at a fresh run of boards!
So far in this series, everything we’ve covered has been geared around the cheapest and easiest possible means of getting on the air: getting your Technician license, buying your first low-end portable transceiver, and checking in on the local repeater nets. That’s all good stuff, and chances are you can actually take all three of those steps and still have change left over from your $50 bill. Like I said, amateur radio doesn’t have to be expensive to be fun.
But at some point, every new ham is going to yearn for that first “real” rig, something with a little more oomph in terms of power, and perhaps with a few more features. For many Technicians, the obvious choice is a mobile rig, something that can be used to chat with fellow hams on the way to work, or to pass the time while on long road trips. Whatever your motivation is, once you buy a radio, you have to install it, and therein lie challenges galore, both electrical and mechanical.
I recently took the plunge on a mobile rig, and while the radio and antenna were an order of magnitude more expensive than $50, the process of installing it was pretty cheap. But it’s not the price of the thing that’s important in this series; rather, it’s to show that ham radio is all about doing it yourself, even when that means tearing your car apart from the inside out and rebuilding it around a radio.
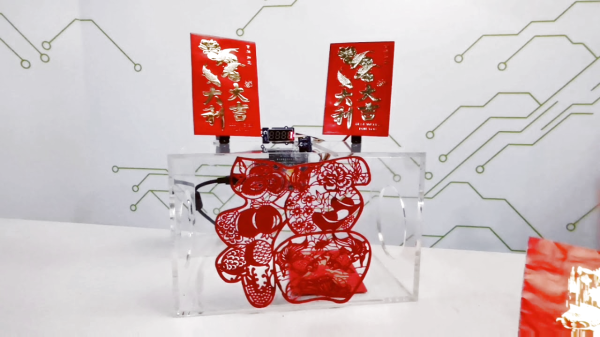
It’s that time of year again when production in Shenzhen grinds to a halt. Lunar New Year has kicked off the annual month-long Spring Festival, and the whole country has taken time off to be with family and celebrate. One tradition of Spring Festival is that everyone gives each other red envelopes with various amounts of money in them called hongbao. The point of this ‘lucky money’ is to spread good fortune in the new year, and it’s easy to amass a whole pile of hongbao by the end of the festival.
[Makerming] made this lovely counting box for anyone looking to keep track of their hongbao in style. It probably goes without saying that this would make an awesome mailbox for Valentines (or anything else that fits in the slot), but there you go. The circuit is pretty simple thanks to a Grove connector shield meant for Arduinos. An IR break-beam module detects the incoming envelope, and the Uno increments the count on the display. The wiggly, servo-driven example hongbao on top are there to add to the fun.
We love the laser-cut decoration on the front, which is an homage to the intricate paper cut decorations. If you don’t like that one, [Makerming] included design files for several other options. Watch it wiggle after the break!