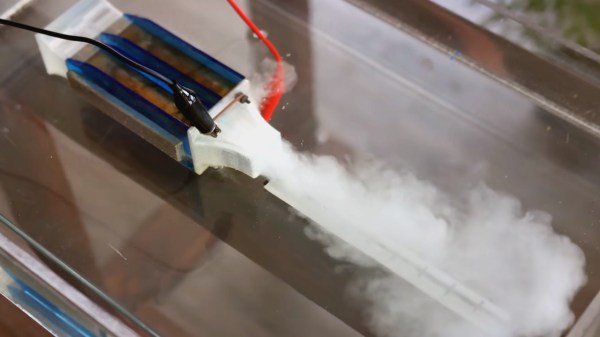
VR Sickness: A New, Old Problem

Have you ever experienced dizziness, vertigo, or nausea while in a virtual reality experience? That’s VR sickness, and it’s a form of motion sickness. It is not a completely solved problem, and it affects people differently, but it all comes from the same root cause, and there are better and worse ways of dealing with it.

If you’ve experienced a sudden onset of VR sickness, it was most likely triggered by flying, sliding, or some other kind of movement in VR that caused a strong and sudden feeling of vertigo or dizziness. Or perhaps it was not sudden, and was more like a vague unease that crept up, leaving you nauseated and unwell.

Just like car sickness or sea sickness, people are differently sensitive. But the reason it happens is not a mystery; it all comes down to how the human body interprets and reacts to a particular kind of sensory mismatch.

Why Does It Happen?

The human body’s vestibular system is responsible for our sense of balance. It is in turn responsible for many boring, but important, tasks such as not falling over. To fulfill this responsibility, the brain interprets a mix of sensory information and uses it to build a sense of the body, its movements, and how it fits in to the world around it.

These sensory inputs come from the inner ear, the body, and the eyes. Usually these inputs are in agreement, or they disagree so politely that the brain can confidently make a ruling and carry on without bothering anyone. But what if there is a nontrivial conflict between those inputs, and the brain cannot make sense of whether it is moving or not? For example, if the eyes say the body is moving, but the joints and muscles and inner ear disagree? The result of that kind of conflict is to feel sick.

Common symptoms are dizziness, nausea, sweating, headache, and vomiting. These messy symptoms are purposeful, for the human body’s response to this particular kind of sensory mismatch is to assume it has ingested something poisonous, and go into a failure mode of “throw up, go lie down”. This is what is happening — to a greater or lesser degree — by those experiencing VR sickness.

Continue reading “VR Sickness: A New, Old Problem”

DIY Self-Assembling 4D Printing

A 4D printed object is like a 3D printed object, but it changes shape or self-assembles when its environment changes. [Teaching Tech] has been reading about this technology and decided to try to replicate it using his conventional 3D printer.

His attempts to make a joint that changes when submerged in the water looked at several options: material that can absorb water, material that expands with temperature, and — the selected option — a dissolvable locking mechanism. Essentially, a hinge is held open by a water-soluble lock. When water dissolves the lock, the hinge can spring to its natural position.

Like most experiments, this one had a few false starts. But you always learn something each time. The final design had a TPU hinge and spring with PLA structural beams. The TPU required flat printing, so various pieces have to be rotatable so they can be placed in their final orientation after printing.

Usually, multi-material setups are for printing different colors of the same kind of plastic, it’s possible to use different plastics, but it can be tricky. As a compromise, [Teaching Tech] did one print using PLA and TPU, but printed the PVA locks in a separate pass and installed them on the print at the end. The first finished 4D print wasn’t entirely successful. The hot water slowly dissolved the PVA, but it also deformed the PLA. A redesign of the lock made a big difference.

We aren’t sure this is practical yet, but we are sure someone has a need for this technique and it could be made very practical with a little work. The last time we saw 4D printing, there were magnets involved. We think this is an exciting time where people aren’t just trying to get conventional printing to work well, but are pushing the envelope with new techniques like conical slicing, for example.

Continue reading “DIY Self-Assembling 4D Printing”

A Handy Guide To The Humble BBS

Some of us who’ve been online since the early days fondly remember the web of yore — with its flashing banners, wildly distracting backgrounds, and automatic side-scrolling text. But there was a time before the worldwide web and the Internet as we recognize it today, and the way of communicating in this before-time was through Bulletin Board Systems, or BBS. There are still some who can cite this deep magic today, and this page is perhaps the definitive guide to this style of retrocomputing.

This how-to is managed by [Blake.Patterson] who is using a wide variety of antique machines and some modern hardware in order to access the BBSes still in service. He notes in this guide that it’s possible to use telnet and a modern computer to access them, but using something like an Amiga or Atari will give you the full experience. There are some tools that convert the telephone modem signals from that original hardware to something that modern networking equipment can understand, and while the experience might be slightly faster as a result, it does seem to preserve the nostalgia factor quite well.

For those looking for more specific guides, we’ve featured [Blake]’s work a few times in the past, once with an antique Epson PX-8 laptop and again with a modern ESP8266. It doesn’t take much computing power to get connected to these old services, so grab whatever you can and start BBSing!

I See By Your Tattoo That You Are A Hacker

We spotted [Segfault]’s new tattoo on a fast failing bird app a few days ago. We thought it was nice looking piece of skin art, but without a write up couldn’t cover it. The bearer of the tattoo pointed us to this blog post about the tattoo, and now we really like it.

It’s fun on it’s own, but when you start staring at it you realize it’s full of hidden jokes and meanings. If you like puzzles, go hunting for them before you read the blog post. We also liked the reminiscence about [Segfault]’s early electronics experimentation days, and how the 555 timer IC figured prominently in them.

We’ve not covered a lot of tattoos here at Hackaday.  Mostly we cover the technology behind skin fused or embedded hacks. But occasionally some tattoo art catches our eye, as it did in this interesting barcode tattoo.

Taking Distance Based CAD To The Next Level

For those who model CAD models regularly, a pair of calipers is essential as it allows reasonably accurate measurements to fit a specific part. However, [Jason Harris] is taking that concept to the next level with a signed distance function-based CAD tool, SDFX.

For those who don’t know, Signed Distance Functions can tell you from a given point how close the nearest part of the model is. The model is represented as a single function that offers some exciting benefits. For instance, chamfering and fileting are often quite complex in traditional CAD programs and trivial in an SDF setting. SDFX is a golang library that allows you to write golang programs to describe the model. OpenSCAD is a favorite of Hackaday as it is a beautiful parametric code-first CAD package. But the syntax and language are somewhat cludgy, to say the best. The advantage of using golang rather than a DSL is that you can use all the niceties that a full-featured language brings. For example, you can export multiple objects, make network requests, and interface with GUI libraries to recreate something like the customizer for OpenSCAD.

Objects are rendered to STL using Marching squares. Then, they can be printed in whatever slicing software suits your fancy. It’s an excellent project with a great API and almost a hundred examples.

The code is available on GitHub under an MIT License.

side by side, showing hardware experiments with capacitor gating through FETs, an initial revision of the modchip board with some fixes, and a newer, final, clean revision.

A Modchip To Root Starlink User Terminals Through Voltage Glitching

A modchip is a small PCB that mounts directly on a larger board, tapping into points on that board to make it do something it wasn’t meant to do. We’ve typically seen modchips used with gaming consoles of yore, bypassing DRM protections in a way that a software hacks couldn’t quite do. As software complexity and therefore attack surface increased on newer consoles, software hacks have taken the stage. However, on more integrated pieces of hardware, we’ll still want to return to the old methods – and that’s what this modchip-based hack of a Starlink terminal brings us.

[Lennert Wouters]’ team has been poking and prodding at the Starlink User Terminal, trying to get root access, and needed to bypass the ARM Trusted Firmware boot-time integrity checks. The terminal’s PCB is satellite-dish-sized, so things like laser fault injection are hard to set up – hence, they went the voltage injection route. Much poking and prodding later, they developed a way to reliably glitch the CPU into verifying a faulty firmware, and got to a root shell – the journey described in a BlackHat talk embedded below. Continue reading “A Modchip To Root Starlink User Terminals Through Voltage Glitching”

An automatic loom

Desktop-Sized Fully Automatic Loom Is An Electromechanical Marvel

Weaving is one of the oldest crafts in the world, and was also among the first to be automated: the Industrial Revolution was in large part driven by developments in loom technology. [Roger de Meester] decided to recreate that part of the industry’s history, in a way, by building his own desktop-sized, fully automatic loom. After a long career in the textiles industry he’s quite the expert when it comes to weaving, and as you’ll see he’s also an expert machine builder.

[Roger]’s loom is of a specific type called a dobby loom, which means that the vertical threads (the warp) can be moved up and down in various ways to create different patterns in the fabric. The horizontal wires (the weft) are created by a shuttle moving left and right, carrying a bobbin that unspools as it travels. A comb-shaped plate (the reed) then fixes the fresh weft in its place. [Roger]’s videos (embedded below) clearly show this mechanism in action, as well as the loom’s overall design.

A detail of an automatic loom, showing the end of the weft being clamped as the shuttle starts its run
A clamp hold the end of the weft as the shuttle starts its run

The 3D printed shuttle is moved back and forth through the warp by a belt-driven system that grabs the magnetic end of the shuttle. Revolving storage drums on either side of the machine enable the use of different thread colors for each shuttle run. Shuttles are exchanged by a robotic arm that picks them up and places them onto the track; there’s a clamp that grabs the end of the thread as the shuttle starts its run, and a wire cutter to detach it when the shuttle is up for replacement.

This intricate mechanical dance is controlled by a set of Arduino Megas and Nanos. They drive all the servos, DC motors, and steppers while reading out an array of sensors and switches. The system can even detect several faults: the weft is checked for proper tension after each cycle, shuttles with empty bobbins are automatically discarded, while a laser keeps an eye on the warp to ensure none of the threads have snapped.

The entire machine is of [Roger]’s own design; apart from 3D-printed and CNC-machined parts, he also re-used components from various pieces of discarded machinery. His ultimate purpose is to use this machine to make specialized fabrics for medical or industrial use: for example, it can use conductive threads to make fabrics with built-in sensors.

Although this isn’t the first DIY automatic loom we’ve featured, it’s definitely the most advanced. Previous examples, like this 3D-printed miniature version or this neat computer-controlled one can’t really compare to [Roger]’s 26 cm reed width and wide customizability. If you prefer to keep things a bit simpler, you can also use a 3D-printer to directly print certain fabrics.

Continue reading “Desktop-Sized Fully Automatic Loom Is An Electromechanical Marvel”