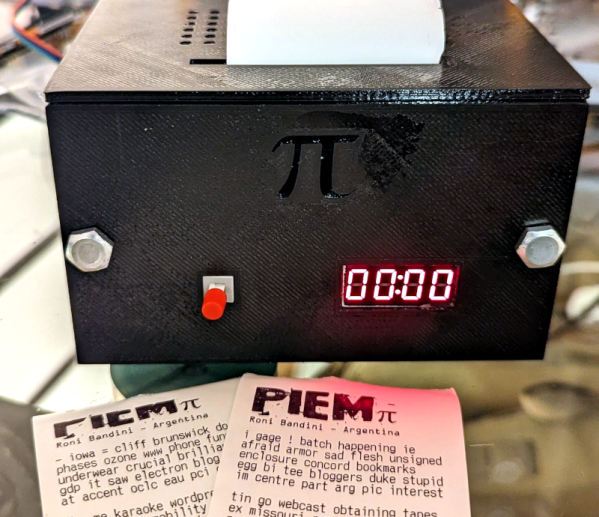
When Combat Robot Wheels Need To Be Nice And Cheap (But Mostly Cheap)

It started with [CHORL] making a promise to himself regarding constructing a new combat robot: no spending of money on the new robot.

That rule was violated (but only a little) by making his robot’s wheels out of EVA kneeling pads. EVA (Ethylene-Vinyl Acetate) is a closed-cell foam that makes for durable yoga mats, kneeling pads, and products of a similar nature. [CHORL] found a way to turn them into light but serviceable wheels for his robot: the Susquehanna Boxcar.

Nested hole saws create concentric holes. Perfect for wheels.

Here’s how the wheels were made: [CHORL] began with two hole saws. Nesting a smaller hole saw into a larger one by putting both on the same arbor created a saw with two holes, both of which were centered with respect to one another. The only problem was that this hole saw was not actually deep enough to cut completely through the thick foam. Luckily, cutting roughly halfway through on one side, then flipping the sheet over and cutting through from the other side was a good workaround. That took care of turning the thick foam sheet into round wheels.

A 3D-printed part served as a wheel hub as well as gear for the drivetrain. We want to call attention to the clever method of reinforcing the connection between the parts. [CHORL] didn’t want to just glue the geared hub directly to the surface of the foam wheel, because he suspected it might separate under stress. To address this, he designed six slots into the hub, cut matching slots into the foam wheel, and inserted six spline-like reinforcements in the form of some ABS strips he had on hand. Gluing it all together with E-6000 and leaving it to cure overnight under a weight resulted in a geared wheel assembly that [CHORL] judged to be about as round and rigid as a wheel should be, so the robot had a solution for nice light wheels that were, above all, cheap!

Lots of robots need wheels, and unsurprisingly, DIY solutions are common projects. [CHORL]’s approach here looks pretty scalable, as long as one can cut some accurate holes.

Interested in knowing more about the robot these wheels are destined for? [CHORL]’s still working on the Susquehanna Boxcar, but it’s almost done, and you can read a bit more about it (and see a few more pictures) here.

Masking Tape Pen Plotter Gets An Upgrade

[Mr Innovative] decided to make his version of a small pen plotter (video after the break) to make labels on masking tape. The result is an impressive compact machine that is remotely controlled using your smartphone. The plotter is constructed using several different techniques, a piece of plywood as the base, a 3D printed bracket for the motors and pen carriage, and a routed acrylic plate that holds the lead screw and linear rail assembly. The whole thing is controlled by an Arduino Nano mounted on a custom motor driver carrier board.

The inspiration for this build came from a project by [michimartini] aka [Molten Cheese Bear] that we covered a few months ago. [Mr Innovative] went for belt vs direct drive and no local screen. It also appears to plot a little bit faster, but that might be due to differences in the ink pens used. An Android app called TextToCNC converts label text into G-Code, and the Grbl Controller app sends those commands to the plotter.

We like continued iterations of open source projects and look forward to seeing what the next generations look like. Thanks to [keithfromcanada] for submitting this tip.

Continue reading “Masking Tape Pen Plotter Gets An Upgrade”

Vapor Trails And Fan Make For Fantastic Photos In DIY Wind Tunnel

Every wanted a mini wind tunnel to check the aerodynamics of scale model cars, drones, or other small objects? Then check out [dannyesp]’s mostly-3D-printed DIY wind tunnel (video, embedded below). Don’t forget to also browse the additional photos in this Reddit thread.

A junk parts project doesn’t have to look like a hack job.

There’s not much for plans available, since as [dannyesp] admits, this device was very much the product of trial-and-error and junk bin parts. The video and photos are more than enough for any enterprising hacker to work with.

The core of the device is a large fan made from a junked drone motor. This fan is located at the rear of the tunnel. A small anemometer is placed at the front, where some 3D-printed baffles also work to smooth out turbulent incoming air.

The foggy trails of vapor come from a hacked-up vape pen. Vapor gets piped through some tubing to the front of the tunnel. There, the vapor trails are drawn towards the low-pressure area at the rear, traveling over and around the object on the way. [dannyesp] also mentions that the platform holding the object is mounted on a rail, which incorporates some kind of pressure sensor in an attempt to quantify wind drag.

We want to take a moment to appreciate just how clean this “junk parts” project looks — even though it is made from things like broken photo frames. All of this comes down to thoughtful assembly. A hack doesn’t have to look like a hack job, after all. We also love the little control box that, instead of having a separate power indicator, lights up like a little nightlight when it has power.

Hacking vaporizers is a fantastic way to create a small, portable fog machine. These can create fantastic costume effects like this smoking Ghost Rider skull. They are a great way to turn an off-the-shelf consumer item into something that cost quite a bit more just a few years back.

Continue reading “Vapor Trails And Fan Make For Fantastic Photos In DIY Wind Tunnel”

Carver M-400 Amplifier Repair Keeps The 1980’s Alive

Carver is a famous name in audio equipment although they have been known to use odd names for things. For example, the 1980’s vintage M-400 magnetic field power amplifier that [JohnAudioTech] is repairing (see the two videos below). That sounds like something off a bad Star Trek remake, but, apparently, we weren’t alone in thinking that, judging by this 1982 review of the unit from a UK magazine.

Still, it is an interesting high-power amplifier and we love seeing gear of this age torn apart. The beast is rated at 201 watts — you have to wonder if the extra watt is another marketing ploy.

There were actually two units and they looked pretty good for four-decade-old boxes. One sounded pretty good outside of some noticeable buzzing. The other had something shorted inside. If you enjoy watching repair videos, you’ll appreciate this two-parter.

We have to admit — and it may be a personal bias — there is something more pleasing about seeing a PCB populated with a bunch of interesting-looking through-hole components. Modern boards with a sea of surface mount parts tend to look a little bland, aesthetically speaking. Of course, when it comes time to make our own boards, we are happy to use SMD and forego all that hole drilling!

We like watching computer repair videos, in particular. Or sometimes, something really exotic.

Continue reading “Carver M-400 Amplifier Repair Keeps The 1980’s Alive”

GCore: Make Portable Devices With Less Frustration

[Dan Julio]’s gCore (short for Gadget Core) is aimed at making GUI-based portable and rechargeable gadgets much easier to develop. gCore is the result of [Dan]’s own need for a less tiresome way to develop such hardware.

A touchscreen is great, but high-quality power control and charging features are what really make a portable device sing.

[Dan] found that he seemed to always be hacking a lot of extra circuitry into development boards just to get decent power management and charge control. To solve this, he designed his own common hardware platform for portable gadgets and the gCore was born.

While the color touchscreen is an eye-catching and useful addition, the real star of his design is the power management and charging features. Unlike most development hardware, the gCore intelligently shares load power with charging power. Power on and power off are also all under software control.

Sound intriguing? That’s not all the gCore has to offer, and you can learn more from the project page at hackaday.io (which has a more in-depth discussion of the design decisions and concept.) There are also some additional photos and details on [Dan]’s website.

[Dan] is no stranger to developing hardware. The tcam-mini thermal imager (and much more) is his work, and we have no doubt the gCore’s design and features are informed directly by [Dan]’s actual, practical development needs.

Easier Self Hosting With Umbrel

While it is undeniable that cloud-based services are handy, there are people who would rather do it themselves. For many of us, it is because we want what we want the way we want it. For others, it is a distrust of leaving your personal data on someone’s server you don’t control. Umbrel is a Linux distribution just for people who want to self-host popular applications like NextCloud or Home Assistant. [ItsFoss] has a good review that points out some of the plusses and minuses of the early version of Umbrel.

What’s really interesting, though, is the approach the distro takes to installing software. Like most modern distributions, Umbrel has a package manager. Unlike most, though, the packages are actually docker containers. So when you install an app, it is preconfigured and lives in its own bubble, unlikely to conflict with other things you might install.

We also like that it has a specific build for a Raspberry Pi, although it will work on other 64-bit hardware and you can even install it within docker on top of your normal operating system. Of course, the docker container concept is also a drawback — at least for now — because it can be difficult to adjust settings inside the container compared to a more conventional install.

It amazes us that hardware has become so capable that it is easier to just duplicate entire operating systems than it is to work out the required dependency interactions. Still, it works, and in most cases, it works well.

If you want to know more about Docker, we’ve covered it a few times in the past. You can even use it for very simple development cases if you like.

Continue reading “Easier Self Hosting With Umbrel”

Part of a picture showing all kinds of different CAN devices in a car

CAN Peripheral For RP2040, Courtesy Of PIO

[Kevin O’Connor] writes to us about his project, can2040adding CAN support to the RP2040. The RP2040 doesn’t have a CAN peripheral, but [Kevin] wrote code for the RP2040’s PIO engine that can receive and send CAN packets. Now we can all benefit from his work by using this openly available CAN driver. This library is written in C, so it’s a good fit for the lower-level hackers among us, and in all likelihood, it wouldn’t be hard to make a MicroPython wrapper around it.

The CAN bus needs a peripheral for the messages to be handled properly, and people have been using external chips for this purpose until now. These chips, [Kevin] tells us, have lately been unavailable due to the chip shortage, making this project more valuable. The documentation is extensive and accessible, and [Kevin] details how to best use this driver. With such a tool in hand, you can now turn your Pico into a CAN tinkering toolkit, or wire up some CAN devices for use in your own projects!

[Kevin] says this code is already being used in Klipper, a framework powering 3D printers and other machines like them. As for your own purposes, you can absolutely use such a CAN tool to hack on your car – here’s a treasure trove of car hacking documentation, by the way! Thanks to the PIO engine, there seems to be no end to the RP2040’s versatility – you can even drive HDMI monitor with this PIO-based DVI code.

Continue reading “CAN Peripheral For RP2040, Courtesy Of PIO”