Twenty Two Servos And An Awesome Clock

servo

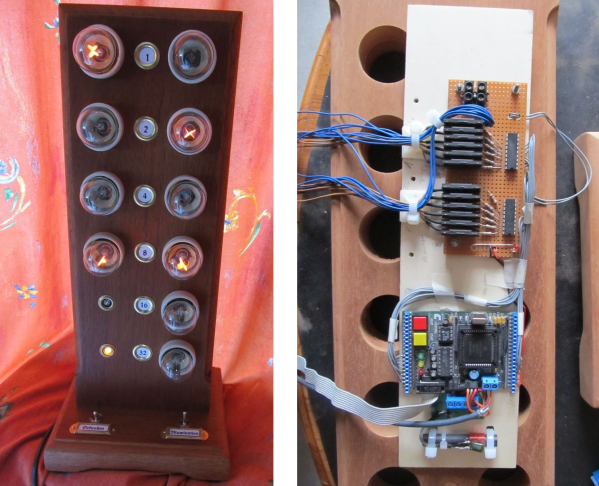
We can never get enough interesting clock builds, and [ebrithil]’s servo clock (Deutsche, Google translation) is up there with the best of them. There’s twenty-two servos in this clock, moving time forward with the mechanistic precision only an Arduino project can.

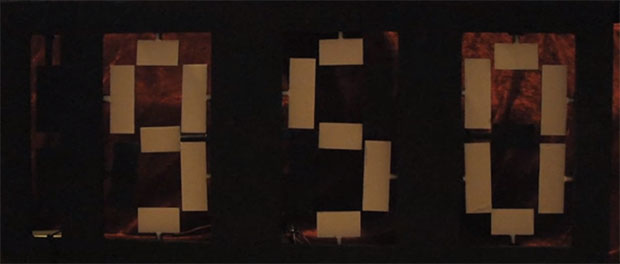
The digits in [ebrithil]’s clock are constructed like seven-segment displays, only instead of lighting up LEDs, servos turn small bits of paper that are light on one side and dark on the other. Turing the servo 180 degrees changes each segment from one shade to the other, making for an electromechanical seven-segment display.

The servos are controlled by an Arduino Mega connected to a DS1302 real-time clock. One problem [ebrithil] had with this project is having the segments rotate slightly every time someone turned on a light attached to the same circuit. He solved this problem by running the circuit off a perpetually charging cell phone battery, allowing him to take this clock on the go without losing time.

Continue reading “Twenty Two Servos And An Awesome Clock”

A Binary Clock That Uses Bulbs

Based on his username, [Horatius.Steam], it’s not a surprise that he calls this project a “SteamPunk” style binary clock. But we think using neon  glow lamps in this binary clock is more of mid-century modern proposition. Either way, the finished look is sure to make it a conversation piece for your home.

He doesn’t give all that much information on the bulbs themselves. They seem to be neon glow lamps along the lines of a Nixie tubes. It sounds like they just need mains power (based on the image annotations for the relay board). The high voltage is switched by that collection of solid state relays. The controller board includes a DCF radio whose antennae is seen just below the controller. This picks up an atomic clock signal from Frankfurt, Germany. We think it’s a nice touch that he included a mechanical relay to simulate a ticking sound. That and the bulbs themselves can be turned off using the two switches in the base of the clock.

This seems like a good time to direct your attention to an artistic take on a Nixie clock.


Fabricating A Mechanical Wristwatch At Home

diy-mechanical-wristwatch

Our mouth is still agape after digging through [Tom’s] watchmaking blog. This gentleman spent several years designing and machining his own mechanical wristwatch. A dozen years ago or so [Tom] answered an ad for an apprentice watchmaker. He worked on watches and came across a book that detailed how timepieces are made. He was told that no-one does it like that anymore, which only fed his curiosity. What he came up with is, to his knowledge, the first timepiece every made in Australia.

It’s no secret that we have a thing for clocks. But we feature digital timepieces almost exclusively. We’ve love mechanical watches too but don’t see them as hobby projects very frequently. After looking at what goes into the mechanism it’s not hard to see why.

[Tom] was faced with a variety of challenges along the way. One of the biggest was having to come up with tools that would let him perform the precise milling work necessary to achieve success. You’ll want to read through his movement design and manufacture posts. He laid out the plan in CAD, but ended up using some hacked together milling tools to get the job done.

[Thanks Amit]

Award Clock Put To Good Use As A Bench Meter

award-clock-turned-voltage-meter

The motivation industry turns out these type of award trinkets by the millions. Here’s a way to actually put the thing to use. Instead of displaying time, the clock dial serves as the readout of a voltage meter.

When we first saw this post we assumed that the hack used some type of coil injection to drive the hands. But it turns out that this is mechanically driven. The image above shows the stepper motor which is mounted behind the clock. Its drive shaft is coupled with the adjustment knob on the back of the clock. The precision of the motor lets the PICAXE set the clock dial based on the number of motor steps. The hour hand shows the tens value with the minutes serving as ones (base 10, not base 60). This means the top measurable voltage is 12V — when the hour hand is at 12 the measurement is 0 volts plus tenths of a volt from the minute hand. With the dial taken care of the rest of the project focuses on measuring the voltage using the ADC, which has an upper limit of just 5V. This is overcome with a simple voltage divider.

After the break you can see the accuracy of the rig as it performs measurements next to a digital voltmeter.

Continue reading “Award Clock Put To Good Use As A Bench Meter”

Hacking Grandfather Clock Accuracy While It’s Still Ticking

grandfather-clock-tweaking

[Keith] got his hands on a few grandfather clocks. Apparently the price tag is greatly reduced if you are able to get them second-hand. The mechanical timepieces require weekly winding, which is a good thing since you’ll also need to correct the time at least that often. But this drift got [Keith] thinking about improving the accuracy of these clocks. He figured out a high-tech way to adjust the timepiece while it’s ticking.

The first thing he needed was a source of super-accurate time. He could have used a temperature compensated RTC chip, but instead went the more traditional route of using the frequency of mains power as a reference. The next part of the puzzle is to figure out how to both monitor the grandfather clock and make small tweaks to its pendulum.

The answer is magnets. By adding a magnet to the bottom of the pendulum, and adjusting the proximity of a metal plate positioned below it, he can speed up or slow down the ticking. The addition of a hall effect sensor lets the Arduino measure the rate of each swing and calculate the accuracy compared to the high voltage frequency reference.

A Clockwork Useless Machine Prototype

usless-machine-mechanical-clockwork

Most of us have seen the [Useless Machine] where a switch is flipped and a finger comes out to turn it off, retreating into it’s box again. Most of those are electrical, but why not a [Useless Machine] made only of mechanical clockwork? Apparently this has been done before, but why not one more?

After some rough, sketches, and almost no research, I finally “came up with” a way to do this mechanically. A small wheel acts as the driver for the assembly, which is weighed down by a T-handle attached to a string wrapped around it. When released, this smaller wheel fully rotates causing the larger wheel to rotate up around ninety degrees then come down again. In reality, the flipped switch doesn’t reverse the motion of the finger at all, it instead stops it from cycling over and over. The video after the break may explain it a bit better.

This machine currently is a prototype. Although it works well without a lid on at simply reversing the switch, it’s much too fast and isn’t capable of lifting any sort of weight. Like a lid to come out of, for instance. This whole assembly was made possible with my CNC router and inexpensive/easily machineable MDF. Continue reading “A Clockwork Useless Machine Prototype”

A Glorious Mechanical Seven Segment Display

If you’ve ever wondered why you’ve never seen a mechanical seven-segment display, now you know. They’re fairly complicated and most likely absurdly expensive, especially when a few light bulbs or LEDs would do the same job equally well. This didn’t stop [kiu] from completing his mechanical seven-segment clock he calls SevenBlocks, and for that we are thankful.

Each of the 28 segments in [kiu]’s clock is made of three layers of acrylic and a short section of a rack gear. Unlike every seven-segment display you’ve ever seen, tiny hobby servos provide the indication for each segment. For the electronics, An ATMega8 is used for the brains of the outfit with a 74HC595 shift register to expand the number of I/O lines. A DS1307 RTC module provides accurate timekeeping, and the dozens of servo outputs visible in the ‘guts shot’ makes you realize why you’ve never seen a mechanical seven segment display before – they’re really friggin’ complex.

If you want to build your own mechanical seven-segment clock, [kiu] put all the files up on Github. Everything is there, from the .DXF files ready to feed to a laser cutter to the schematic and board files for each of the three PCBs. A video showing this clock in action is sort of necessary, so you can check that out after the break.

Continue reading “A Glorious Mechanical Seven Segment Display”