First Days With A New Microscope

For big-ticket purchases, I tend to do a lot of research before I open my wallet. I like to at least have the illusion that when I send my money off to a far-away stranger, I’m likely to get back something of equal value in a reasonable timeframe that does what I want it to do. So I tend more toward the “analysis paralysis” end of the spectrum, where I pore over so many specs and reviews that I end up buying nothing.

While that sounds like a bad thing, and sometimes is, I find that it tends to help me avoid rashly spending money on things that aren’t going to work for me. This is especially true in the area of tools, where while I’m trapped in my analysis loop, I often find a workaround or substitute that’s good enough to get the job done.

For some things, though, there is no substitute, and when you start working with SMD components that you’d have a hard time telling from a grain of salt, you’re probably going to need a microscope. I recently determined that this was where I was in my electronics journey, and now that I’ve worked my way through the analysis and procurement phase of the process, I thought I’d share my first impressions of my microscope, and what it’s like to get used to working with one.

Continue reading “First Days With A New Microscope”

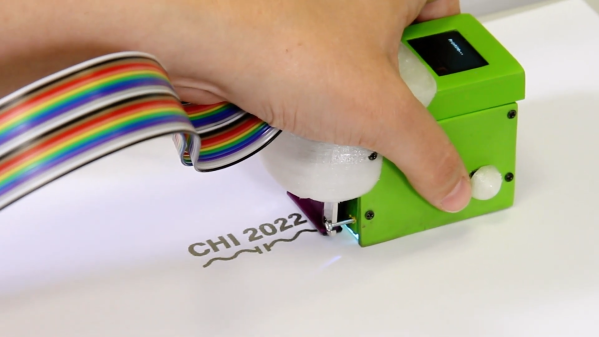
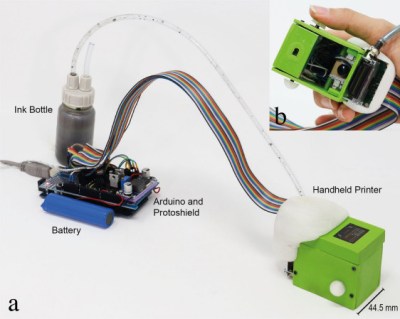
A handheld printer printing "CHI 2022 and a capacitor symbol

Print-a-Sketch Turns Any Surface Into A Printed Circuit Board

Although powerful design software and cheap manufacturing services have made rolling your own PCBs easier than ever, there are some situations where a piece of FR-4 just doesn’t cut it: think art projects with hidden LEDs or biomedical applications that need to attach to the human body. For such occasions, [Narjes Pourjafarian] and her team at Saarland University in Germany developed Print-a-Sketch: a handheld device that lets you print electric circuits on almost any surface using conductive ink.  Also check out their academic paper (PDF).

The heart of the device is a piezoelectric print head, as used in some types of inkjet printer. It dispenses tiny droplets of silver nanoparticle ink, which is conductive enough to make useful electronic circuits by simply printing a schematic. Lines can be drawn to connect components, while customized footprints can hold LEDs, capacitors or even integrated circuits.

As demonstrated in the video embedded below, the Print-a-Sketch can be used in various different modes. In freehand mode, you can draw whatever you like just by moving the device around. But it also has several assisted sketching modes, where it can straighten out wobbly lines, draw multiple lines in parallel, or even print complete predefined shapes. Especially satisfying is the way it can draw resistors by literally printing zig-zagging lines.

Thanks to an optical motion sensor, similar to the ones used in gaming mice, the device knows at all times where it is and how fast it’s going. That enables the control circuitry to compensate for unsteady movement; the authors claim a printing precision of less than 0.5 mm. In addition, an RGB camera is used to detect the material underneath and adjust the amount of ink dispensed, depending on how absorbent the surface is: rough paper needs more ink to obtain a conductive trace than a ceramic tile.

The number of potential applications seems limitless: how about a yoga mat with integrated touch buttons to control the video player on your iPad? A piece of kinesiology tape with an integrated stretch sensor to measure the exact motion of your arm? Or a floor tile with a printed moisture sensor? All of these are demonstrated by the team, but we’re sure our readers can come up with many more ideas.

Of course, drawing circuits using conductive ink is not a new idea: previous projects either relied on drawing the entire thing by hand, or used traditional inkjet printers. But the Print-a-Sketch’s sophisticated hardware and software really put it in a league of its own. And since the entire design is open-source, you can simply build one and bring your ideas to life.

Continue reading “Print-a-Sketch Turns Any Surface Into A Printed Circuit Board”

Accurately Track Your Mains Frequency

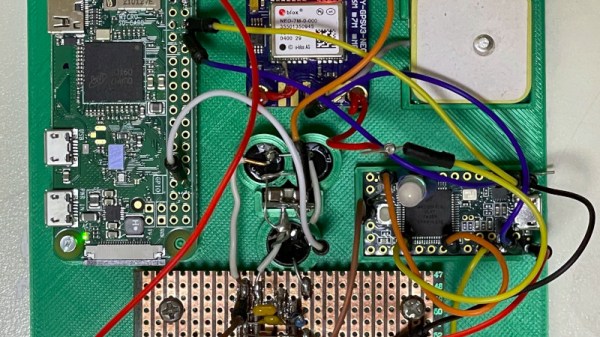
Depending upon where in the world you live, AC mains frequency is either 50Hz or 60Hz, and that frequency is maintained accurately enough over time that it can be used as a time reference for a clock. Oddly it’s rarely exactly that figure though, instead it varies slightly with load on the network and the operators will adjust it to keep a constant frequency over a longer period. These small variations in frequency can easily be measured, and [jp3141] has created a circuit that does exactly that.

It’s a surprisingly straightforward device, in which a Teensy takes its power supply from a very conventional if now a little old-school mains transformer, rectifier, and regulator. A sample of the AC from the transformer passes through a low-pass filer and a clamp, and thence to the Teensy where it is fed into one of the on-board comparators from which its period is measured using one of the timers. Even then the on-board crystal isn’t considered accurate enough, so it is in turn disciplined by a 1 pulse per second (PPS) signal from a GPS receiver.

The Teensy then reports its readings over a serial line every five seconds to a Raspberry Pi, which collates and graphs the data. In case you are wondering what the effect of mains frequency variations might be, we once covered the story of how an entire continent lost six minutes.

A Hombrew Retro Laptop

We feel bad when we see a retrocomputer project and think, “Hey! That’s not that old.” But, usually, when we think about it, it really is. Take the Penkesu. It looks like one of the little organizer computers that were popular — ok — a long time ago.

Inside is a Raspberry Pi Zero 2W, a 7.9 inch 400×1280 screen and a 48-key mechanical keyboard. Unsurprisingly, the case is mostly 3D printed, but it does use Gameboy Advance SP hinges.

Continue reading “A Hombrew Retro Laptop”

Printing Magnets

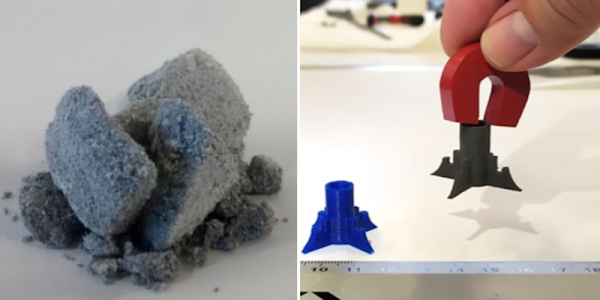
A research center in Spain has been working on ways to solve recent supply chain issues. One of these issues is a shortage of materials to make magnets. Their answer? Recycle ferrite residue by treating it and mixing it with ABS for 3D printing.

The mixing of ferrite with a polymer isn’t the key though, instead the trick is in the processing. The team collected strontium ferrite waste and ground it to a powder. Heating to the point of calcination (about 1000C) creates a superior material with a 350% increase in coercitivity and a 25% increase in remanence over the original waste material.

Continue reading “Printing Magnets”

As Fast As A Speeding Bullet

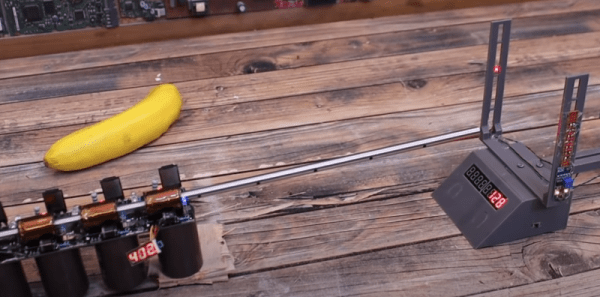
[Electronoobs] built a coil gun and the obvious question is: how fast is the projectile? To answer it, he built a chronograph suitable for timing a bullet. The principle is straightforward. A laser and a light sensor would mark the entry and exit of the projectile over a known distance. As it turns out, there are some issues to resolve.

For one thing, a laser is too narrow and might miss the projectile. The first attempt to rectify this used mirrors, but the loss was too great — we suspect he was using a second surface mirror. The final answer was to use an array of detectors and removed the laser’s collimation lens to cover a wider area.

Continue reading “As Fast As A Speeding Bullet”

A Solari Mechanical Digital Clock Hack With A Little Extra

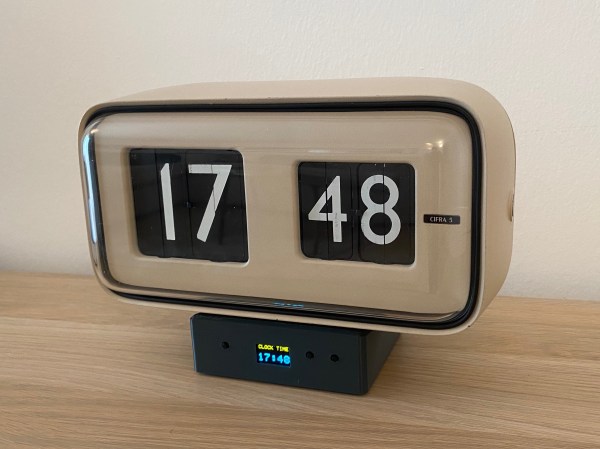
[Alfredo Cortellini] was perusing an antique shop in Bologna, and came across a nice example of a late 1950s timepiece, in the shape of a Solari Cifra 5 slave clock, but as the shop owner warned, it could never tell the time by itself. That sounded like a challenge, and the resulting hack is a nice, respectful tweak of the internals to bring it into the modern era. Since the clock requires a single pulse-per-minute in order to track time, the simplest track often followed is to open the back, set the correct time manually by poking the appropriate levers, and then let an external circuit take over clocking it. [Alfredo] wanted autonomy, and came up with a solution to make the thing fully adjust itself automatically.

Electronics-wise, initial prototyping was performed with a Nucleo 32 dev board and a pile of modules, before moving to a custom PCB designed in Altium Designer. An STM32G031 runs the show, with a few push buttons and a SSD1306 OLED display forming the UI.

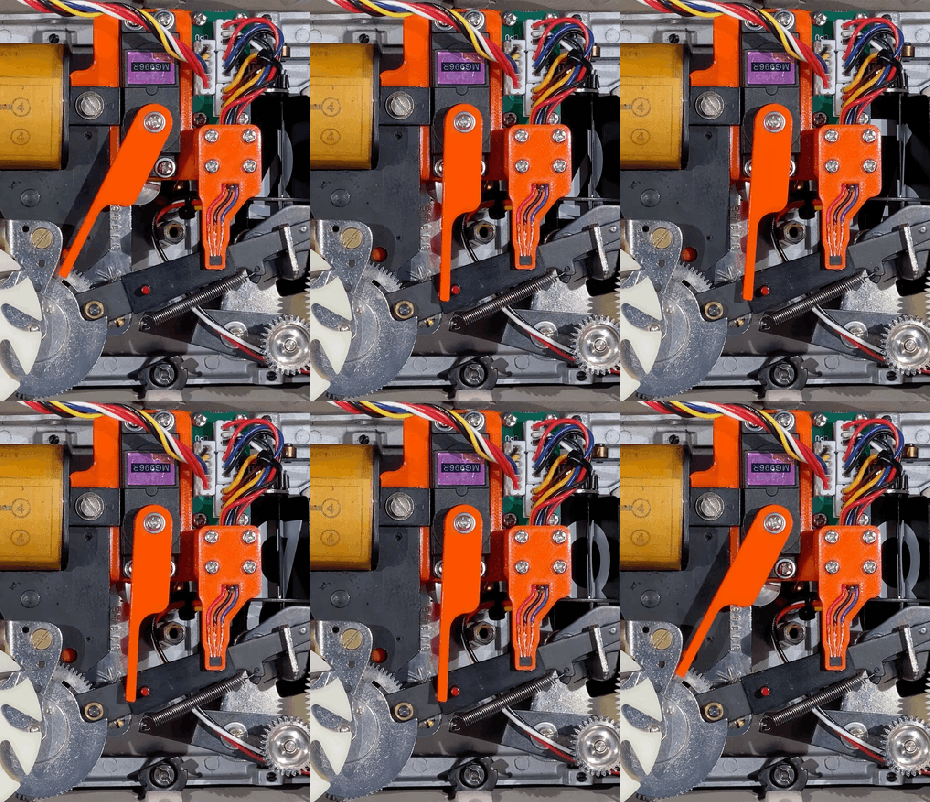
Using some strategically-placed magnets and hall effect sensors, the status of the internal mechanism could be determined. Minute advancements were effected by driving the clock’s 24V electromagnet with a DRV8871 motor driver IC, the power supply for which was generated from the USB supply via a TPS61041 boost converter. In order to synchronise the mechanism with the electronics, the unit could have been driven to advance a minute at a time, but since every hour would need sixty pulses, this could take a while given the limited speed at which that could be done reliably. The solution was to sneak in a crafty MG996R high-torque servo motor, which pushes on the hour-advancement lever, allowing the unit to be zeroed much faster. Sensing of the zero-hour position was done by monitoring the date-advance mechanism, that is not used in this model of clock. Once zeroed, the clock could then be advanced to the correct time and kept current. Firmware source, utililising FreeRTOS can be found on the project GItHub, with schematics and Fusion360 files on the Hackaday.IO project linked above.

If you were thinking you’ve seen these Solari soft-flap displays here before, you’d be quite correct, but if you’re not so much interested in marking the passage of time, but bending such devices to your other indication whims, we’ve got you covered also.

Continue reading “A Solari Mechanical Digital Clock Hack With A Little Extra”