LayerLapse Simplifies 3D Printer Time-lapse Shots

We know you’ve seen them: the time-lapses that show a 3D print coming together layer-by-layer without the extruder taking up half the frame. It takes a little extra work compared to just pointing a camera at the build plate, but it’s worth it to see your prints materialize like magic.

Usually these are done with a plugin for OctoPrint, but with all due respect to that phenomenal project, it’s a lot to get set up if you just want to take some pretty pictures. Which is why [Whopper Printing] put together the LayerLapse. This small PCB is designed to trigger your DSLR or mirrorless camera once its remotely-mounted hall effect sensor detects the presence of a magnet.
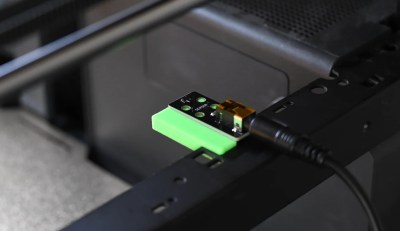
The remote hall effect sensor.

The idea is that you just need to stick a small magnet to your extruder, add a bit of extra G-code that will park it over the sensor at the end of each layer, and you’re good to go. There’s even a spare GPIO pin broken out should you want to trigger something else on each layer of your print. Admittedly we can’t think of anything else right now that would make sense, other than some other type of camera, but we’re sure some creative folks out there could put this feature to use.

Currently, [Whopper Printing] is selling the LayerLapse as a finished product, though it does sound like a kit version is in the works. There’s also instructions for building a DIY version of the hardware using your microcontroller of choice. Whether you buy or build the hardware, the firmware is available under the MIT license for your tinkering pleasure.

Being hardware hackers, we appreciate the stand-alone nature of this solution. But if you’re already controlling your printer through OctoPrint, you’re probably better off just setting up one of the available time-lapse plugins.

Cyanotype Prints On A Resin 3D Printer

Not that it’s the kind of thing that pops into your head often, but if you ever do think of a cyanotype print, it probably doesn’t conjure up thoughts of modern technology. For good reason — the monochromatic technique was introduced in the 1840s, and was always something of a niche technology compared to more traditional photographic methods.

The original method is simple enough: put an object or negative between the sun and a UV-sensitive medium, and the exposed areas will turn blue and produce a print. This modernized concept created by [Gabe] works the same way, except both the sun and the negative have been replaced by a lightly modified resin 3D printer.

A good chunk of the effort here is in the software, as [Gabe] had to write some code that would take an image and turn it into something the printer would understand. His proof of concept was a clever bit of Python code that produced an OpenSCAD script, which ultimately converted each grayscale picture to a rectangular “pixel” of variable height. The resulting STL files could be run through the slicer to produce the necessary files to load into the printer. This was eventually replaced with a new Python script capable of converting images to native printer files through UVtools.

On the hardware side, all [Gabe] had to do was remove the vat that would usually hold the resin, and replace that with a wooden lid to both hold the UV-sensitized paper in place and protect the user’s eyes. [Gabe] says there’s still some room for improvement, but you wouldn’t know it by looking at some of the gorgeous prints he’s produced already.

No word yet on whether or not future versions of the project will support direct-to-potato imaging.

A guy's leg encased in a 3D printer showing a fresh printed tattoo

Do, Dare Or Don’t? Getting Inked By A 3D Printer

This unusual tattoo hack by [Emily The Engineer] is not for the weak of heart, but let’s be frank: we kind of know her for that. And she gives out a warning, albeit at a good 10 minutes in, to not do this at home. What she’s about to do takes creativity and tech obsession to the next level: to transform a 3D printer into a functional tattoo machine. Therefore, [Emily] ingeniously modified one of her standard 3D printers to operate two-dimensionally, swapped its plastic extruder for a tattoo gun, and, yes, even managed to persuade a willing participant to try it out.

The entire process can be seen in [Emily]’s video below, which humorously yet meticulously documents the journey from Sharpie test runs to actually inking skin. Aside from a lot of tongue-in-cheek trial and error, this project requires a sheer amount of problem-solving. [Emily] employs firmware edits to bypass safety checks, and clever hardware adaptations to ensure smooth transitions between strokes. One impressive upgrade is the emergency solenoid system, a literal panic button to stop the machine mid-tattoo in case of trouble—a critical addition for something with needles involved!

This hack sits on the edge of DIY body modification, raising eyebrows and technical questions alike. If you missed the warning and are now frantically searching for tattoo removal options, know we’ve covered some (but you might be rightfully scared of automating that, too, at this point). If you haven’t lifted a finger while reading this, just do the safe thing: watch [Emily]’s video, and tinker about the subsequent purposes this discovery creates for 3D printing or tattoo art.

Continue reading “Do, Dare Or Don’t? Getting Inked By A 3D Printer”

Time Vs Money, 3D Printer Style

A few months ago, Hackaday’s own Al Williams convinced me to buy a couple of untested, returned-to-manufacturer 3D printers. Or rather, he convinced me to buy one, and the incredible success of the first printer spurred me on to the second. TL;DR: Lightning didn’t strike twice, but I’d still rate it as worth my time. This probably isn’t a good choice for your first printer, but if you’ve done the regular maintenance on your first printer already, I’d recommend it for your second or twelfth.

As background, Al has been volunteering with local schools to teach a 3D printing summer class, and this means outfitting them with a 3DP lab on the dirt cheap. His secret is to buy last year’s model which has all of the features he needs – most importantly for the kids, automatic bed height probing – but to buy it from the scratch-and-dent shelf at Creality. Why? Because they are mid-grade printers, relatively new, but on deep discount.

How deep? I found an essentially endless supply of printers that retail for $300 on discount for $90 each. The catch? It might work, it might not. I bought my son one, because I thought that it would at least make a good project for us to work on together. Those plans were spoiled – it worked absolutely flawlessly from the moment we bolted it together, and he runs 24-hour jobs on the thing without fear. From the look of the build plate, it had been used exactly once and returned for whatever reason. Maybe the owner just didn’t want a 3D printer?

The siren song of straightforward success was too much for me to resist, and I picked another up to replace my aging A8 which was basically a kit for a 3D printer, and not a particularly good one at that, but could be made to work. My scratch-and-dent Creality came with a defective bed-touch sensor, which manifest itself as a random absolute refusal to print.

I took it apart, but the flaw is in the design of the V1 touch sensors – the solenoid requires more current to push down than the 3DP motherboard can reliably deliver. It works 100% of the time on my bench power supply, but in situ it fails about 30% of the time, even after hitting it with graphite and making sure everything is mechanically sound. Creality knows this and offers a free trade-in, just not for me. The new version of the Creality probe costs $50 new, but you can get cheap knock-off BL Touch models for $14. Guess what I did?

And guess what bit me? The cheapo touch probe descends a bit slower than the Creality version should, and the firmware is coded to time-out in an extra-short timeframe. Thankfully, Creality’s modifications to Marlin are all open source, and I managed to tweak and flash a new firmware that made it work 100% of the time, but this was at a cost of probably eight hours of bug-hunting, part-ordering, and firmware-compiling. That said, I got some nice extra features along the way, which is the advantage of a printer running open-source firmware.

So my $300 printer cost me $105, plus eight hours of labor. I only charge one coffee per hour for fun hardware debugging tasks, but you may have a different valuation. Taken together with my son’s printer, we have $600 worth of printer for under $200 plus labor, though, which starts to sound a little better.

Is gambling on an untested return 3D printer worth it? For us, I would say it was, and I’d do it again in a few years. For now, though, we’ve got three printers running and that’s all we need. Have you gone down this perilous path?

Open Source Lemontron 3D Printer Is Ready To Build

In this era of cheap turn-key machines, the idea of actually building your own desktop 3D printer might seem odd to some. But if you’re looking for a challenge, and want to end up with a printer that legitimately sets itself apart from what they’re stocking on Amazon these days, then take a look at the Lemontron.

We’ve been keeping tabs on the development of this open source 3D printer for some time now, and just before Christmas, the files finally were released for anyone who wants to try putting one together themselves. There’s currently no formal kit available, but once you’ve printed out all the parts, there’s a very nice bill of materials you can find on the website which will tell you everything you need to complete the assembly — and critically — where you can get it.

Continue reading “Open Source Lemontron 3D Printer Is Ready To Build”

Old 3D Printer Parts Repurposed Into DIY Camera Slider

What do you do with an old 3D printer? They’re full of interesting components, after all, from switches and motors to lovely smooth rails. [Mukesh Sankhla] had a great idea—why not repurpose the components into a motorized camera slider?

The heart of the slider is the 4020 V-slot aluminum profile. It’s upon this that the camera carriage rides, running on rubber rollers to keep things smooth. A stepper motor and belt are then used to move the slider at a constant speed up or down the rail while the camera gets the necessary shot. The build relies almost entirely on salvaged components, save for an ESP32, OLED screen, and a few buttons to act as the control interface. There are also the TMC2208 stepper motor drivers, of course, but they came from the salvaged Ender 3 unit as well.

This is a classic project. Many old 3D printers have pretty much the perfect set of parts to build a camera slider, making this build a no-brainer. Indeed, others have tread the same path. There are plenty of other potential uses around the lab or for soldering.

Meanwhile, the proof is in the pudding. Scope the slider’s performance in the video below.

Continue reading “Old 3D Printer Parts Repurposed Into DIY Camera Slider”

3D Printer Eliminates The Printer Bed

Anyone who has operated a 3D printer before, especially those new to using these specialized tools, has likely had problems with the print bed. The bed might not always be the correct temperature leading to problems with adhesion of the print, it could be uncalibrated or dirty or cause any number of other issues that ultimately lead to a failed print. Most of us work these problems out through trial and error and eventually get settled in, but this novel 3D printer instead removes the bed itself and prints on whatever surface happens to be nearby.

The printer is the product of [Daniel Campos Zamora] at the University of Washington and is called MobiPrint. It uses a fairly standard, commercially available 3D printer head but attaches it to the base of a modified robotic vacuum cleaner. The vacuum cleaner is modified with open-source software that allows it to map its environment without the need for the manufacturer’s cloud services, which in turn lets the 3D printer print on whichever surface the robot finds in its travels. The goal isn’t necessarily to eliminate printer bed problems; a robot with this capability could have many more applications in the realm of accessibility or even, in the future, printing while on the move.

There were a few surprising discoveries along the way which were mentioned in an IEEE Spectrum article, as [Campos Zamora] found while testing various household surfaces that carpet is surprisingly good at adhering to these prints and almost can’t be unstuck from the prints made on it. There are a few other 3D printers out there that we’ve seen that are incredibly mobile, but none that allow interacting with their environment in quite this way.

Continue reading “3D Printer Eliminates The Printer Bed”