10-Foot High 3D Printer Based On Ender 3

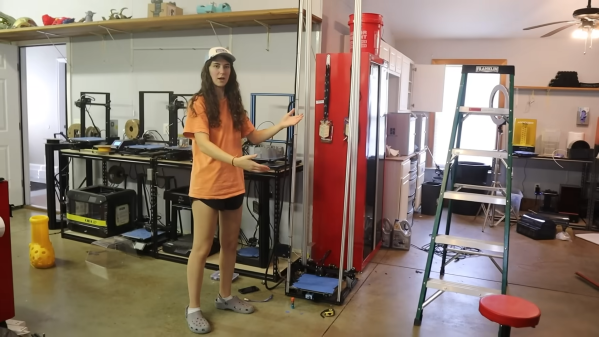
There are two main ways to 3D print large things. You can either make lots of small 3D prints and stick them together, or you can use a larger 3D printer. [Emily the Engineer] went the latter route by making her Ender 3 a full 10 feet tall.

The best Doug Dimmadome hat we’ve seen in a while, printed on the 10-foot Ender 3. If you’re unfamiliar, Doug Dimmadome is the owner of the Dimmsdale Dimmadome.

The Ender 3’s modular construction made this feat straightforward in the early steps. The printer was simply disassembled, with longer aluminium extrusions bolted in their place. New wheels were resin printed via Onshape to to run along the new extrusions, which were of a slightly different profile to the original parts. Wiring was also a hurdle, with the 10-foot printer requiring a lot longer cables than the basic Ender 3.

An early attempt to make the Z-axis work with a very long threaded rod failed. Instead, a belt-driven setup was subbed in, based on existing work to convert Ender 3s to belt drive. With a firmware mod and some wiring snarls fixed, the printer was ready to try its first high print. Amazingly, the printer managed to complete a print at full height, albeit the shaking of the tall narrow print lead to some print quality issues. The frame and base were then expanded and some struts installed to add stability, so that the printer could create taller parts with decent quality.

While few of us would need a 10-foot high Ender 3, it’s easy to see the value in expanding your printer’s build volume with some easy mods. [Emily] just took it to the extreme, and that’s to be applauded. Video after the break.

Continue reading “10-Foot High 3D Printer Based On Ender 3”

Looking Inside A 3D Printer Nozzle With Computed Tomography

Have you ever wondered what’s actually going on inside the hotend of your 3D printer? It doesn’t seem like much of a mystery — the filament gets melty, it gets squeezed out by the pressure of the incoming unmelty filament, and lather, rinse, repeat. Or is there perhaps more to the story?

To find out, a team from the University of Stuttgart led by [Marc Kreutzbruck] took the unusual step of putting the business end of a 3D printer into a CT scanner, to get a detailed look at what’s actually going on in there. The test setup consisted of a Bondtech LGX extruder and an E3D V6 hot end mounted to a static frame. There was no need for X-Y-Z motion control during these experiments, but a load cell was added to measure extrusion force. The filament was a bit specialized — high-impact polystyrene (HIPS) mixed with a little bit of tungsten powder added (1% by volume) for better contrast to X-ray. The test system was small enough to be placed inside a micro CT scanner, which generated both 360-degree computed tomography images and 2D radiographs.

The observations made with this experimental setup were pretty eye-opening. The main take-home message is that higher filament speed translates to less contact area between the nozzle wall and the melt, thanks to an air gap between the solid filament and the metal of the nozzle. They also saw an increased tendency for the incoming filament to buckle at high extruder speeds, which matches up with practical experience. Also, filament speed is more determinative of print quality (as measured by extrusion force) than heater temperature is. Although both obviously play a role, they recommend that if higher print speed is needed, the best thing to optimize is hot end geometry, specifically an extended barrel to allow for sufficient melting time.

Earth-shattering stuff? Probably not, but it’s nice to see someone doing a systematic study on this, rather than relying on seat-of-the-pants observations. And the images are pretty cool too.

Silencing A 3D Printer With Acoustic Foam Isn’t That Easy

3D printers are supremely useful tools, but their incessant whining and droning can be distracting and tiresome. [Handy Bear] decided to try some simple ways to quieten down their printer using acoustic foam, with mixed results.

The video starts by exploring two different acoustic foams; one black, one white. The latter was found to hold a flame when ignited, making it a poor choice for a 3D printer with many hot components. The black foam, advertised for use in automotive installations, was reluctant to burn at all, and so made a safer choice.

The UP Mini 3 printer is then disassembled to receive its soundproofing treatment. The printer’s various panels all got a healthy lashing of thick sticky insulating foam. This took some work, thanks to the need to cut around various ribs and screw bosses on the panels. Cut appropriately, though, the printed was able to be reassembled neatly with its foam hidden inside.

Unfortunately, the work didn’t have a great effect on the printer’s sound output. That’s perhaps unsurprising, given it still has uninsulated panels like the front window which are still free to radiate sound. The foam did help cut down on fan noise and high-pitch sounds from the printer, but the annoying medium and low pitched noises from the printer’s motors were still very audible.

Using an enclosure or a quieter stepper driver are probably more effective DIY methods to quiet a noisy printer; share your own ideas in the comments. Video after the break.

Continue reading “Silencing A 3D Printer With Acoustic Foam Isn’t That Easy”

Hackaday Prize 2023: Gen5X A Generatively Designed 5-Axis 3D Printer

[Ric Real] is entering the 2023 Hackaday Prize with the Gen5X, a generatively designed 3D printed five-axis 3D printer. The concept is not a new one, with the type of construction being seen a few times here and there. In addition to the usual three directions of motion, we’re familiar with, with the cartesian bot design, these types of machines add an additional two rotation axes, one which can swing the build platform front and back around the X-axis, and a second that provides rotation around the Z-axis. These combined motions give rise to some very interesting capabilities, outside of our familiar 3D printing design constraints.

As for the generative side of things, this is a largely theoretical idea. Essentially the concept is that the machine’s design can be iteratively updated and optimised for performance to fit into the constraints of available hardware such as motors and other ‘vitamins’ needed to create the next generation of machines. The design files should be parameterised enough such that this optimisation process can be automated, potentially via input from AI, but we suspect we’re a way off from that yet. Whether this project as yet satisfies any of these lofty goals remains to be seen, but do keep an eye on it if you’re so inclined. There is a Fusion 360 project here to dig into, but if you’re not interested in the research side of the project, but just want to build a 5-axis machine to play with, then you can find the project source on the GitHub Page.

If this feels familiar, you’d be on the right track, as we covered at least one other 5D printer recently. We have also touched upon generative design at least once. We’re sure we will see more on this topic in the future.

Continue reading “Hackaday Prize 2023: Gen5X A Generatively Designed 5-Axis 3D Printer”

Checking Belt Tension Gets Easier For (Some) Prusa 3D Printers

Belts on a 3D printer should be tight enough, but not too tight. That can be an iffy thing to get right for someone who lacks familiarity with CNC platforms. Prusa Research aims to make it a bit easier with a web app that can measure tension via your mobile phone’s microphone and diagnose belt tightness, at least for their MK4 and XL printers.

Using different tools to analyze belt tightness (including belt acoustics) have been tried in the past with mixed results, but this is a pretty focused approach that aims to give exact guidance for specific printer models. It’s pretty useful to provide someone with a reliable go/no-go number, after all.

What happens to a printer if a belt’s tension is not right? Well, there’s actually a pretty forgiving range within which the printer will mostly work fine, but not as well as it could be. Loose belts can have novices chasing other problems, and overly-tightened belts definitely put extra strain on parts. It’s one of those things that’s worth a little extra work to get right.

3D printable tension meter is a different option for Prusa MK3 and Mini printers, if one has some Prusament PETG to print it in.

Everything about belt tension for Prusa printers is covered in their documentation, but did you know there’s also neat 3D printable tension meter for Prusa MK3 and Mini printers? It’s meant to be printed in Prusament PETG (printing in other materials may have different results) but it’s a pretty neat idea for a tool.

If you have a Prusa MK4 or XL and want to try their new method, go here and allow access to your device’s microphone. Then select a printer model and an axis to test. Gently strum the upper part of the belt (avoid touching the bottom belt in the process) and watch live results telling you whether the belt is too tight, too loose, or just right. Prusa have a video demonstrating the process, also embedded below.

Continue reading “Checking Belt Tension Gets Easier For (Some) Prusa 3D Printers”

Take A PEEK At This 3D Printer

Normally, when you think of PEEK in 3D printing, you think of a part made of PEEK, suitable for lower-temperature plastics. [ND-3D] has a different idea: printing with PEEK. You can get the details over on Hackaday.io, and there are a few YouTube videos below. Using a special controller and a halogen lamp, you can modify your own printer to use this exotic material often found in printer hot ends.

Logically, if PEEK is used near the hot end of regular printers, it must need a higher temperature to print. PEEK has a glass transition temperature of about 143 °C and melts at 343 °C. Compare this to PLA, which melts between 150 °C and 180 °C and has a glass transition temperature of only 60 °C.

Continue reading “Take A PEEK At This 3D Printer”

Metal Forming With A 3D Printer

How do you use a 3D printer to bend metal? One way would be to take it to a machine shop and offer to trade the owner your printer for some time in their shop. A smarter way is to do like [Jaba 3D], and print dies using the printer. You can then use those dies in a press to make the shapes you want.

In the case of [Jaba], the Harbor Freight press uses a hydraulic cylinder to develop about 6 tons of pressure. We don’t think Harbor Freight carries this particular press, but for between $150 and $250, you can get a 12-20 ton press, and, of course, there are other suppliers, as well.

The target object, in this case, was an automotive bracket. The process of grabbing an image, converting it to an SVG, and then creating a 3D part has many uses. Apparently, PLA is sufficient for this purpose, although the print uses ten top and bottom layers along with 80% infill. That does make the prints take a long time.

As you might expect, the dies don’t last very long. In this case, they needed two shots, and they got them, but PLA is probably not the right material if you wanted to go for mass production.

Metal forming does occur at large scales, too. If you want to make your own press-forming tools, we have advice for you.