The Feather “FAUXBERRY” Is Now A Real Thing

Last month we featured an interesting project from Hackaday.io that was essentially trying to recreate the iconic Blackberry form factor for use with Adafruit’s line of Feather development boards. This would let you drop in modules for everything from LTE to packet radio, opening up a nearly limitless possibilities for handheld hacking. The only problem was, it didn’t actually exist yet.

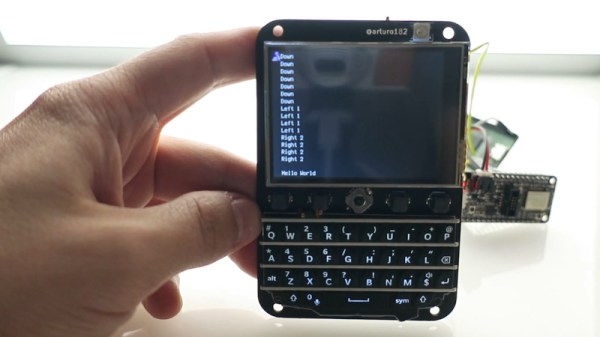
But recently creator [arturo182] wrote in to tell us that not only had all the parts arrived, but that he’d completed assembly of the first prototype. He even put together a video about the current status of the device, which you can see after the break. The short version is: it works, and it looks fantastic.

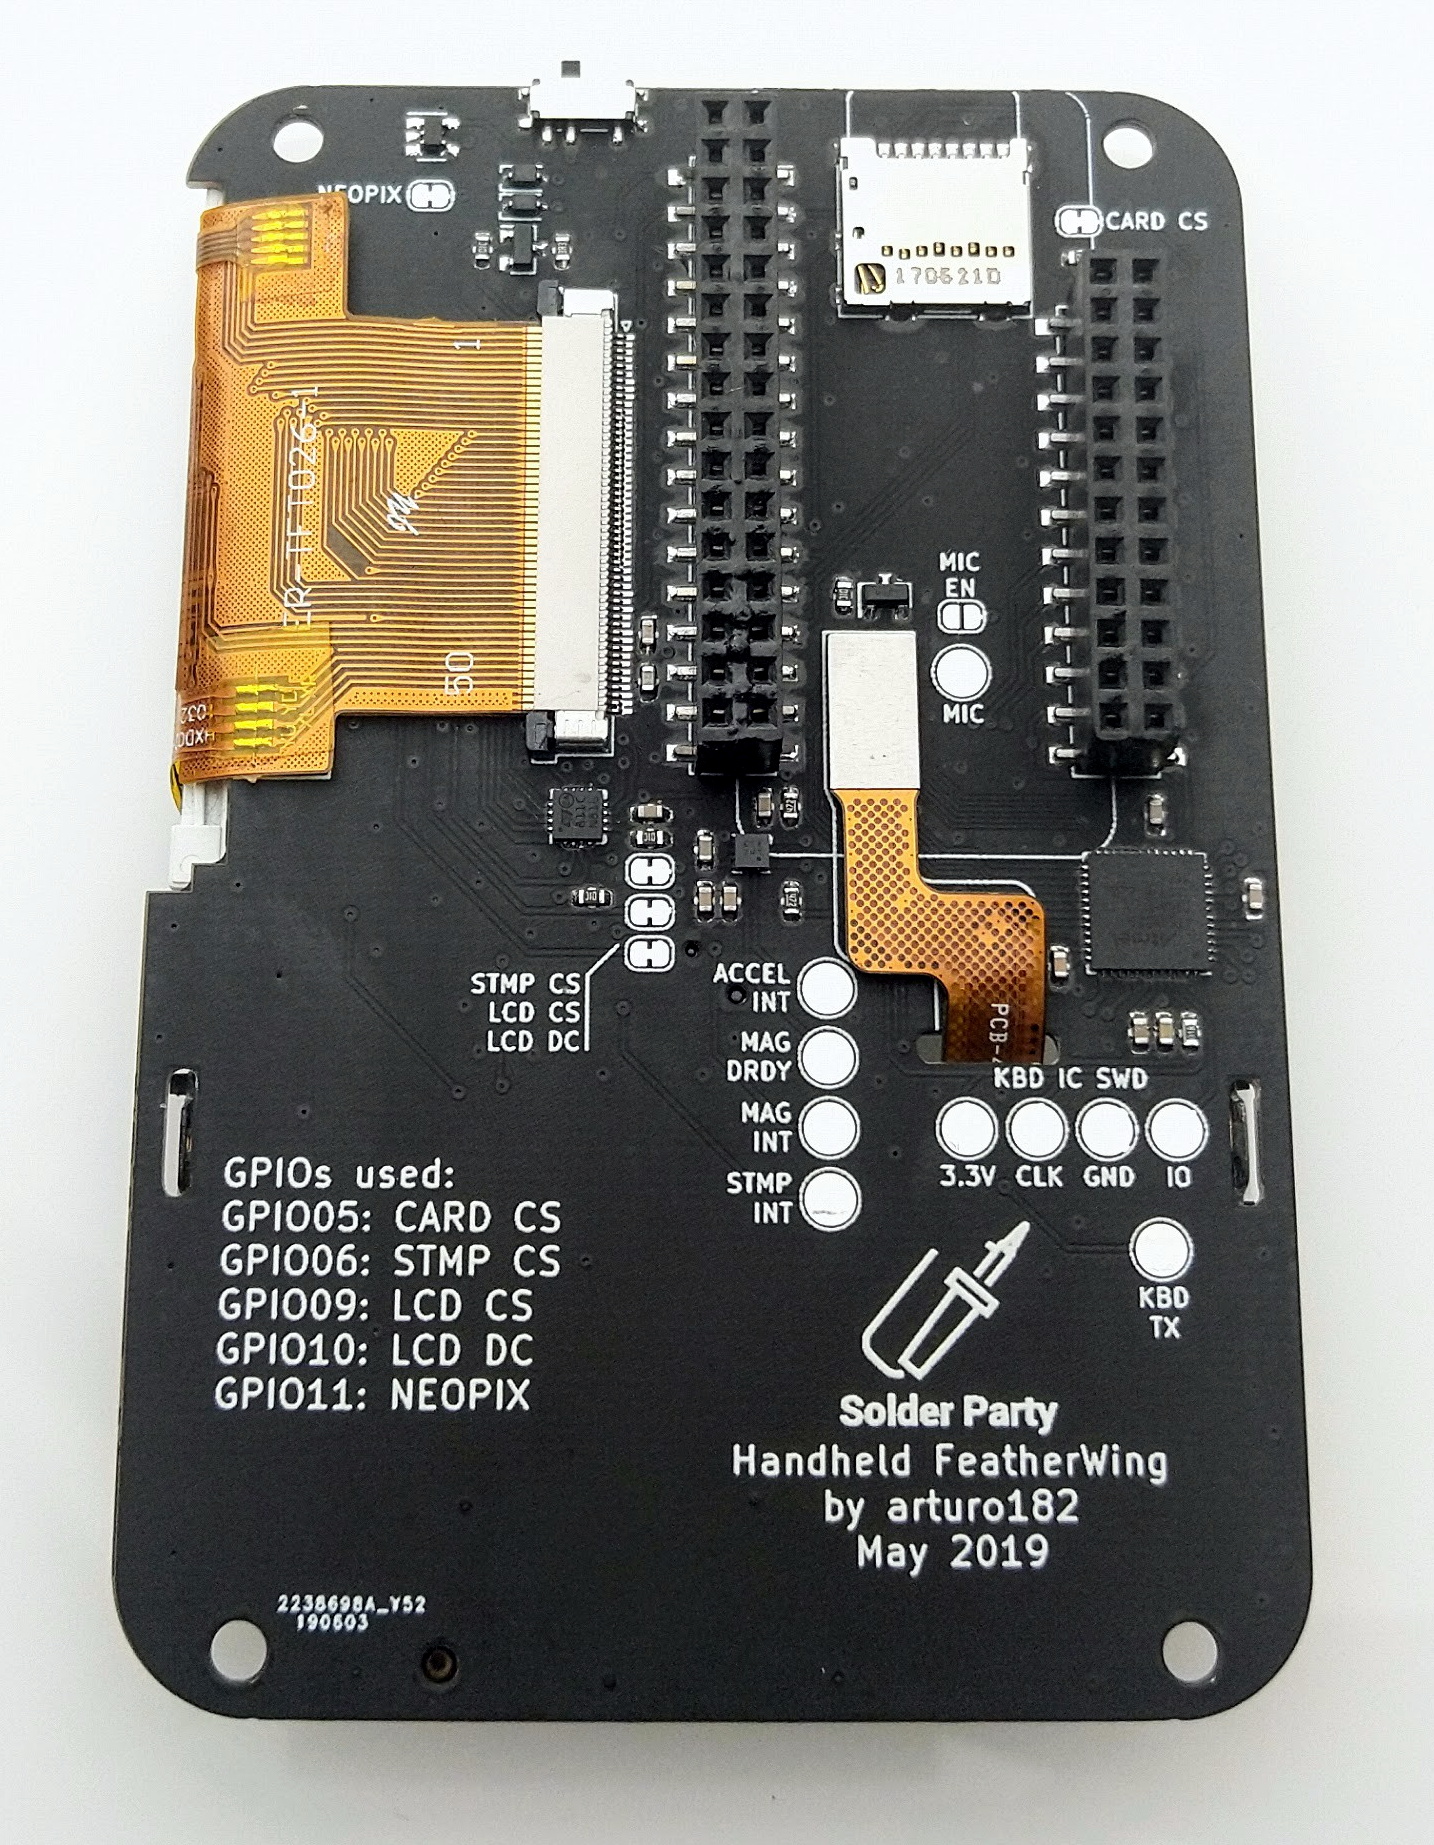
For those who might not have seen this project the first time around, the front features a 2.6 inch 320×240 touch screen display, four general purpose buttons, a RGB NeoPixel LED for visual status display, a five way joystick, and what’s arguably the star of the show, a QWERTY keyboard originally designed for the Blackberry Q10. Around the back it has an SD card slot, a socket for the Feather module of your choice, and some handy GPIO expansion pads you can attach your own hardware onto.

[arturo182] says he’s looking at a couple cosmetic changes, but on the whole, everything works and he considers the PCB essentially done. He’ll soon be sending out a handful of test units to individuals who’ve expressed interest in helping him develop the project and then…well, he’s not really sure what’s going to happen then. Some kind of commercial release seems like the logical conclusion given the interest he’s already seen in the project, but he hasn’t quite worked out whether that will be a kit or as assembled devices.

Until then, anyone who’s looking for a pocket sized device that will let them bang out some Python with a physical keyboard will have to stick with their TI-83s.

Continue reading “The Feather “FAUXBERRY” Is Now A Real Thing”

That TRS Jack On Your Graphing Calculator Does More Than You Think

It’s not Apple IIs, and it’s not Raspberry Pis. The most important computing platform for teaching kids programming is the Texas Instruments graphing calculator. These things have been around in one form or another for almost three decades, and for a lot of budding hackers out there, this was the first computer they owned and had complete access to.

As hacking graphing calculators is a favorite for Maker Faires, we were pleased to see Cemetech make it out to this year’s World Maker Faire in New York last weekend. They’re the main driving force behind turning these pocket computers with truly terrible displays into usable computing platforms.

As you would expect from any booth, Cemetech brought out the goods demonstrating exactly what a graphing calculator can do. The most impressive, at least from a soldering standpoint, is their LED cube controlled by a graphing calculator. The electronics are simple, and just a few 595s and transistors, but this LED cube is taking serial data directly from the link cable on a graphing calculator. Of course, the PCB for the LED cube is designed as an Arduino shield for ease of prototyping, but make no mistake: this is an LED cube controlled by a calculator.

If you can send serial data to a shift register from a graphing calculator, that means you can send serial data to anything, bringing us to Cemetech’s next great build featured this year. It’s an N-gauge model train, with complete control over the locomotive.

There’s a lot more to controlling model trains these days than simply connecting a big ‘ol variac to the tracks. This setup uses Direct Cab Control (DCC), a system that modulates commands for locomotives while still providing 12-15V to the tracks. There’s a good Arduino library, and when you have that, you can easily port it to a graphing calculator.

Cemetech is one of the perennial favorites at Maker Faire, and over the years we’ve seen everything from the Ultimate TI-83+ sporting an RGB backlight and a PS/2 port to a game of graphing calculator Whac-A-Mole. It’s all a great example of what you can do with the programmable computer every 90s kid had, and an introduction to computer programming education, something Cemetech is really pushing out there with some hard work.

Bear McCreary's floppy music for Revolt

Floppy Drive Music By Emmy Winning Composer

We’ve featured a lot of awesome music made using floppy drives before, but this is the first time we’ve seen it used as the main instrument in a movie score, and by Emmy winning composer [Bear McCreary]. The movie, in this case is alien invasion film, Revolt, but you’ve surely heard Bear’s amazing work in the reimagined Battlestar Galactica series, The Walking Dead, Terminator: The Sarah Connor Chronicles (my favorite of his), or the one for which he won an Emmy, Da Vinci’s Demons wherein the main theme sounds the same backwards as forwards, to name just a few. So when someone of [Bear]’s abilities makes use of floppy drives, we listen.

[Bear] works with a team, and what they learned was that it’s a clicking sound which the drives make that we hear. It’s just so fast that it doesn’t come across as clicks. The speed at which the clicks are made determines the pitch. And so to control the sound, they control the floppy drives’ speed. They also found that older floppy drives had more of the type of sound they were looking for than newer ones, as if floppy drives weren’t getting hard to find as is. In the end, their floppy orchestra came out to around twelve drives. And the result is awesome, so be sure to check it out in the video below.

Continue reading “Floppy Drive Music By Emmy Winning Composer”

Hackaday Links Column Banner

Hackaday Links: September 3, 2017

The TI-83, TI-84, and TI-86 have been the standard graphing calculators in classrooms for two decades. This is the subject of an xkcd. Now, hopefully, there’s a contender for the throne. Numworks is a graphing calculator that looks like it was designed in at least 2006 (so very modern), and apparently, there’s a huge community behind it.

Juicero is shutting down. No one could have seen this one coming. The Juicero was a $700 press that turned proprietary, DRM’ed juice packs into juice and garbage. It was exquisitely engineered, but it turns out very few people want to spend thousands of dollars per year on DRM’ed juice. Oh, since the Juicero phones home, those $700 presses probably won’t work in the future.

Are you in the Bay area? Do you need test equipment? There’s a gigantic auction happening somewhere around San Jose. [Dave] tipped everyone off to this one, and this auction is pretty freakin’ spectacular. Spectrum analyzers, signal gens, a ‘mega zoom’ oscilloscope, and 4-channel, 500 MHz scopes for $50. There are a thousand lots in this auction. It’s nuts.

Everybody loves PCB art, and [Uri] has a guide for designing custom, functional electronic circuit boards. The toolchain used in this guide is Inkscape and KiCad, with blinky hearts, blinky pandas, and other blinky PCBs.

This one is a little out there even for us. Here’s how you build your own AA batteries. It’s a dozen #10 copper washers, a dozen or so #10 zinc washers, some cardboard, vinegar, salt, and some heat shrink tubing. The assembly of this battery is exactly what you would expect, and yes, it does work. Here’s the thing, though: The very crude tests suggest these batteries have a capacity of about 800-1000 mAh, which is far more than we would expect. Who has a programmable load and wants to do a few experiments? Also, these batteries are ‘rechargeable’ by taking them apart, sanding the crud off each washer, and adding new electrolyte.

[Jan] has made a name for himself stuffing synthesizers into tiny little microcontrollers. The latest project is the Infinity37, a polyphonic synth with MIDI, envelopes, and a whole bunch of cool stuff. Check out the video.

[rctestflight] is building a solar powered aircraft. It’s has a beautiful wing studded with solar panels. The latest flight was four hours, long enough to make piloting a plane through some FatSharks extremely tedious. Future developments will probably include a MPPT charging solution, and probably an autopilot.

The Connected Calculator With ESP8266

Calculator hacks have been around for a while now and we have seen the most action around the Texas Instruments TI-83 and TI-84. When [johnkimdinh] found a way to add an ESP8266 to a scientific calculator (machine translation) and this time around it’s a Kenko FX-82M calculator which appears eerily similar to the Casio FX-82M.

In his video, [johnkimdinh] demonstrates his hack which has a web interface for transmitting numbers to the calculator. This is accomplished by accessing the keypad using the ESP8266 GPIOs and it is essentially the equivalent of typing remotely. The rest of the circuit remains intact so bit more work and the other functions should be available remotely as well.

Perhaps this hack is best suited as a dedicated display for outputting measurements and other data which requires some type of post-processing to be human readable. If the next iteration delivers the ability to read from the display we’ll really be getting somewhere. We envision such calculators being used as the future of education where the connectivity is used to retrieve an array of real time parameters for assignments. Add a few sensors into the mix and it could be the next big thing for STEM.

In the past, we have had calculators brought to life to do vector and matrix math and ESP8266s connected to TI-84 calculators. After all, everyone has calculators, they simply must be hacked!

Continue reading “The Connected Calculator With ESP8266”

Android Donut Running On A Graphing Calculator

[Josh] is trying to fight a misconception that Android only runs on fast, powerful smartphones. He’s convinced Android will run on extremely low-end hardware, and after a great deal of searching, hit upon a great combination. He’s running Android Donut on a TI nSpire CX graphing calculator.

Unlike just about every other TI calculator, homebrew developers are locked out of the nSpire CX and CX CAS. Without the ability to run native applications on this calculator, [Josh] would be locked out of his platform of choice without the work of the TI calculator community and Ndless, the SDK for this series of calculators.

With the right development environment, [Josh] managed to get the full Android stack up and running and ironed the bugs out. Everything he’s done is available on the GitHub for this project, and with the instructions on the xda developers post, anyone can get a version of Android running on this TI calculator.

While [Josh] has Android Donut running along with most of the 1.6 apps, a terminal emulator, keyboard, WiFi, USB, and Bluetooth running, this calculator-come-Android isn’t as useful as you think it would be. The vast majority of calculator emulators on the Google Play store require Android version 2.2 and up. Yes, [Josh] can still run a TI-83 emulator on his calculator, but finding an app that’s compatible with his version of Android is a challenge.

Still, even with a 150MHz processor and 64MB of RAM – far less than what was found in phones that shipped with Donut – [Josh] is still getting surprisingly good performance out of his calculator. He can play some 2D games on it, and the ability to browse the web with a calculator is interesting, to say the least. It is, however, the perfect example that you don’t need the latest and greatest phone to run Android. Sometimes you don’t even need a phone.

ArTICam Interfaces Game Boy Camera With TI Calculators

[Christopher Mitchell] has given Texas Instruments calculators the ability to capture images through a Game Boy Camera with ArTICam. First introduced in 1998, The Game Boy Camera was one of the first low-cost digital cameras available to consumers. Since then it has found its way into quite a few projects, including this early Atmel AT90 based hack, and this Morse code transceiver.

TI calculators don’t include a Game Boy cartridge slot, so [Christopher] used an Arduino Uno to interface the two. He built upon the Arduino-TI Calculator Linking (ArTICL) Library  to create ArTICam. Getting the Arduino to talk with the Game Boy Camera’s M64282FP image sensor turned out to be easy, as there already are code examples available. The interface between the camera sensor and the Arduino is simple enough. 6 digital lines for an oddball serial interface, one analog sense line, power and ground. [Christopher] used a shield to solder everything up, but says you can easily get away with wiring directly the Arduino Uno’s I/O pins. The system is compatible with the TI-83 Plus and TI-84 Plus family of calculators. Grabbing an image is as simple as calling  GetCalc(Pic1) from your calculator program.

So, If you have an old calculator lying around, give it a try to enjoy some 128×123-pixel grayscale goodness!