This Arduino Console Has 64 Bit Graphics

Numbers are wonderful things when applied to technical specifications. Take [Bobricius]’ handheld Arduino-based game console. With an 8×8 LED matrix for a display it’s not going to win any prizes, but while he’s pushing the boundaries of dubious specification claims he’s not strictly telling any lies with his tongue-in-cheek statement that the graphics are 64-bit.

Jokes aside, it’s a neatly done build using a DIP version of the Arduino MCU and all through-hole components on a custom PCB. Power comes from a CR2032 cell, and it includes three buttons and a small piezoelectric speaker. He’s implemented a whole slew of games, including clones of Pong, Breakout, and Tetris, and judging by the video below it’s surprisingly playable.

Now you might look at this console and wonder what the big deal is. After all, there are plenty of similar designs to be found, and it’s nothing new. Of course, it’s a neat project for any hacker or maker, but we can see that this would make a great starter project for the younger person in your life who wants to try their hands at building something electronic. All through-hole construction for easy soldering, and a neat game at the end of it all.

He’s posted a full write-up of the design process as well as the hackaday.io page linked above, so if you fancy building one yourself there’s nothing to stop you too squeezing 64 bits of graphical goodness from an Arduino.

Continue reading “This Arduino Console Has 64 Bit Graphics”

Let’s Make Robots Changes Hands: Kerfuffle Ensues

There’s been a bit of a shakeup at Let’s Make Robots (LMR).

LMR is possibly the most popular DIY robotics website around and was started up by a fun-loving Dane, [Frits Lyneborg]. It grew a large community around building up minimal robots that nonetheless had a lot of personality or pushed a new technical idea into the DIY robotics scene. [Frits] says that he hasn’t had time for DIY robotics for a while now, and doesn’t have the resources to run a gigantic web forum either, so he worked out a deal to let the Canadian hobbyist supply company Robot Shop take it over.

LMR has always been a little bit Wild-West, and many of the members quite opinionated, and that’s been part of its charm. So when the new corporate overlords came in, set up “Rules” (which have seemingly been downgraded to “suggestions”) and clarified the ownership of the content, some feathers were ruffled.

A few weeks later, everything looks to be settling back down again. (Edit: Or has it?!? See the comments below.) We wish LMR all the best — everyone loves robots, and LMR is a tremendous resource for the newbie interested in getting into DIY robotics on the cheap. More than a few LMR posts have been featured here at Hackaday over the years. Among our favorites are this drumming rovera clever 3D printed gripper, and this wicked bicycle-style balancer.

Sphero Riding Strandbeest Is A Robot With An Exoskeleton

[Theo Jansen] makes awesome things called Strandbeests; wind-driven automatons that roam beaches and art galleries. It has long been one of our favorite mechanisms. Newer, but also a favorite is the Sphero smartphone controlled orb. The combination of the two is epic!

You may remember seeing Sphero used to create a tiny BB8 replica. Inside the orb is a tiny robot capable of rolling itself hamster-wheel-style in any direction. It’s a rather powerful bot and that makes Sphero fast. The high RPM is what makes this hack possible. Sphero spins rapidly while perched on some rollerblade wheels. Gearing converts this to the rolling motion of the Strandbeest.

The original concept was posted a year ago but it was just now brought to our attention by [fhareide]  who is working on his own smaller Strandbeest driven by a Sphero. Since there are no assembly details on the original posting, you can follow along with [fhareide’s] documentation in order to complete your own build. So far [fhareide] imported the STL model into Autodesk Inventor, printed out one set of gears to insure the printer resolution could handle it, and assembled one set of legs.
We think of this as a kind of exoskeleton for a Sphero. We’ll keep an eye on this through the assembly, testing the drive mechanism and then the point where the whole thing becomes self-aware and either runs away to hide or terminates him.

Continue reading “Sphero Riding Strandbeest Is A Robot With An Exoskeleton”

Sea Rendering

Project Sea Rendering Autonomously Renders Sea Bottoms

[Geir] has created a pretty neat device, it’s actually his second version of an autonomous boat that maps the depths of lakes and ponds. He calls it the Sea Rendering. The project is pretty serious as the hull was specially made of fiberglass. The propulsion is a simple DC motor and the rudder is powered by an RC servo. A light and flag adorn the top deck making the small craft visible to other larger boats that may be passing by. Seven batteries are responsible for all of the power requirements.

Sea Rendering

The craft’s course is pre-programmed in Mission Planner and uses ArduPilot loaded on an Arduino to steer to the defined way points. An onboard GPS module determines the position of the boat while a transducer measures the depth of the water. Both position and depth values are then saved to an SD card. Those values can later be imported into a software called Dr Depth that generates a topographic map of the water-covered floor.

[Geir] has sent this bad boy out on an 18 km journey passing through 337 way points. That’s pretty impressive! He estimates that the expected run time is 24 hours at a top speed of 3 km/h, meaning it could potentially travel 72 km on a single charge while taking 700 depth measurements during the voyage.

Continue reading “Project Sea Rendering Autonomously Renders Sea Bottoms”

DIY Tank Tracks Give Tons Of Traction

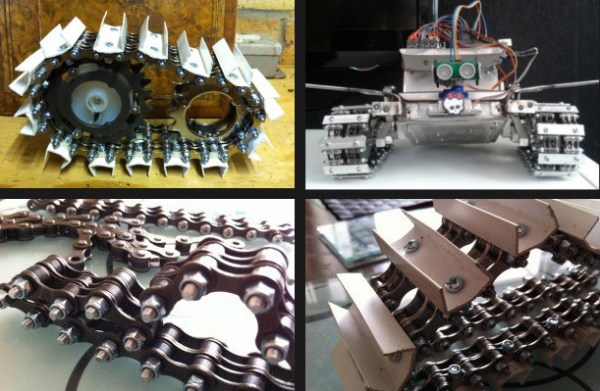
If you’re building a robot for off-road or rough terrain, chances are you’ve thought about using a tank-tread style drive. There are a ton of kits available with plastic tread and wheels, but they are typically really expensive or pretty flimsy. Instead of going with an off-the-shelf solution, [Paul B] designed a heavy-duty tank tread made with common bike chain and conduit.

Some DIY tread designs we’ve featured just use a single bike chain on either side of the tread pieces. This gets the job done, but each section of tread is usually bolted through the chain. This means that you can’t use a sprocket to drive the chain since all the bolt heads block where the teeth engage. Instead, these designs typically use drive wheels inside the tread, which are prone to slip under a heavy load. [Paul B]’s design is a bit different: it uses a DIY double-wide chain so he can bolt tread segments to the chain and still use a drive sprocket.

Constructing the double-wide chain took quite a bit of work. [Paul B] completely disassembled a couple of bike chains with a delinker tool and then reassembled the chain in a double-wide configuration with M3 bolts instead of the original chain pins. Each section of tread (made out of cut pieces of plastic conduit) bolts on the outside section of chain, and a sprocket runs on the inside. His DIY chain approach saves him money too, since double-wide chains are pretty expensive. Since his sprockets directly engage the drive train, his design should be able to handle as much torque as his drivetrain can put out.

Bouncing Ball Robot

Bouncing A Ball With A Robot

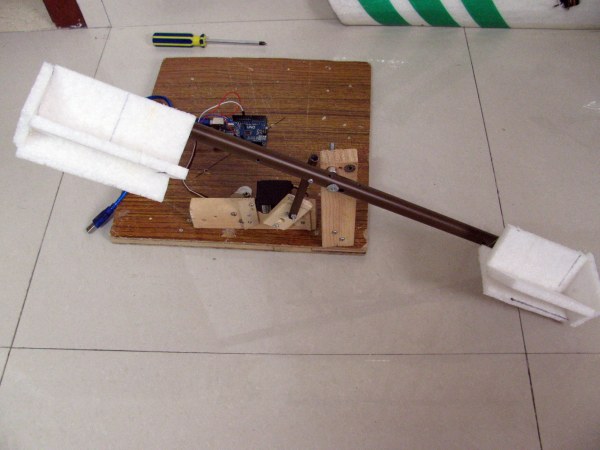
A fan of kinetic projects, [Jimmy Demello] threw together a pretty cool robot that can bounce a ball back and forth between its hand(s).

Made from scraps around the house, it consists of some wood, a piece of a fishing pole, chop sticks, a single servo motor, and of course an Arduino Uno. His original plan was to make [Claude Shannon]’s juggling robot, but this is as far as he’s gotten — so far anyway.

It bounces a 2cm ball-bearing twice before catching it and passing it back again. He thinks it would be an awesome project to scale up and use basketballs, and we’d have to agree.

Continue reading “Bouncing A Ball With A Robot”

Medical Tricorder Mark I

A handheld tricorder is as good a reason as any to start a project. The science-fiction-derived form factor provides an opportunity to work on a lot of different areas of hardware development like portable power, charging, communications between sensor and microcontroller. And of course you need a user interface so that the values being returned will have some meaning for the user.

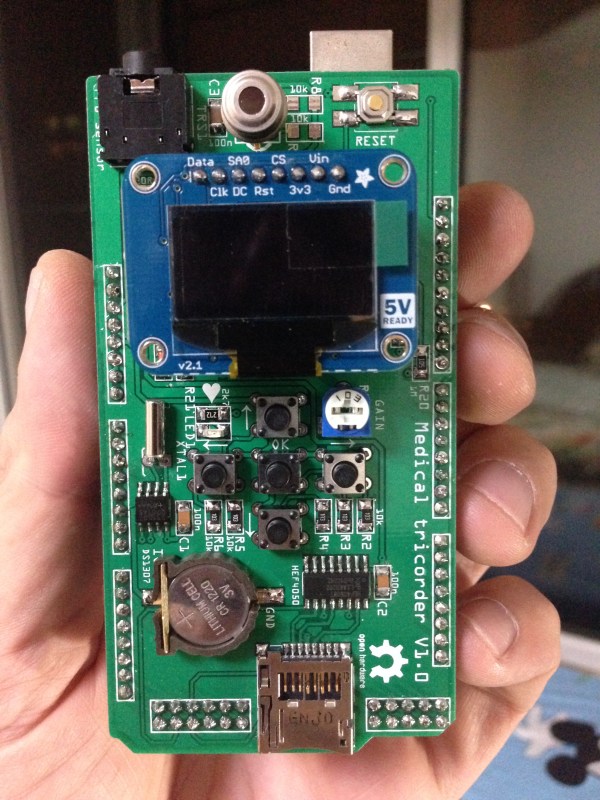
[Marcus B] has done a great job with all of this in his first version of a medical tricorder. The current design hosts two sensors, one measures skin temperature using infrared, the other is a pulse sensor.

For us it’s not the number of sensors that makes something a “tricorder” but the ability of the device to use those sensors to make a diagnosis (or to give the user enough hints to come to their own conclusion). [Marcus] shares similar views and with that in mind has designed in a real-time clock and an SD card slot. These can be used to log sensor data over time which may then be able to suggest ailments based on a known set of common diagnosis parameters.

Looking at the image above you may be wondering which chip is the microcontroller. This build is actually a shield for an Arduino hiding underneath.

There’s a demonstration video after the break. And if you find this impressive you won’t want to miss the Open Source Science Tricorder which is one of the finalists for the 2014 Hackaday Prize.

Continue reading “Medical Tricorder Mark I”