Electric Solder Paste Dispenser Speeds Up Reflow Prep

solder paste dispenser

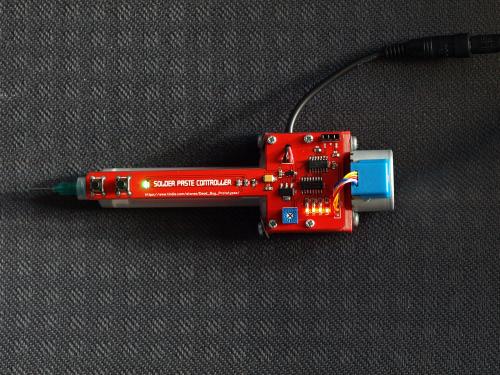
[Geir Andersen] of Let’s Make Robots has been venturing deeper and deeper into the wonderful world of surface mounted devices, which as you know, can be tricky to solder! Not wanting to shell out a few hundred for a professional solder paste dispenser (and air compressor), [Geir] decided to build his own.

It allows him to use a standard syringe for solder paste, which can easily be refilled using this technique. The professional dispensers use air pressure to control the flow of the paste, but [Geir] decided to go the all-electric route instead. He’s hooked up a small stepper motor to a threaded shaft which can push the plunger up and down the syringe.

Couple that with a few 3D printed parts for the housing, a nicely designed PCB, and bam you have yourself a super handy solder paste dispenser! He’s even included a small potentiometer on the board to change the speed of the motor.  It might not be quite as accurate as a professional one, but as you can see in the video after the break it seems to work great for [Geir’s] purposes.

Continue reading “Electric Solder Paste Dispenser Speeds Up Reflow Prep”

The Un-Digital Robotic Arm

556When you think of a robotic arm, you’re probably thinking about digital control, microcontrollers, motor drivers, and possibly a feedback loop. Anyone who was lucky enough to have an Armatron knows this isn’t the case, but you’d still be surprised at how minimal a robotic arm can be.

[viswesh713] built a servo-powered robotic arm without a microcontroller, and with some interpretations, no digital control at all. Servos are controlled by PWM signals, with a 1 ms pulse rotating the shaft one way and a 2 ms pulse rotating the shaft the other way. What’s a cheap, popular chip that can easily be configured as a timer? Yep, the venerable 555.

The robotic arm is actually configured more like a Waldo with a master slave configuration. [viswesh] built a second arm with pots at the hinges, with the resistance of the pots controlling the signal output from a 556 dual timer chip. It’s extremely clever, at least until you realize this is how very early robotic actuators were controlled. Still, an impressive display of what can be done with a simple 555. Videos below.

Continue reading “The Un-Digital Robotic Arm”

Two Wheeler Is Gyroscope Stabilized

[Jim] loves gyros – not those newfangled MEMS devices, but old-fashioned mechanical gyroscopes. His obsession has pushed him to build this gyro stabilized two wheeler. We love watching hacks come together from simple basic materials and hand tools, with liberal amounts of hot glue to hold everything in place.  That seems to be [Jim’s] philosophy as well.

This is actually the fifth incarnation of [Jim’s] design. Along the way he’s learned a few important secrets about mechanical gyro design, such as balancing the motor and gyro assembly to be just a bit top-heavy. [Jim’s] gyro is a stack of CDs directly mounted to the shaft of a brushed speed400 R/C airplane motor. The motor spins the CDs up at breakneck speed – literally. [Jim] mentions that they’ve exploded during some of his early experiments.

The gyroscope is free to move in the fore-aft direction. Side to side balance tilting is on the wheels themselves. The wheels are model airplane wheels, which have a curved tread. No cheating by using flat LEGO wheels in [Jim’s] lab! A potentiometer measures the tilt angle of the gyro. The voltage from the pot is fed into an Arduino Uno which closes the loop by moving a servo mounted counterweight.

The vehicle is controlled with a regular R/C plane radio. A servo steers the front wheel while another DC motor drives the rear wheel. Not only is [Jim’s] creation able to balance on its own, it can even make a U-Turn within a hallway.

Continue reading “Two Wheeler Is Gyroscope Stabilized”

HexDrake — A Low Cost 2-DOF Hexapod

hexdrake low cost hexapod

[David’s] been making robots since he was 16. After conquering the basics, he wanted to build something a bit more interesting than a simple wheeled-robot — he wanted to buy a hexapod but they were too expensive — so he decided to design his own low-cost version!

It’s made out of hand-cut wood, SG90 servos, an Arduino and a 16-channel servo controller. A 2.4GHz remote control sends commands to the Arduino which then communicates to the USC servo controller, allowing for intricate control of the 14 servos that make up the HexDrake.

He’s also added a few LED arrays for the eyes of his robot, which in the future will be animated to give expression to his little hexapod.

It’s an extremely well built little bot, and [David’s] made a very in-depth Instructable for anyone who would like to follow in his footsteps. Stick around after the break to see it scurry around!

Continue reading “HexDrake — A Low Cost 2-DOF Hexapod”

Hackaday Links: March 16, 2014

hackaday-links-chain

Tape decks are fertile hacking ground. In this offering from [Erich] the speed of the motor has been turned into a MIDI instrument. Drive it faster and the pitch rises, slower and it falls. There are all kinds of other magnetic tape hacks around here, this tape delay is a classic.

[Dbever] needed a reason to use a big 7-segment display module. He opened up the drill press at his Hackerspace, Pumping Station One, and added a sensor which shows the RPM of the drill on the display. Hackaday was lucky enough to be invited for a tour of the space last fall.

There’s a lot of hype about 3D printing… and rightly so since it’s the radest; which is even better than being “the most rad”. But if you don’t have access to one that shouldn’t stop you. Here’s an example of making robot parts using polymorph instead of 3D printing (or laser cutting) them.

If you’re living in the east-coast metroplex and are unable to travel to Maker Faire Bay Area this Spring you can still get in on some live hacking. Check out MassHack which takes place the same May weekend but in Boston instead of San Fran.

Blimps; not as cool as quadcopters but orders of magnitude less likely to go down in flames (as it were). Draw some inspiration for your own build from silent_runner. The graceful travel of these lighter-than-air-craft make for an interesting camera platform. Here’s a POV video inside of a church, and some shots from the ground while in the woods. [Thanks Oliver]

We try not to pimp crowd-funding campaigns just for the sake of getting them to the goal. But we hope you’ll agree that the Gamebuino we saw a few months back makes a strong argument for backers. Their Indiegogo for the Arduino-compatible handheld gaming rig is over half-way there after just a couple of days.

DAGU: The Standalone CNC Controller

CNC

In terms of user interfaces, 3D printers are far, far beyond the usual CNC machine. It’s difficult to find a new, commercial 3D printer without some sort of display, set of buttons, and an SD card slot for loading G Code and running a printer. For CNC routers, though, you’re usually dealing with a parallel port interface connected to an old computer.

DAGU hopes to change that by providing a huge 240×128 LCD display, a bunch of buttons, and an SD card slot for loading G Code directly from an SD card. This is a fully functional controller, able to deliver 3.5 A to each stepper motor winding.

Right now DAGU is in the prototype stage, but already there are some really interesting features: the interface allows for a basic preview of the job before it begins, and should be somewhat affordable. At least as cheap as using an old computer for CNC control, anyway.

Video demo of the use and operation of DAGU below.

Continue reading “DAGU: The Standalone CNC Controller”

QFN Breakout Is Easy On The Eyes, Wallet

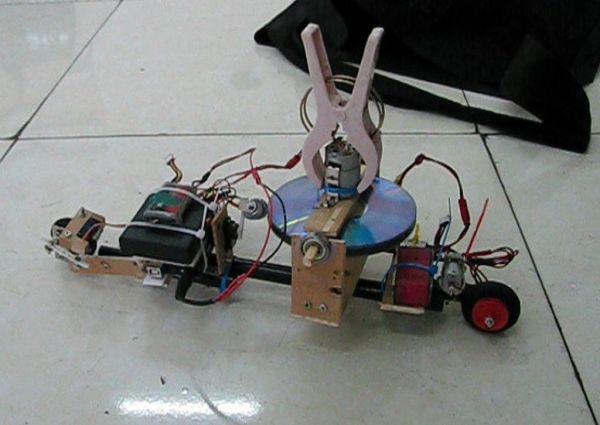
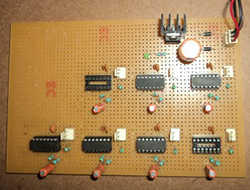
What do you do when you have ATMega328s in QFN package burning a hole in your bug box, but you aren’t set up for SMD and have limited access to parts? You man up and do what [Djpanjan] did: make your own breakout board with solder, right angle header, and many tiny, beautiful wires.

[Djpanjan] says the process is a simple one that requires great concentration. Once he had it broken out, he covered the wires with hot glue to make sure they all stay in place. He programmed it using an Arduino as an ISP and he was able to run the blink sketch without issue. He blinked all the output pins to make sure there were no shorts.

[Djpanjan] says that if he can’t get a breakout for his LQFP-144, he’s going to make his own again. Good luck, [Djpanjan]. We’re all counting on you.

If you’re set up for SMD and etching, there’s always the surface mount breakout route. If not, you can always use magnet wire and protoboard.