Taking The Pulse (Width Modulation) Of An FPGA

I like to think that there are four different ways people use FPGAs:

  1. Use the FPGA as a CPU which allows you to add predefined I/O blocks
  2. Build custom peripherals for an external CPU from predefined I/O blocks
  3. Build custom logic circuitry from scratch
  4. Projects that don’t need an FPGA, but help you learn

I’d bet the majority of FPGA use falls into categories one and two. Some FPGAs even have CPUs already built-in. Even without an onboard CPU, you can usually put a CPU “core” (think reusable library) into the chip. Either way, you can always add other cores to create UARTs, USB, Ethernet, PWM, or whatever other I/O you happen to need. You either connect them to a CPU on the chip, or an external one. With today’s tools, you often pick what you want from a list and then your entire project becomes a software development effort.

Continue reading “Taking The Pulse (Width Modulation) Of An FPGA”

Learning Verilog For FPGAs: Hardware At Last!

Getting into FPGA design isn’t a monolithic experience. You have to figure out a toolchain, learn how to think in hardware during the design, and translate that into working Verliog. The end goal is getting your work onto an actual piece of hardware, and that’s what this post is all about.

In the previous pair of installments in this series, you built a simple Verilog demonstration consisting of an adder and a few flip flop-based circuits. The simulations work, so now it is time to put the design into a real FPGA and see if it works in the real world. The FPGA board we’ll use is the Lattice iCEstick, an inexpensive ($22) board that fits into a USB socket.

Like most vendors, Lattice lets you download free tools that will work with the iCEstick. I had planned to use them. I didn’t. If you don’t want to hear me rant about the tools, feel free to skip down to the next heading.

Continue reading “Learning Verilog For FPGAs: Hardware At Last!”

Learning Verilog For FPGAs: Flip Flops

Last time I talked about how to create an adder in Verilog with an eye to putting it into a Lattice iCEstick board. The adder is a combinatorial circuit and didn’t use a clock. This time, we’ll finish the demo design and add two clocked elements: a latch that remembers if the adder has ever generated a carry and also some counters to divide the 12 MHz clock down to a half-second pulse to blink some of the onboard LEDs.

Why Clocks?

Clocks are an important part of practical digital design. Suppose you have a two input AND gate. Then imagine both inputs go from zero to one, which should take the output from zero to one, also. On paper, that seems reasonable, but in real life, the two signals might not arrive at the same time. So there’s some small period of time where the output is “wrong.” For a single gate, this probably isn’t a big deal since the delay is probably minuscule. But the errors will add up and in a more complex circuit it would be easy to get glitches while the inputs to combinatorial gates change with different delays.

Continue reading “Learning Verilog For FPGAs: Flip Flops”

FPGA Starter Videos To Help Soften That Learning Curve

Digi-Key have been producing YouTube videos for a number of years now, and if you weren’t aware, they’re definitely worthy of some viewing time. The playlist we’re highlighting here is a pretty good introduction to FPGAs, specifically those supported by open source tools, with low cost hardware. If you’ve always wanted to get into hacking FPGA platforms, but don’t know where to start, this is going to be a big help. After first covering what an FPGA is and is not, and why you want to use one, [Shawn Hymel] dives in to the toolchain.

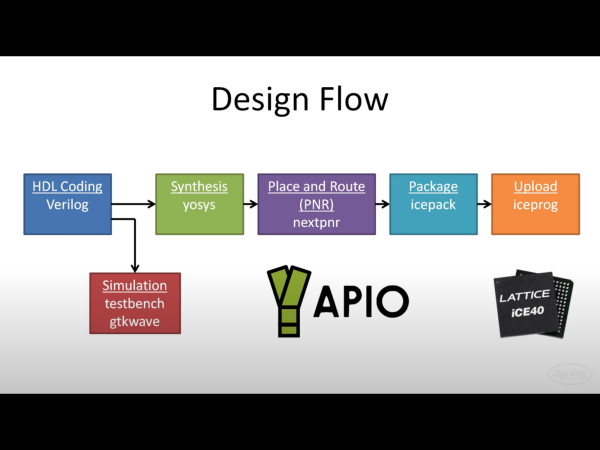
We’re really lucky that the bitstream for the Lattice iCE40 was reverse engineered by the super talented Claire (née Clifford) Wolf (AMP hour interview) which enabled the project ICEstorm toolchain to be created. Leveraging Yosys for synthesis and logic mapping, Icarus verilog coupled with GTKwave for simulation, netpnr for place and route and finally the project ICEstorm bitstream tools for packing into iCE40 format and loading onto the hardware. The whole toolchain flow is managed by APIO for simplicity, that is, provided your FPGA board is supported!

Of course, [Shawn] is using the low cost (for an FPGA) ICEStick by Lattice for this tutorial series, and they’re currently hard to get (you know why by now!) but, there are many other boards you could use. If you want to play with applications coupling a ARM micro to an FPGA, then the excellent BlackIce Mx is an option, but there are many other boards now with an decent micro nestled next to an FPGA and a few peripherals for convenience.

We should mention here, that project ICEstorm and the iCE40 is not the only show in town. Project Trellis has had our eye for a while, which targets the more complex Lattice ECP5 device. Yosys and friends do support more architectures, but the available flows usually require at least some vendor tool support at this time (looking straight at you, Xilinx) but as more devices get decoded, the open source tools will grow, and we will bring you that news!

What’s nice about this Digi-Key YT series, is that it doesn’t just cover the basic toolchain flow, then drop you in at the deep end of a big learning curve. There are videos covering subjects such as finite state machines (FSMs), test-benching and simulation, using embedded (block) memories, PLLs, harder subjects like dealing with metastability and clock-domain crossing (OK, he covers one technique – there’s more than one way to skin that particular cat) before finally looking at soft cores like the RISC-V. Lots to learn, and pretty well executed if you ask us! A Github version is available, for those who can’t stand watching the videos!

Continue reading “FPGA Starter Videos To Help Soften That Learning Curve”

Icestorm Tools Roundup: Open Source FPGA Dev Guide

We like the ICE40 FPGA from Lattice for two reasons: there are cheap development boards like the Icestick available for it and there are open source tools. We’ve based several tutorials on the Icestorm toolchain and it works quite well. However, the open source tools don’t always expose everything that you see from commercial tools. You sometimes have to dig a little to find the right tool or option.

Sometimes that’s a good thing. I don’t need to learn yet another fancy IDE and we have plenty of good simulation tools, so why reinvent the wheel? However, if you are only using the basic workflow of Yosys, Arachne-pnr, icepack, and iceprog, you could be missing out on some of the most interesting features. Let’s take a deeper look.

Continue reading “Icestorm Tools Roundup: Open Source FPGA Dev Guide”

Arduino Just Introduced An FPGA Board, Announces Debugging And Better Software

Today ahead of the Bay Area Maker Faire, Arduino has announced a bevy of new boards that bring modern features and modern chips to the Arduino ecosystem.

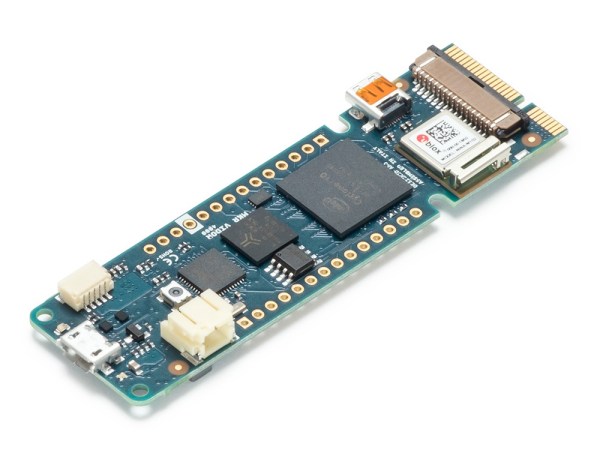
Most ambitious of these new offerings is a board that combines a fast ARM microcontroller, WiFi, Bluetooth, and an FPGA. All this is wrapped in a package that provides Mini HDMI out and pins for a PCIe-Express slot. They’re calling it the Arduino MKR Vidor 4000.

Bringing an FPGA to the Arduino ecosystem is on the list of the most interesting advances in DIY electronics in recent memory, and there’s a lot to unpack here. FPGA development boards aren’t new. You can find crates of them hidden in the storage closet of any University’s electronics lab. If you want to buy an FPGA dev board, the Terasic DE10 is a good starter bundle, the iCEstick has an Open Source toolchain, and this one has pink soldermask. With the release of the MKR Vidor, the goal for Arduino isn’t just to release a board with an FPGA; the goal is to release a tool that allows anyone to use an FPGA.

The key to democratizing FPGA development is Arduino’s work with the Arduino Create ecosystem. Arduino Create is the company’s online IDE that gives everyone the ability to share projects and upload code with Over-the-Air updates. The MKR Vidor will launch with integration to the Arduino Create ecosystem that includes a visual editor to work with the pre-compiled IP for the FPGA. That’s not to say you can’t just plug your own VHDL into this board and get it working; that’s still possible. But Arduino would like to create a system where anyone can move blocks of IP around with a tool that’s easy for beginners.

A Facelift for the Uno WiFi

First up is the brand new Arduino Uno WiFi. While there have been other boards bearing the name ‘Arduino Uno WiFi’ over the years, a lot has changed in the world of tiny radio modules and 8-bit microcontrollers over the past few years. The new Arduino Uno WiFi is powered by a new 8-bit AVR, the ATMega4809. The ATMega4809 is a new part announced just a few months ago, and is just about what you would expect from the next-generation 8-bit Arduino; it runs at 20MHz, has 48 kB of Flash, 6 kB of SRAM, and it comes in a 48-pin package. The ATMega4809 is taking a few lattices of silicon out of Microchip’s playbook and adds Custom Configurable Logic. The CCL in the new ATMega is a peripheral that is kinda, sorta like a CPLD on chip. If you’ve ever had something that could be more easily done with logic gates than software, the CCL is the tool for the job.

But a new 8-bit microcontroller doesn’t make a WiFi-enabled Arduino. The wireless power behind the new Arduino comes from a custom ESP-32 based module from u-blox. There’s also a tiny crypto chip (Microchip’s ATECC508A) so the Uno WiFi will work with AWS. The Arduino Uno WiFi will be available this June.

But this isn’t the only announcement from the Arduino org today. They’ve been hard at work on some killer features for a while now, and now they’re finally ready for release. What’s the big news? Debuggers. Real debuggers for the Arduino that are easy to use. There are also new boards aimed at Arduino’s IoT strategy.

Continue reading “Arduino Just Introduced An FPGA Board, Announces Debugging And Better Software”

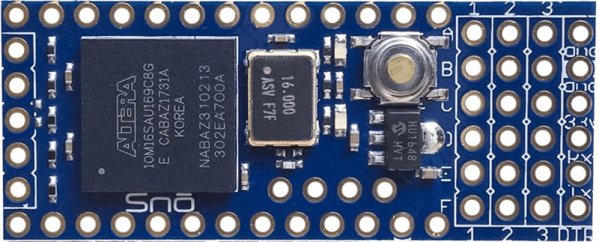
Tiny Arduino + FPGA = Sno

Alorium rolled out a new product late last year that caught our attention. The Sno (pronounced like “snow”) board is a tiny footprint Arduino board that you can see in the video below. By itself that isn’t that interesting, but the Sno also has an Altera/Intel Max 10 FPGA onboard. If you aren’t an FPGA user, don’t tune out yet, though, because while you can customize the FPGA in several ways, you don’t have to.

Like Alorium’s XLR8 product, the FPGA comes with preprogrammed functions and a matching Arduino API to use them. In particular, there are modules to do analog to digital conversion, servo control, operate NeoPixels, and do floating point math.

Continue reading “Tiny Arduino + FPGA = Sno”