
[Tuckie] sent in his wireless fireworks controller. The electronic parts are off the shelf – a 12 channel relay board and remote provide the guts. He used a rock tumbler to mill the black powder needed to make the detonators. A combination of the fine ground black powder, nichrome wire and ping pong balls makes up the business end of each detonator. When a channel is selected with the remote, the relay is activated, current is sent to the detonator which is taped to the firework fuse.

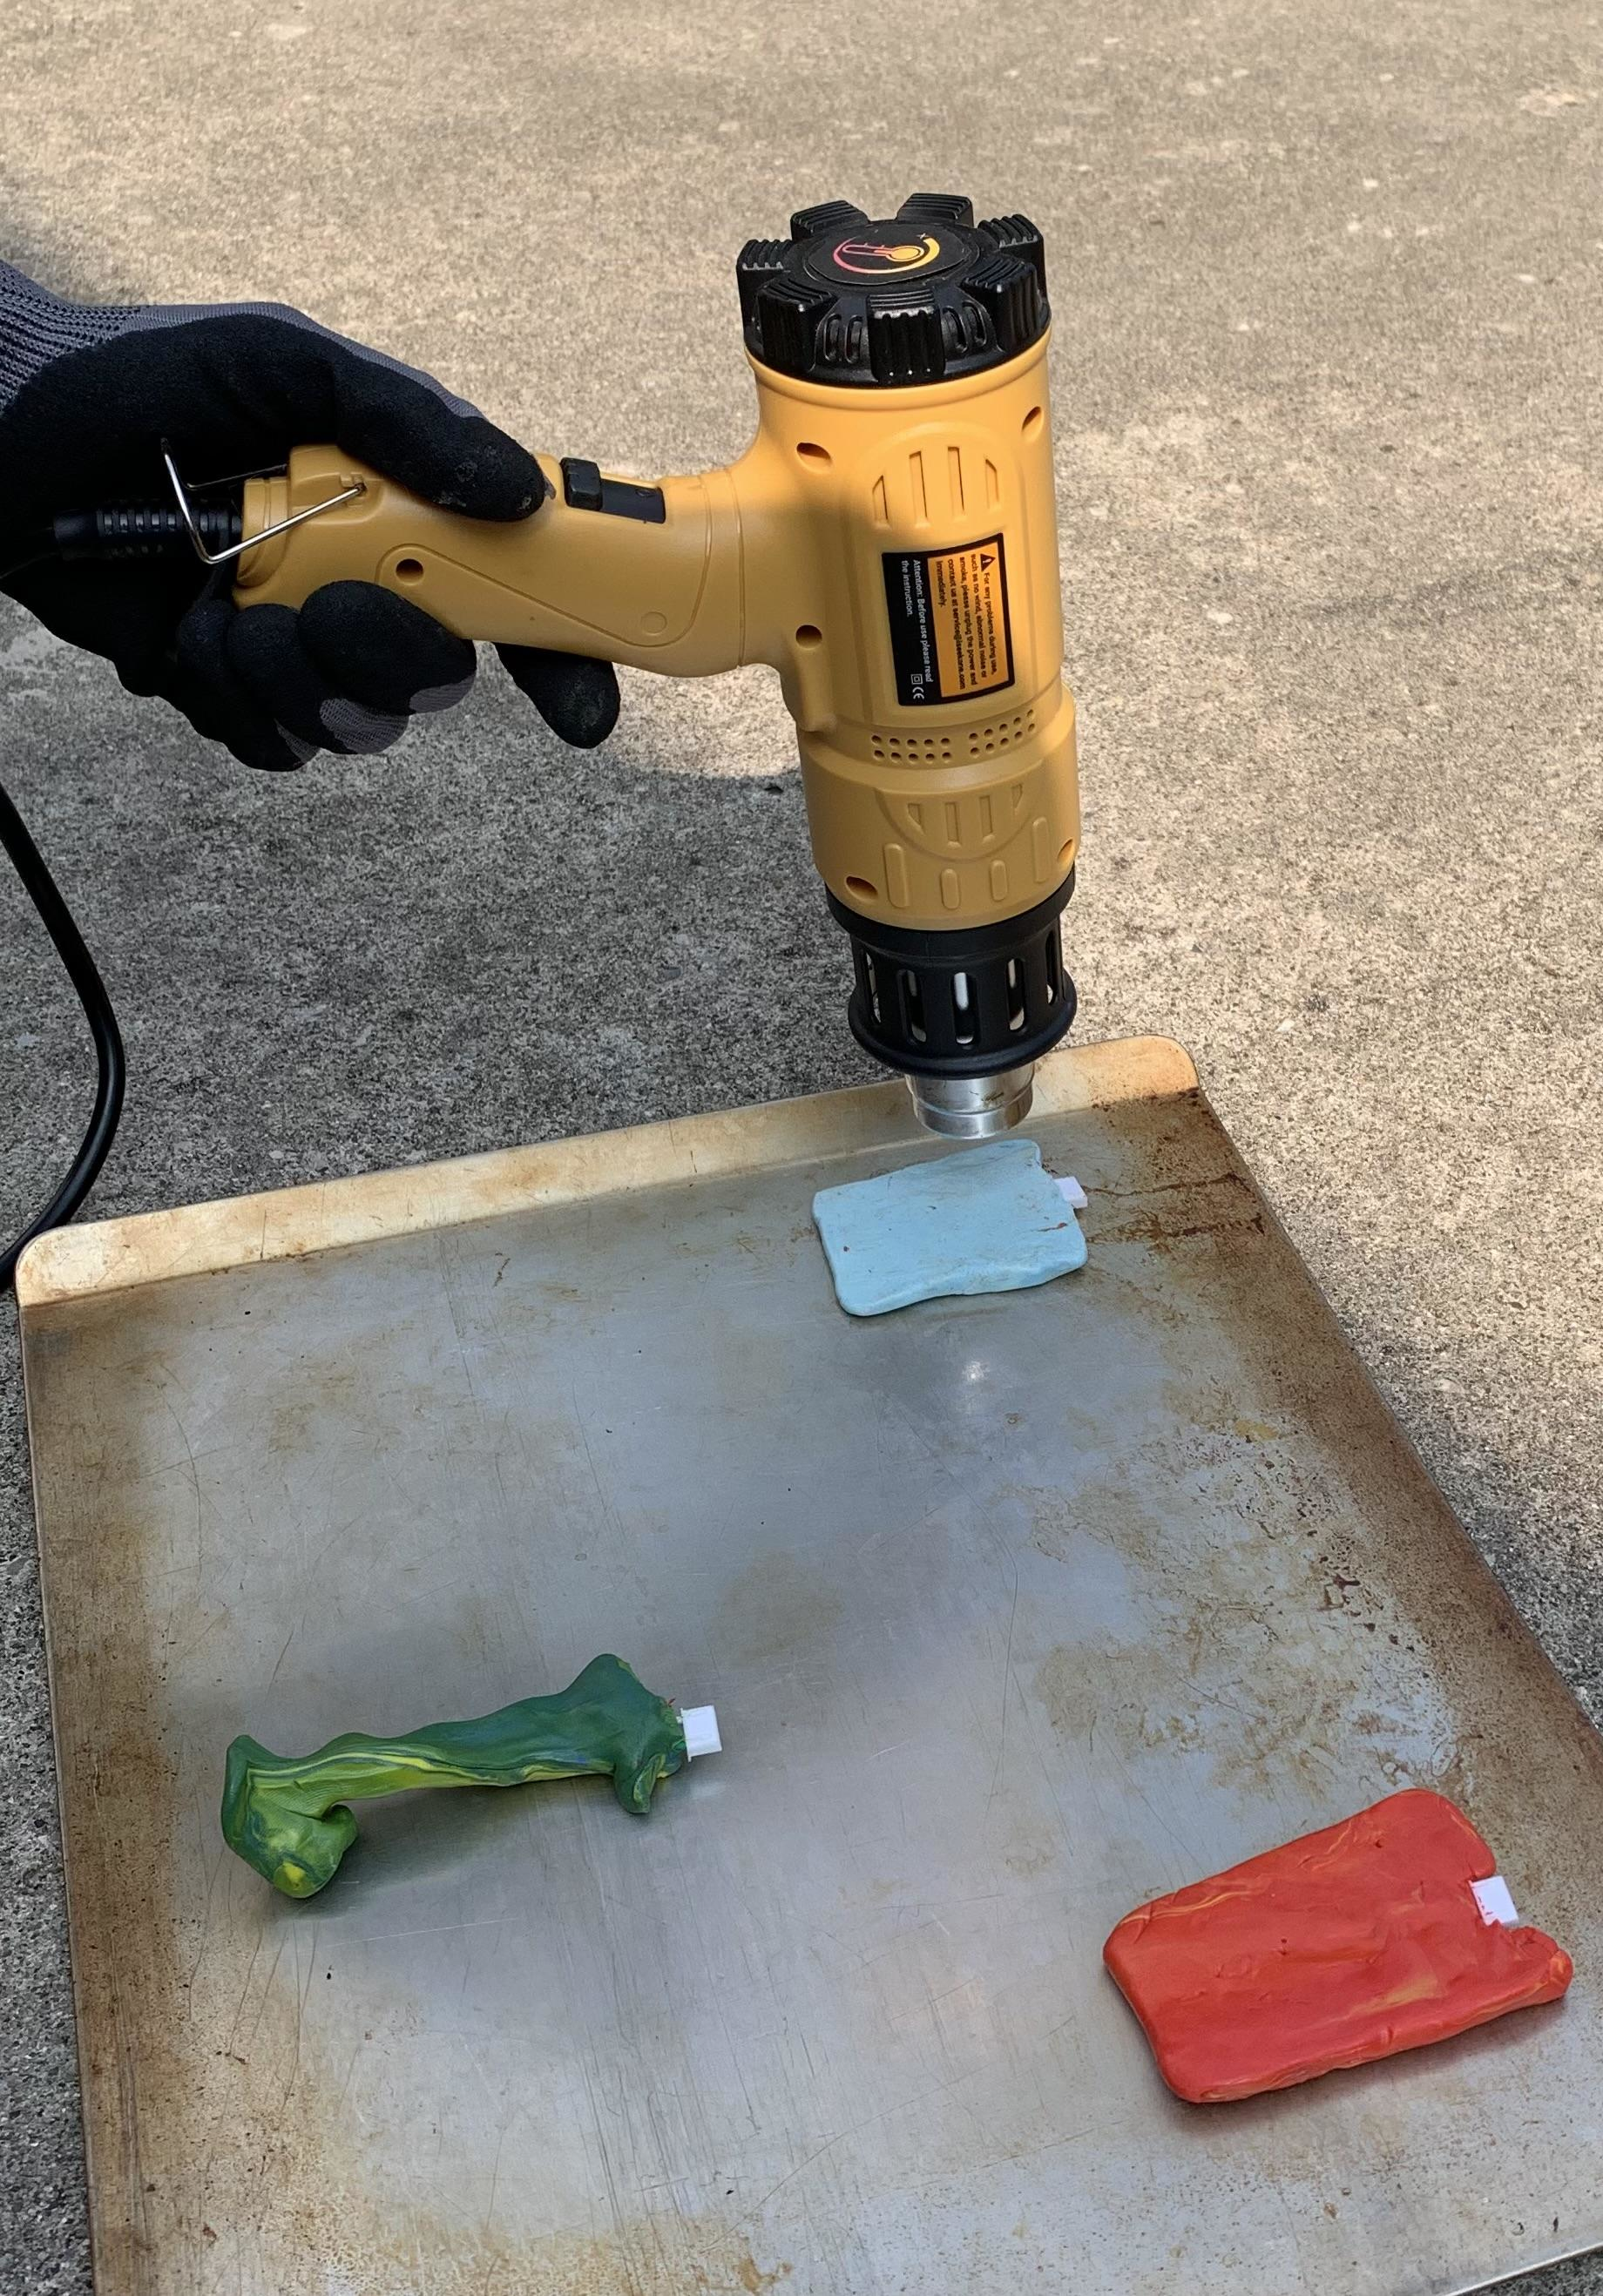
Adjustable Electric Hand Warmers
It may be the last gasp of summer here in the Northern Hemisphere, but it’s always cold somewhere, whether it’s outdoors or inside. If you suffer from cold, stiff hands, you know how difficult it can be to work comfortably on a computer all day. Somehow, all that typing and mousing does little to warm things up. What you need are hand warmers, obviously, and they might as well be smart and made to fit your hands.
 Fifteen-year-old [Printerforge] created these bad boys in an effort to learn how to code LCDs and control heat like Magneto controls ferrous metals. Thanks to digital control, they can heat up to specific temperatures, and they happen to run for a long time.
Power-wise, these warmers use a 18650 cell and a TP4056 charging module. Everything is controlled by an Arduino Nano, which reads from both a thermistor and a potentiometer to control the output.
[Printerforge] really thought this project through, as you’ll see in the Instructable. There’s everything from a table of design requirements to quick but thorough explanations of nichrome wire and basic electronic theory.
And then there’s the material consideration. [Printerforge] decided that polymer clay offers the best balance of heat conductivity and durability. They ended up with two styles — flat, and joystick grip. The best part is, everything can fit in a generous pocket.
Clay is good for a lot of things, like making the perfect custom mouse.

Power Resistance Isn’t Futile
As [Electronoobs] points out, everything has resistance. So, how hard can it be to make a high-power resistor? In the video below, he examines a commercial power resistor and how to make your own using nichrome wire.
Sure, in theory, you can use a long piece of wire, but normally, you want to minimize the amount of space occupied. This leads to winding the wire around some substrate. If you just wind the wire, though, you get an inductor. This can cause nasty voltage spikes when there is a change in current through the resistor. You can get “noninductive” wire wound resistors that use either two opposing windings or alternate the turn direction on each turn. This causes the magnetic fields to tend to cancel out, reducing the overall inductance.
Nichrome wire has more resistance per millimeter and can dissipate more power. Modern digital meters can measure the resistance of a wire if you account for the test leads. To make a substrate, [Electronoobs] got creative since he anticipated generating a lot of heat. The final product even uses water cooling.
Why do you want a big resistor? Maybe you need a dummy load, or you want to drain some batteries. If you want to recycle nichrome wire, it is much more common than you might expect.
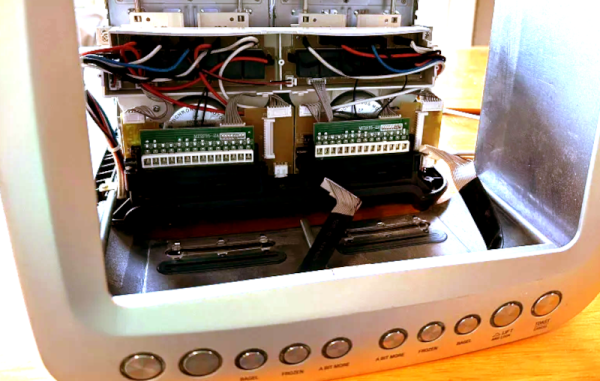
Fixing An Expensive Smart Toaster Is Worth The Time
There was a time when the simplest and cheapest kitchen appliance you could think of was a toaster. Some nichrome wire, a spring, and a mechanical thermostat were all you needed. Those days are gone and today’s toasters are full of special features, network connections, and fancy cases.
Take [boilerbot]’s Breville die-cast smart toaster. The four-slice model is upwards of $200. As Star Trek’s [Mr. Scott] said, “The more they overthink the plumbing, the easier it is to stop up the drain.” That seems to be the case here. The toaster failed and while [boilerbot] did fix it, he got lucky. He mentions that if the damage had been lower in the toaster, getting to it would have been nearly impossible.
Continue reading “Fixing An Expensive Smart Toaster Is Worth The Time”
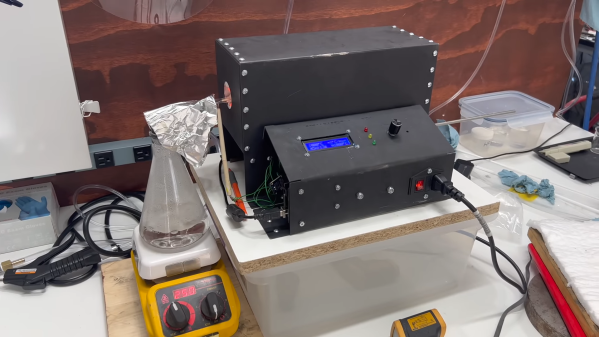
Start Your Semiconductor Fab With This DIY Tube Furnace
Most of us are content to get our semiconductors from the usual sources, happily abstracting away the complexity locked within those little epoxy blobs. But eventually, you might get the itch to roll your own semiconductors, in which case you’ll need to start gearing up. And one of the first tools you’ll need is likely to be something like this DIY tube furnace.
For the uninitiated, [ProjectsInFlight] helpfully explains in the video below just what a tube furnace is and why you’d need one to start working with semiconductors. Perhaps unsurprisingly, a tube furnace is just a tube that gets really, really hot — like 1,200° C. In addition to the extreme heat, commercial furnaces are often set up to seal off the ends of the tube to create specific conditions within, such as an inert gas atmosphere or even a vacuum. The combination of heat and atmospheric control allows the budding fabricator to transform silicon wafers using chemical and physical processes.
[ProjectsInFlight]’s tube furnace started with a length of heat-resistant quartz glass tubing and a small tub of sodium silicate refractory cement, from the plumbing section of any home store. The tube was given a thin coat of cement and dried in a low oven before wrapping it with nichrome wire. The wrapped tube got another, thicker layer of silicate cement and an insulating wrap of alumina ceramic wool before applying power to cure everything at 1,000° C. The cured tube then went into a custom-built sheet steel enclosure with plenty of extra insulation, along with an Arduino and a solid-state relay to control the furnace. The video below concludes with testing the furnace by growing a silicon dioxide coating on a scrap of silicon wafer. This was helped along by the injection of a few whisps of water vapor while ramping the furnace temperature up, and the results are easily visible.
[ProjectsInFlight] still needs to add seals to the tube to control the atmosphere in there, an upgrade we’ll be on the lookout for. It’s already a great start, although it might take a while to catch up to our friend [Sam Zeloof].
Continue reading “Start Your Semiconductor Fab With This DIY Tube Furnace”

Calibrating Thermal Cameras With Hot Patterned Objects
Thermal cameras are great if you want to get an idea of what’s hot and what’s not. If you want to use a thermal camera for certain machine vision tasks, though, you generally need to do a geometric calibration to understand what the camera is seeing and correct for lens distortion. [Henry Zhang] has shared various methods of doing just that.
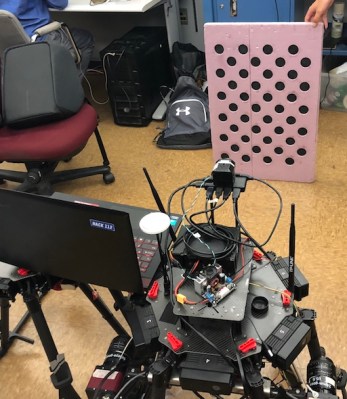
To calibrate a thermal camera, first you need a thermal pattern. This is like typical test image for a camera or screen, but with temperatures instead of colors. [Henry] explains several methods for doing this. One involves using a grid of nichrome wires to create a thermal pattern for calibration purposes. Another uses discs of cold aluminium inserted into a foam board. Even a simple checkerboard can work, with the black spaces heating up more from ambient sunlight than their neighbouring white spots. [Henry] then explains the mathematical techniques used for calibrating based on these patterns.
It’s a useful primer on the topic if you’re working with thermal camera systems. We’ve looked at some other interesting machine vision topics before, too. If you’ve got any great thermal imaging tips of your own, don’t hesitate to drop us a line!

Ask Hackaday: What’s Your Worst Repair Win?
Like many of you, I’ve become the designated “fix-it” person for my family and friends. While it can be a lot of work — I just finished an oil change that required me to lay in a cold, wet driveway and I can’t mention in polite company the substances I was bathed in while fixing a clogged pipe last week — I generally relish my role. I enjoy solving problems, I love working with my hands and my head, and who doesn’t like saving money and time?
But for me, the best part of being the fix-it guy is the satisfaction that comes from doing something others can’t do. I find this especially true with automotive repairs, which conventional wisdom says is strictly the province of factory-trained experts. A little bit of a hero complex, perhaps? Absolutely! After all, I don’t get paid for my repairs, so I’ve got to get a little something for the effort.
This is why a recent pair of unrelated fixes left me feeling thoroughly unsatisfied. Neither of these jobs was a clear win, at least in terms of getting the rush of being able to do something that nobody else could. At best, these were qualified wins, which both still left me feeling a little defeated. And that got me thinking that I’m probably not the only one who has had marginal repair wins like these.
Continue reading “Ask Hackaday: What’s Your Worst Repair Win?”


