When it comes to peer-to-peer file sharing protocols, BitTorrent is probably one of the best known. It requires a client implementing the program and a tracker to list files available to transfer and to find peer users to transfer those files. Developed in 2001, BitTorrent has since acquired more than a quarter billion users according to some estimates.
While most users choose to use existing clients, [Jesse Li] wanted to build one from scratch in Go, a programming language commonly used for its built-in concurrency features and simplicity compared to C.
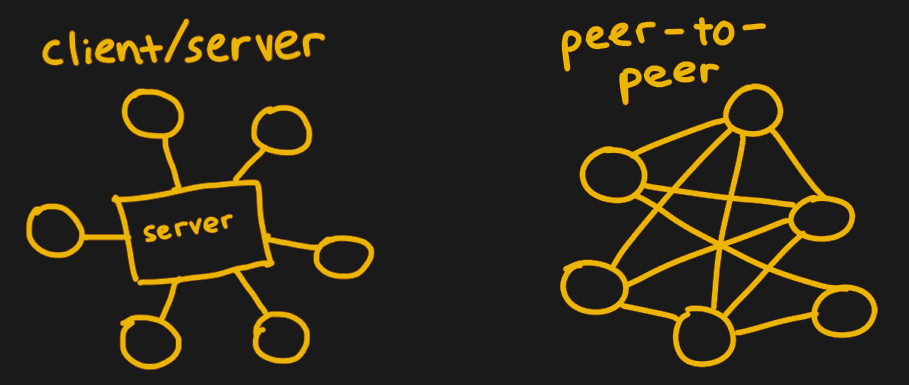
The first step for a client is finding peers to download files from. Trackers, web servers running over HTTP, serve as centralized locations for introducing peers to one another. Due to the centralization, the servers are at risk of being discovered and shut down if they facilitate illegal content exchange. Thus, making peer discovery a distributed process is a necessity for preventing trackers from following in the footsteps of the now-defunct TorrentSpy, Popcorn Time, and KickassTorrents.
The client starts off by reading a .torrent file, which describes the contents of the desired file and how to connect to a tracker. The information in the file includes the URL of the tracker, the creation time, and SHA-1 hashes of each piece, or a chunk of the file. One file can be made up of thousands of pieces – the client will need to download the pieces from peers, check the hashes against the torrent file, and finally assemble the pieces together to finally retrieve the file. For the implementation, [Jesse] chose to keep the structures in the Go program reasonably flat, separating application structs from serialization structs. Pieces are also separated into slices of hashes to more easily access individual hashes.

Next, a GET request to an `announce` URL in the torrent file announces the presence of the client to peers and retrieves a response from the tracker with the list of peers. To start downloading pieces, the client starts a TCP connection with a peer, completes a two-way BitTorrent handshake, and exchanges messages to download pieces.
One interesting data structure exchanged in the messages is a bitfield, which acts as a byte array that checks which pieces a peer has. Bits are flipped when their respective piece’s status changes, acting somewhat like a loyalty card with stamps.
While talking to one peer may be straightforward, managing the concurrency of talking to multiple peers at once requires solving a classically Hard problem. [Jesse] implements this in Go by using channels as thread-safe queues, setting up two channels to assign work and collect downloaded pieces. Requests are later pipelined to increase throughput since network round-trips are expensive and sending blocks individually inefficient.
The full implementation is available on GitHub, and is easy enough to use as an alternative client or as a walkthrough if you’d prefer to build your own.