Hackaday Podcast Episode 297: Prusa Eschews Open Source Hardware, The Lemontron Prints Upside-Down, And The Vecdec Cyberdeck Does Minority Report

This week on the Podcast, Hackaday’s Elliot Williams and Kristina Panos joined forces to bring you the latest news, mystery sound, and of course, a big bunch of hacks from the previous week.

First up in the news: Elliot was at Electronica and spotted a wild Raspberry Pi Compute Module 5. And just as excitingly, FreeCAD has finally reached version 1.0, which means it’s stable and ready for real work.

Kristina is getting tired of losing at What’s That Sound, so she’ll have to come up with some to stump you all. Can you get this week’s sound? If you can, and your number comes up, you get a special Hackaday Podcast t-shirt.

Then it’s on to the hacks and such, but first, there’s even more news and opinion to be had in Tom’s review of Prusa’s new printer, which happens to be closed-source. Then we’ll discuss another printer that prints upside-down, an elegant cyberdeck, and a cyberpunk pocket watch. Finally, we talk about the Great Redbox Cleanup, and take a look at man-made stalactites.

Check out the links below if you want to follow along, and as always, tell us what you think about this episode in the comments!

Download in DRM-free MP3 and savor at your leisure.

Continue reading “Hackaday Podcast Episode 297: Prusa Eschews Open Source Hardware, The Lemontron Prints Upside-Down, And The Vecdec Cyberdeck Does Minority Report”

Hackaday Podcast Episode 296: Supercon Wrapup With Tom And Al, The 3DP Brick Layering Controversy, And How To Weld In Space

In this episode you’ll get to hear not one, not two, but three Hackaday Editors! Now that the dust has mostly settled from the 2024 Hackaday Supercon, Al Williams joins Elliot and Tom to compare notes and pick out a few highlights from the event. But before that, the week’s discussion will cover the questionable patents holding back a promising feature for desktop 3D printers, a new digital book from NODE, and the surprisingly limited history of welding in space. You’ll also hear about the challenge of commercializing free and open source software, the finicky optics of the James Web Space Telescope, and the once exciting prospect of distributing software via pages of printed barcodes.

Direct MP3 download for offline, “easy” listening.

Continue reading “Hackaday Podcast Episode 296: Supercon Wrapup With Tom And Al, The 3DP Brick Layering Controversy, And How To Weld In Space”

Building A Motor Feed For The UE1 Vacuum Tube Computer’s Paper Tape Reader

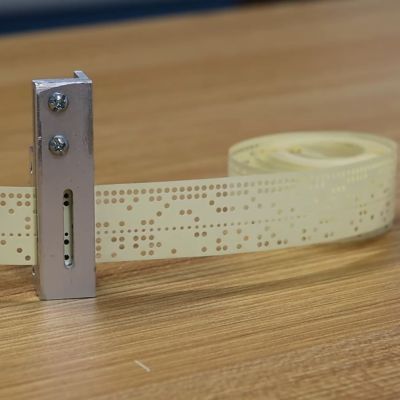
Building a paper tape reader by itself isn’t super complicated: you need a source of light, some photoreceptors behind the tape to register the presence of holes and some way to pull the tape through the reader at a reasonable rate. This latter part can get somewhat tricky, as Usagi Electric‘s [David Lovett] discovered while adding this feature to his vacuum tube-era DIY reader. This follows on what now seems like a fairly simple aspect of the photosensors and building a way to position said photosensors near the paper tape.

As the feed rate of the paper tape is tied to the reading speed, and in the case of [David]’s also contains the clock for the custom tube-based UE1 computer, it determines many of the requirements. With 8 bits per line, the tape forms the ROM for the system, all of which has to be executed and used immediately when read, as there is no RAM to load instructions into. This also necessitates the need to run the tape as an endless loop, to enable ‘jumping’ between parts of this paper-based ROM by simple masking off parts of the code until the desired address is reached.

For the motor a slot car motor plus speed-reduction gear was chosen, with a design to hold these then designed in FreeCAD. Courtesy of his brother’s hobby machine shop and a CAD professional’s help, producing these parts was very easy, followed by final assembly. Guides were added for the tape, not unlike with a cassette player, which allowed the tape to be pulled through smoothly. Next up is wiring up the photodiodes, after which theoretically the UE1 can roar into action directly running programs off paper tape.

Continue reading “Building A Motor Feed For The UE1 Vacuum Tube Computer’s Paper Tape Reader”

Usagi Electric’s Paper Tape Reader Is Ready To Hop With The Tube Computer

After previously working out a suitable approach to create a period-correct paper tape reader for his tube-based, MC14500B processor-inspired computer, [David Lovett] over at the Usagi Electric farm is back with a video on how he made a working tape reader.

The assembled paper tape reader as seen from the front with tape inserted. (Credit: David Lovett, Usage Electric, YouTube)

The tape reader’s purpose is to feed data into the tube-based computer, which for this computer system with its lack of storage memory means that the instructions are fed into the system directly, with the tape also providing the clock signal with a constant row of holes in the tape.

Starting the tape reader build, [David] opted to mill the structural part out of aluminum, which is where a lot of machining relearning takes place. Ultimately he got the parts machined to the paper design specs, with v-grooves for the photodiodes to fit into and a piece to clamp them down. On top of this is placed a part with holes that line up with the photodiodes.

Another alignment piece is added to hold the tape down on the reader while letting light through onto the tape via a slot. After a test assembly [David] was dismayed that due to tolerance issues he cracked two photodiodes within the v-groove clamp, which was a hard lesson with these expensive (and rare) photodiodes.

Although tolerances were somewhat off, [David] is confident that this aluminum machined reader will work once he has it mounted up. Feeding the tape is a problem that is still to be solved.  [David] is looking for ideas and suggestions for a good approach within the limitations that he’s working with. At the video’s end, he mentions learning FreeCAD and 3D printing parts in the future.  That would probably not be period-correct in this situation, but might be something he could get away with for some applications within the retrocomputing space.

We covered the first video and the thought process behind picking small (1.8 mm diameter) photodiodes as a period-correct tape hole sensor for a 1950s-era computing system, like the 1950s Bendix G-15 that [David] is currently restoring.

Continue reading “Usagi Electric’s Paper Tape Reader Is Ready To Hop With The Tube Computer”

Lithium-Ion Battery Hotswapping, Polarity, Holders

Everyone loves, and should respect, lithium-ion batteries. They pack a ton of power and can make our projects work better. I’ve gathered a number of tips and tricks about using them over the years, based on my own hacking and also lessons I’ve learned from others.

This installment includes a grab-bag of LiIon tricks that will help you supercharge your battery use, avoid some mistakes, and make your circuits even safer. Plus, I have a wonderful project that I just have to share.

Hot-swapping Cells

When your device runs out of juice, you might not always want to chain yourself to a wall charger. Wouldn’t it be cool if you could just hot-swap cells? Indeed it is, I’ve been doing it for years, it’s dead simple to support, but you can also do it wrong. Let me show you how to do it right!

Recently, a new handheld has hit the hacker markets – the Hackberry Pi. With a Blackberry keyboard and a colour screen, it’s a pretty standard entry into the trend of handheld Pi Zero-backed computers with Blackberry keyboards. It’s not open-source and the author does not plan to open-source its hardware, so I want to make it absolutely clear I don’t consider it hacker-friendly or worth promoting. It did publish schematics, though, and these helped me find a dangerous mistake that the first revision made when trying to implement LiIon battery hot-swap. Continue reading “Lithium-Ion Battery Hotswapping, Polarity, Holders”

An L-shaped orange mounting structure with two white reservoirs on top, a set of pumps on the outer bottom edges, and a membrane cell bolted together in the center. The parts are connected by a series of transparent tubes.

Open Source Residential Energy Storage

Battery news typically covers the latest, greatest laboratory or industry breakthroughs to push modern devices further and faster. Could you build your own flow battery stationary storage for home-built solar and wind rigs though?

Based on the concept of appropriate technology, the system from the Flow Battery Research Collective will be easy to construct, easy to maintain, and safe to operate in a residential environment. Current experiments are focusing on Zn/I chemistry, but other aqueous chemistries could be used in the future. Instead of an ion exchange membrane, the battery uses readily attainable photo paper and is already showing similar order of magnitude performance to lab-developed cells.

Any components that aren’t off-the-shelf have been designed in FreeCAD. While they can be 3D printed, the researchers have found traditional milling yields better results which isn’t too surprising when you need something water-tight. More work is needed, but it is promising work toward a practical, DIY-able energy storage solution.

If you’re looking to build your own open source wind turbine or solar cells to charge up a home battery system, then we’ve got you covered. You can also break the chains of the power grid with off-the-shelf parts.

3D Printing With A Twist

When we think about sending an STL off on the Internet for processing, we usually want someone to print it for us or we want mesh repair. But [Chuck] found an interesting project on GitHub from [Andrew Sink] that will let you add a variable amount of twist to any STL and then return it to you for printing or whatever else you use STLs for. If you don’t get what we mean, check out the video below.

The site that does the work initially loads a little gnome figure if you are too lazy to upload your own model. That’s perfect, though, because the little guy is a good example of why you might want to twist a model. With just a little work, you can make the gnome look in one direction or even look behind him.

[Chuck] shows how to use the tool for artistic effect by twisting his standard cube logo. The result is something that looks like it would be difficult to create, but could hardly be easier. The tool lets you rotate the object, too, so you can get the twist effect in the right orientation for what you want to accomplish. A great little tool for making more artistic 3D prints without learning new software. If you want some fun, you can try the version that uses sound from your microphone to control the twist.

If you’d rather twist in CAD, we can help. If you really want artsy 3D printing, you probably need to learn Blender.

Continue reading “3D Printing With A Twist”