Lux: A 100% Open Source Camera

luxCamera

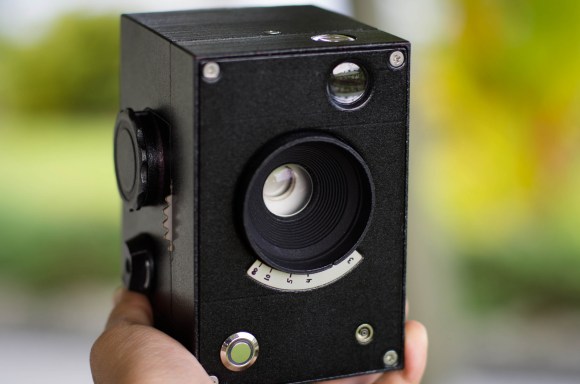
[Kevin Kadooka] recently finished his open source camera. The Lux Camera is 100% open source. Lux uses no parts from other cameras – not even a lens! To date we’ve only seen this with achieved with pinhole cameras. [Kevin] isn’t new to camera hacking. He was the man behind the Duo camera, which had a successful Kickstarter campaign in February of 2013. Duo is a DIY camera, but it still required lenses from Mamiya-Sekor, and a shutter from Seiko. Lux is a different animal. It has a manual focus 65mm f/5.6 Single Element lens. The shutter is [Kevin’s] own solenoid based leaf shutter design. Just as in the original shutter, an Arduino controls shutter operation and timing.

The main camera body and many of its parts are 3D printed. [Kevin] got some very nice quality parts from Shapeways 3D printing service. We have to say that some of the assemblies look a bit complex for desktop printers. However since everything is open source, anyone willing to put the time in could adapt them for the average RepRap or Ultimaker. [Kevin] has posted detailed build photos, as well as some photos taken with the Lux on his flickr stream. The pictures have  a decidedly holga-esque look to them, due in part to the single element lens. Even with this limitation, we love the idea of having a brownie style camera built completely from scratch.

Low Cost Filament Extruder

Here’s a great low cost filament extruder solution. It uses basic parts available from any hardware store, and a few 3D printed ones — estimated cost is well under $100.

It’s very similar to the Lyman Filament Extruder, but can be built for even less money. By using 200C set-point heaters, his setup requires absolutely no electronics — although a cheap PID controller from China could give him more extrusion capabilities with temperature control… Regardless, the system appears to make good filament and he uses it exclusively for his personal filament consumption in his Delta printer. He’s even hacked up the ABS casing of a refrigerator, ground it down, and turned it into filament using this machine! If you’re hungry for more details, the full build log and discussion can be found on the RepRap forums.

He also has a guide on making your own ABS color masterbatch to make your own filament colors!

[Thanks Liam!]

Hackerspacing In Europe: The Garage Lab In Düsseldorf

1

The Garage Lab (translated) is a small hackerspace quite close to the Chaosdorf. As the name implies, it exists in a garage complex — each unit has a garage and an upstairs office. The Garage Lab shares their unit with a co-working space upstairs — basically, they get the garage at all the times, but only the upstairs on the weekend when it is empty.

It’s been around for about 2 years and has about 40 members (~20 of which are active). To be a member it is quite cheap, only €15/month or €10/month if you are a student. They mostly focus on 3D printing and electronics.

The space has several 3D printers, a large work area, and many hand tools. They run CAD classes quite often and are hoping to expand with 3D printing classes and other technical lectures. Our guide was a cool guy named [Axel] who works as a 3D designer at his own company, but loves spreading 3D printing knowledge with the world.

Check out the tour gallery!

Continue reading “Hackerspacing In Europe: The Garage Lab In Düsseldorf”

Smoothieboard, The Be-all, End-all CNC Controller

A while back we took a look at electronics boards for 3D printers, going over the cost and benefits of the most common electronics boards for printers, laser cutters, and mills. One of the most impressive boards was the Smoothieboard, but finding a supplier back then was a little difficult. Now, the Smoothieboard is up on Kickstarter, giving everyone the opportunity to get their hands on this very cool CNC control board.

While most RepRap and 3D printer controller boards use an ATMega or other 8-bit microcontroller, the Smoothie uses a 32-bit ARM chip in the form of an NXP LPC Cortex-M3 chip. Not only does this allow the Smoothie to do some very cool things with your machine – native arcs and circles, for example, but this better hardware also allows for Ethernet, drag-and-drop firmware, and exposing the USB port as both a serial port or mass storage device.

The Smoothie comes in three flavors, with either 3, 4, or 5 stepper motor drivers. These Allegro A4982 drivers are good enough for any 3D printer, laser cutter, or small mill, but the broken out pins allow for stepper drivers supplying more than 2A of current.

Everything on the Smoothieboard is modular, meaning this board is equally capable of powering a RepRap, mill, laser cutter, or plotter. There’s even a planned control panel called the Smoothiepanel, making this a great choice for your next CNC build.

Automatic Bluetooth Module Programmer

automatic-bluetooth-programming

Before we dive in don’t be confused by the title. This doesn’t flash firmware to the device. But it does automate the process of setting up the Bluetooth to serial module for use in your projects.

We’re often confused by the lack of a standard way of describing these inexpensive modules. We would look at this can call it an HC-05, but we’re not sure if that’s right or not. [James Daniel] calls it a JY-MCU board. If you have a handle on the differences (or lack of) please let us know in the comments. Either way we know that these boards can be frustrating to work with. They can be found with a wide variety of different firmwares, which can make the configuration process a bit different for each.

[James’] solution connects the device to an Arduino running a sketch that he wrote. Connect the device, launch the terminal monitor in the Arduino IDE, then give it your desired settings. The sketch will poll the Bluetooth module to see what speed it is set to run at. It will then establish which firmware version the board is running, displaying this info in the terminal. It then uses that information to program the board with your desired settings.

In this case [James] is using one of the modules to drive his 3D printer without being tethered to his laptop.

Continue reading “Automatic Bluetooth Module Programmer”

World Maker Faire 2013: The Sub-$500 Deltaprintr

There are a few delta bot 3D printers out there such as the Rostock which, while being a very nice printer, is still a little expensive. When [Shai] from SUNY wanted to use a 3D printer for his artistic and academic pursuits, he decided to build his own printer. Thus the Deltaprintr was born.

Instead of printed parts, the Deltaprintr uses laser cut and machined parts for just about all of its bill of materials. The three motors mounted in the base are connected to the delta arms with Spectra fishing line, thus getting rid of the ludicrous cost of belts of the requisite length.

Everything is Open Source, and the guys behind the project should be putting their printr up on Kickstarter sometime next month. Word is the entire thing should be sub-$500, and a little bit of guessing tells me that doesn’t mean $499.

BeagleBone Black Does CNC With RAMPS

[Bart] Wanted to try controlling a CNC with his BeagleBone black, but didn’t want to invest in a CNC Cape. No problem – he created his own translator board for RAMPSLinuxCNC for the BeagleBone Black has been available for a few months now, and [Bart] wanted to give it a try. He started experimenting with a single stepper motor and driver.  By the time he hooked up step, direction, and motor phases, [Bart] knew he needed a better solution.

Several CNC capes are available for the BeagleBone boards, but [Bart] had a RAMPS board just sitting around, waiting for a new project.  Most RepRap fans have heard of the RAMPS – or Reprap Arduino Mega Pololu Shield.  In fact, we covered them here just a few days ago as part of our 3D Printering series.   RAMPS handle all the I/O needed for 3D printing, which carries over quite nicely to other CNC applications as well.   The downside is that they’re specifically designed for the Arduino Mega series. Continue reading “BeagleBone Black Does CNC With RAMPS”