Art of 3D printer in the middle of printing a Hackaday Jolly Wrencher logo

3D Printering: Speed Is So Hot Right Now

Speed in 3D printing hasn’t been super important to everyone. Certainly, users value speed. But some value quality even more highly, and if gaining quality means giving up speed, then so be it. That’s more or less how things stood for a while, but all things change.

The landscape of filament-based 3D printing over the past year or so has made one thing clear: the market’s gotten a taste of speed, and what was once the domain of enthusiasts installing and configuring custom firmware is now a baseline people will increasingly expect. After all, who doesn’t want faster prints if one doesn’t have to sacrifice quality in the process?

Speed vs. Quality: No Longer a Tradeoff

Historically, any meaningful increase in printing speed risked compromising quality. Increasing print speed can introduce artifacts like ringing or ghosting, as well as other issues. Printing faster can also highlight mechanical limitations or shortcomings that may not have been a problem at lower speeds. These issues can’t all be resolved by tightening some screws or following a calibration process.

The usual way to get into higher speed printing has been to install something like Klipper, and put the necessary work into configuring and calibrating for best results. Not everyone who prints wishes to go this route. In 3D printing there are always those more interested in the end result than in pushing the limits of the machine itself. For those folks, the benefits of speedy printing have generally come at too high a cost.

That’s no longer the case. One can now buy a printer that effectively self-calibrates, offers noticeably increased printing speeds over any earlier style machines, and does it at a reasonable price.

Continue reading “3D Printering: Speed Is So Hot Right Now”

3D Printering: Treating Filament Like Paint Opens Wild Possibilities

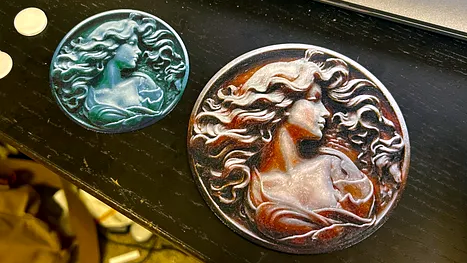
New angles and concepts in 3D printing are always welcome, and we haven’t seen anything quite like [Horn & Rhode]’s 3D prints that do not look anything like 3D prints, accomplished with an experimental tool called HueForge. The concept behind it is simple (though not easy), and the results can be striking when applied correctly.

3D prints that really don’t look 3D-printed.

The idea is this: colored, melted filament is, in a sense, not that different from colored paint. Both come in various colors, are applied in thin layers, and blend into new colors when they do so. When applied correctly, striking imagery can emerge. An example is shown here, but there are several more both on the HueForge project page as well as models on Printables.

Instead of the 3D printer producing a 3D object, the printer creates a (mostly) flat image similar in structure to a lithophane. But unlike a lithophane, these blend colors in clever and effective ways by printing extremely thin layers in highly precise ways.

Doing this effectively requires a software tool to plan the color changes and predict how the outcome will look. It all relies on the fact that even solid-color filaments are not actually completely opaque — not when printed at a layer height of 0.08 mm, anyway — and colors will, as a result, blend into one another when layered. That’s how a model like the one shown here can get away with only a few filament changes.

Of course, this process is far from being completely automated. Good results require a solid amount of manual effort, and the transmissivity of one’s particular filament choices plays a tremendous role in how colors will actually blend. That’s where the FilaScope comes in: a tool to more or less objectively measure how well (or how poorly) a given filament transmits light. The results plug into the HueForge software to better simulate results and plan filament changes.

When done well, it’s possible to create things that look nothing at all like what we have come to expect 3D-printed things to look. The cameo proof-of-concept model is available here if you’d like to try it for yourself, and there’s also an Aztec-style carving that gives a convincing illusion of depth.

[Horn & Rhode] point out that this concept is still searching for a right-sounding name. Front-lit lithophane? Reverse lithophane? Filament painting? Color-blended bas-relief? If you have a better idea, we urge you not to keep it to yourself because [Horn & Rhode] absolutely want to hear from you.

Art of 3D printer in the middle of printing a Hackaday Jolly Wrencher logo

3D Printering: Can You Ever Have Enough Vitamins?

As a community we owe perhaps more than we realise to the RepRap project. From it we get not only a set of open-source printer designs, but that 3D printing at our level has never become dominated by proprietary manufacturers in the way that for example paper printing is. The idea of a printer that can reproduce itself has never quite been fully realised though, because of what the RepRap community refer to as “vitamins“.

These are the mass-produced parts such as nuts, bolts, screws, and other parts which a RepRap printer can’t (yet) create for itself. It’s become a convenience among some of my friends to use this term in general for small pieces of hardware, which leads me to last week. I had a freshly printed prototype of one of my projects, and my hackerspace lacked the tiny self-tapping screws necessary for me to assemble it. Where oh where, was my plaintive cry, are the vitamins!

So my hackerspace is long on woodscrews for some reason, and short on machine screws and self-tappers. And threaded inserts for that matter, but for some reason it’s got a kit of springs. I’m going to have to make an AliExpress order to fix this, so the maybe I need you lot to help me. Just what vitamins does a a lone hardware hacker or a hackerspace need? Continue reading “3D Printering: Can You Ever Have Enough Vitamins?”

Art of 3D printer in the middle of printing a Hackaday Jolly Wrencher logo

3D Printering: Managing Multiple Printing Profiles

I know people who have 3D printers that are little more than appliances. They buy it, they print with it, and they don’t change much of anything. That doesn’t describe me and, I’m guessing, it doesn’t describe you either. This does lead to a problem, though, when it comes to slicers. You have to keep changing profiles and modifying them. It can be hard to keep things straight. For example, if you have profiles for different nozzles, you get to make a choice: keep one profile and edit the parts that change, or keep multiple profiles and any common changes have to be propagated to the other profiles.

Part of the reason I want to manage multiple profiles has to do with this mystery object…

I’ve long wanted to create a system that lets me have baseline profiles and then just use specific profiles that change a few items in the baseline. Turns out, I didn’t need to do it. Prusa Slicer and its fork, SuperSlicer, have the capability already. Both of these, of course, are based on Slic3r, but the scripting languages are different and what I’m doing does require G-code scripting. The problem is, this capability is not documented very well and the GUI doesn’t really support it directly, which requires a little sidestepping. I’ll show you how I have things set up and where the limitations are. If you want to try your hand at it, I highly suggest you backup your configuration directory or switch to a new one.

Continue reading “3D Printering: Managing Multiple Printing Profiles”

Art of 3D printer in the middle of printing a Hackaday Jolly Wrencher logo

3D Printering: Today’s Resins Can Meet Your Needs

Filament-based 3D printers spent a long time at the developmental forefront for hobbyists, but resin-based printers have absolutely done a lot of catching up, and so have the resins they use. It used to be broadly true that resin prints looked great but were brittle, but that’s really not the case anymore.

A bigger variety of resins and properties are available to hobbyists than ever before, so if that’s what’s been keeping you away, it’s maybe time for another look. There are tough resins, there are stiff resins, there are heat-resistant resins, and more. Some make casting easy, and some are even flexible. If your part or application needs a particular property, there is probably a resin for it out there.

Continue reading “3D Printering: Today’s Resins Can Meet Your Needs”

Art of 3D printer in the middle of printing a Hackaday Jolly Wrencher logo

3D Printering: Giants

Newton famously said, “If I see further than others, it is by standing upon the shoulders of giants.” For 3D printing, though, it might be the reverse. If a printer prints larger than others, it is probably using work developed for smaller printers. There are a variety of very large 3D printers out there now and you frequently see claims in the press of “world’s largest 3D printer.” Roboze, for example, makes that claim with a build volume of 1 meter on each axis.

Continue reading “3D Printering: Giants”

Art of 3D printer in the middle of printing a Hackaday Jolly Wrencher logo

3D Printering: Water-Cooled Hotends

There’s an old joke about the Thermos bottle that keeps things hot and cold, so someone loaded it with soup and ice cream. That joke is a little close to home when it comes to FDM 3D printers.

You want to melt plastic, of course, or things won’t print, so you need heat. But if the plastic filament gets hot too early, it will get soft, expand, and jam. Heat crawling up the hot end like this is known as heat creep and there are a variety of ways that hot ends try to cope with the need to be hot and cold at the same time. Most hotends today are air-cooled with a small fan. But water-cooled hotends have been around for a while and are showing up more and more. Is it a gimmick? Are you using, planning to use, or have used (and abandoned) water cooling on your hot end?

Heat Break

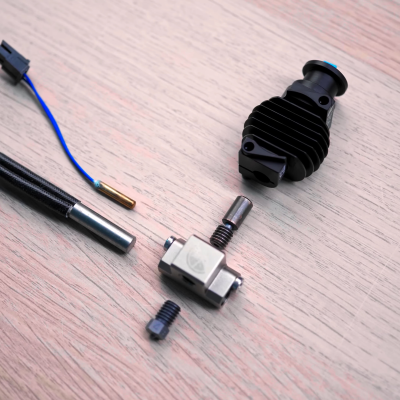
The most common method is to use a heat-break between the heating block and the rest of the filament path. The heat-break is designed to transfer as little heat as necessary, and it usually screws into a large heat sink that has a fan running over it. What heat makes it across the break should blow away with the fan cooling.

From Thomas Sanladerer’s review of the Copperhead hotend. Heat break in the middle.

High tech solutions include making heat-breaks out of titanium or even two dissimilar metals, all with the aim of transferring less heat into the cooler part of the hot end. More modern hot ends use support structures so the heatbreak doesn’t need mechanical rigidity, and they can make very thin-walled heatbreaks that don’t transmit much heat. Surely, then, this is case closed, right? Maybe not.

While it is true that a standard heat-break and a fan can do the job for common 3D printing tasks, there can be problems. First, if you want to print fast — time is money, after all — you need more power to melt more filament per second. If a heatbreak transfers 10% of the heat, this increases demands on the upstream cooling. Some engineering materials want to print at higher temperatures, so you can have the same problem there as well. If you want to heat the entire print chamber, which can help with certain printing materials, that can also cause problems since the ambient air is now hotter. Blowing hot air around isn’t going to cool as effectively. Not to mention, fans that can operate at high temperatures are notoriously expensive.

There are other downsides to fans. Over a long print, a marginal system might eventually let enough heat creep up. Then there’s the noise of a fan blowing during operation. True, you probably have other fans and noisy parts, but it is still one more noise source. With water cooling, you can move the radiator outside a heated enclosure and use larger, slower, and quieter fans while getting more cooling right where you want it. Continue reading “3D Printering: Water-Cooled Hotends”