Heated Build Chambers Don’t Have To Be That Complex

800px-HBC_open_door_view

Looking to improve the quality of your 3D prints? Worried about peeling, warping, and de-laminating layers? All you need is to do is make a heated build chamber!

The heated build chamber is one of the patents that the big 3D printer company owns (we won’t point any fingers), and that’s why you don’t see it as a feature on any of the “consumer” grade 3D printers. But that won’t stop people from making their own!

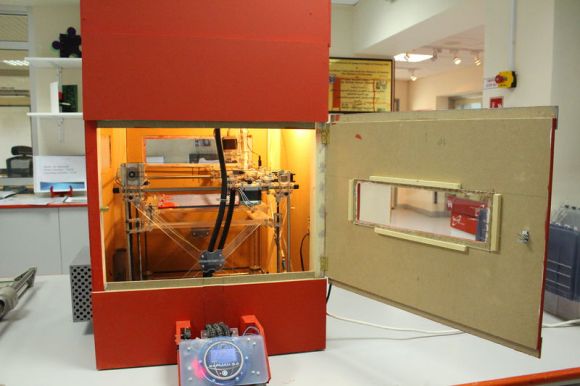
[Repkid] just finished a wiki page on this topic, and it’s a great way to build a heated chamber — if you have the space for it! He’s built a large wooden enclosure for his RepRap out of MDF sheets. Double-ply cardboard is used as thin insulation, although we imagine if you’re building something this large you might as well use some commercial insulation.

The chamber is heated by a blow dryer which is mounted off the back of the box, and the heat is controlled by changing the speed setting of the dryer. A laser cut vent allows for further adjustment. If you want to get really fancy, it would be very easy to install a thermostat PID controller that could regulate the temperature more accurately. To prevent overheating the electronics, all the control boards are also outside of the box.

Continue reading “Heated Build Chambers Don’t Have To Be That Complex”

MRRF: Stuff From Lulzbot

A lot of the big names in 3D printers were at the Midwest RepRap festival showing off their wares, and one of the biggest was Lulzbot with their fabulous Taz 3 printer. This year, they were showing off a new filament, a new extruder, and tipping us off to a very cool project they’re working on.

The new products Lulzbot is carrying are Ninjaflex filament and the extruder to go with it. Ninjaflex is the stretchiest filament we’ve ever seen, with the feel of a slightly hard silicone rubber. Straight off the spool, the filament will stretch to a little less than twice its original length, and in solid, printed form its a hard yet squishy material that would be perfect for remote control tank treads, toys, and 3D printed resin molds. With all the abuse the sample parts received over the weekend, we’re going to call Ninjaflex effectively indestructible, so long as you don’t try to pull the layers apart.

Also from Lulzbot is word on the new 3D scanner they’re working on. The hardware isn’t finalized yet, but the future device will use a webcam, laser, and turntable to scan an object and turn it directly into an .STL file. Yes, that means there won’t be any point clouds or messing about with Meshlab. Lulzperson [Aeva] is working on the software that subtracts an object from its background and turns it into voxels. The scanner will be low-cost and open source, meaning no matter what the volume of the scanner will be, someone will eventually build a person-sized 3D scanner with the same software.

Videos of [Aeva] below showing off the new stuff and talking about the scanner.

Continue reading “MRRF: Stuff From Lulzbot”

A 3-Axis Paper Cutting Mini Laser

LaserCutter

Laser are awesome, and so are projects that use lasers. A recent Instructable by [kokpat] gives an overview of how to create a fully functional laser paper cutter using CDROM stepper motors and an Arduino.

What is special about this build, is that it showcases how easy it can be to build a 3-axis mechanical system used for laser cutters, CNC machines, and 3D printers. Using a stepper stage that consist of a motor screw with a nut slider based carriage, the mechanical system can be put together quite easily and cost effectively. Luckily, from an electronics and software perspective, everything is quite standardized with the proliferation of the RepRap and similar machines. Simply pick any three stepper drivers, find the most pertinent firmware, and voilà! You’re done! Well, almost. Don’t forget a 100mW violet laser!

We have seen a ton of really cool laser cutters before, but this has to be one of the cheapest. See the laser cutter in action after the break.

Continue reading “A 3-Axis Paper Cutting Mini Laser”

MRRF: CoreXZ

It is mid-day Saturday and the Midwest RepRap Festival is in full swing. Saying that there is a lot of 3D printers here is an extreme understatement. There must be at least 100. Out of all these, there are a couple that stand out from the rest due to their non-standard geometry. These are both creations of [Nicholas Seward], called the Wally and Simpson.

Both of these printers were designed to not use linear rails or bearings and be as reprap-able as possible. For example, the Simpson’s only non-printed custom parts are the two wooden base plates and the print bed. The rest of the parts are general hardware and standard 3D printer electronics.

Simpson3

[Nicholas] is showing off something new this weekend (less than 2 weeks new, actually). It is a new printer, currently code named CoreXZ. Unlike his previous designs, the CoreXZ does use linear rails and bearings. The frame is laser cut and is held together with zip ties. This new design uses an h-bot style setup for movements in the X and Z axes. The Y axis is a standard moving bed design with linear rails and bearings.

Continue reading “MRRF: CoreXZ”

Solving Endstop Woes With A Simple Analog Filter

NoiseEndstop

You know what’s cool? Using your engineering knowledge to solve problems that you have while building something. This is exactly what [Reinis] did when his 3D printer’s endstop wasn’t working.

Many of us automatically go to a microcontroller when we run into a problem with a sensor, but often a simple analog filter will do the trick. The endstop in [Reinis’s] RepRap style 3D printer was giving off an unusual amount of noise when closed. When he hooked the endstop up to his oscilloscope, he was shocked to see how much noise there really was. In comes the low-pass filter. Unhappy with the response time of his low-pass filter, [Reinis] solved the problem using a pullup resistor. Two resistors and a capacitor was all that he needed to fix the problem. A great solution!

How have you used analog filters in your projects? Send us a tip and let us know!

OpenKnit, The Open Source Knitting Machine

For all the hubbub about 3D printers leading a way into a new era of manufacturing, a third industrial revolution, and the beginnings of Star Trek replicators, we really haven’t seen many open source advances in the production of textiles and clothing. You know, the stuff that started the industrial revolution. [Gerard Rubio] is bucking that trend with OpenKnit, an open-source knitting machine that’s able to knit anything from a hat to a sweater using open source hardware and software.

We’ve seen a few builds involving knitting machines, but with few exceptions they’re modifications of extremely vintage Brother machines hacked for automation. OpenKnit is built from the ground up from aluminum extrusion, 3D printed parts, a single servo and stepper motor, and a ton of knitting needles.

The software is based on Knitic, an Arduino-based brain for the old Brother machines. This, combined with an automatic shuttle, allows OpenKnit to knit the sweater seen in the pic above in about an hour.

Since OpenKnit is inspired by the RepRap project, all the files, software, and assembly instructions will be up on Github shortly. there’s also a video available below, and a Flickr gallery right here.

Continue reading “OpenKnit, The Open Source Knitting Machine”

4 Axis Delta Router Says Hello World

deltaRouter

[Bart] stood upon the shoulders of the delta 3D printer giants and created this 4 axis delta router. The router was originally created for ORD Camp, an invite only hackers gathering. Each year he creates a new thing with one main purpose: to spark conversation. In his own words “Practicality and suitability are way down the list, so go ahead and snark away. If you do, you are missing the point.”

[Bart] did things a bit differently with his delta. For motors, he went with non captive steppers. “Non captive” means that rather than a shaft, the motor has a hollow threaded nut which rotates. A lead screw (usually with an acme thread) is passed through this nut. As the motor’s nut turns, the screw is pushed or pulled through the motor, creating a linear actuator. The only major downside is that a non captive stepper motor can’t be adjusted by hand. The screw doesn’t turn and neither do any external parts of the motor. For structure, the router uses MakerSlide and v-grove wheels. The spindle is a simple brushless hobby motor and 30 amp speed control. Rather than the outrunner motors we’ve seen lately, [Bart] wisely chose an inrunner motor normally used on R/C cars. Inrunners generally have less torque than their outrunner counterparts, but they make up for this in RPM. [Bart’s] motor is capable of 30,000 RPM, which is plenty for spindle duty. We think the motor bearings will probably need an upgrade, as the original motor bearings weren’t designed for side loads. For a controller, [Bart] utilized an  Azteeg X3 running Repetier.

The router made a great showing at camp, and [Bart] decided it needed a 4th axis. He sourced a rotary axis from eBay. To keep the software simple, he connected the rotary axis to the extruder outputs on his controller. He was then able to hack the mach3 wrapped rotary post processor to output extruder commands. The results look great. [Bart] says the system definitely needs a tailstock, and we agree. We’re looking forward to the next update on this machine!

Continue reading “4 Axis Delta Router Says Hello World”