Using Backscatter Radio For A Soil Sensor Network

With almost 8 billion souls to feed and a changing climate to deal with, there’s never been a better time to field a meaningful “Internet of Agriculture.” But the expansive fields that make industrial-scale agriculture feasible work against the deployment of sensors and actuators because of a lack of infrastructure to power and connect everything. So a low-power radio network for soil moisture sensors is certainly a welcome development.

We can think of a lot of ways that sensors could be powered in the field. Solar comes to mind, since good exposure to the sun is usually a prerequisite for any cropland. But in practice, solar has issues, the prime one being that the plants need the sun more, and will quickly shade out low-profile soil-based sensors.

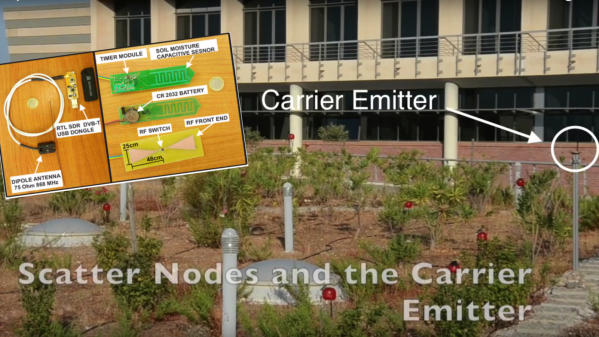
That’s why [Spyros Daskalakis] eschewed PV for his capacitive soil moisture sensors in favor of a backscatter technique very similar to that used in both the Great Seal Bug and mundane RFID tags alike. The soil sensor switches half of an etched PCB bowtie antenna in and out of a circuit at a frequency proportional to soil moisture. A carrier signal from a separate transmitter is reflected off the alternately loaded and unloaded antenna, picking up subcarriers with a frequency proportional to soil moisture. [Spyros] explains more about the sensor design and his technique for handling multiple sensors in his paper.

We really like the principles [Spyros] leveraged here, and the simplicity of the system. We can’t help but wonder what sort of synergies there are between this project and the 2015 Hackaday Prize-winning Vinduino project.

Continue reading “Using Backscatter Radio For A Soil Sensor Network”

Harmonographs Generate Geometric Images Unique As Fingerprints

When my elder brother and I were kids back in the late 1970’s, our hacker Dad showed us this 1960-61 catalog of the Atlas Lighting Co (later Thorn Lighting) with an interesting graphic design on the cover. He told us to do a thought experiment, asking us to figure out how it would be possible to have a machine that would draw the design on that catalog cover.

Incorrectly, our first thought was that the design was created with a Spirograph. A spirograph has two main parts: a large ring with gear teeth on the inside and outside circumferences and a set of smaller, toothed wheels with holes in them for inserting a drawing instrument — usually a ball point pen. You hold the big ring, insert the pen in the smaller wheel, and then mesh and rotate the smaller wheel around the big ring. But spirographs can’t be used to draw irregular, asymmetrical figures. You could always recreate a design. Because of the nature of gears, none of them were unique, one off, designs.

A spirograph set like this cannot make the image above[Image credit: Multicherry CC-BY-SA 3.0]
A spirograph set like this cannot make the image above [Image credit: Multicherry CC-BY-SA 3.0]
We figured adding some lever arms, and additional geared wheels (compound gears) could achieve the desired result. It turns out that such a machine is called a Cycloid Drawing Machine. But even with this kind of machine, it was possible to replicate a design as often as required. You would fix the gears and levers and draw a design. If the settings are not disturbed, you can make another copy. Here’s a video of a motorized version of the cycloid machine.

The eventual answer for making such designs was to use a contraption called as the harmonograph. The harmonograph is unique in the sense that while you can make similar looking designs, it would be practically impossible to exactly replicate them — no two will be exactly the same. This thought experiment eventually led to my brother building his own harmonograph. This was way back when the only internet we had was the Library, which was all the way across town and not convenient to pop in on a whim and fancy. This limited our access to information about the device, but eventually, after a couple of months, the project was complete.

Continue reading “Harmonographs Generate Geometric Images Unique As Fingerprints”

Precision CNC Drawing With EtchABot

Turning the classic toy Etch-A-Sketch into a CNC drawing tablet intrigues a large number of hackers. This version by [GeekMom] certainly takes the award for precision and utility. Once you build something like this, you can hardly stop writing firmware for it; [GeekMom] produced an entire Arduino library of code to allow joystick doodling, drawing web images, and a self-erasing spirograph mode. The topper is the version that runs as a clock!

gallery

The major hassle with making a CNC version of this toy is the slop in the drawing mechanism. There is a large amount of backlash when you reverse the drawing direction. If that isn’t bad enough, the backlash is different in the vertical or horizontal directions. Part of [GeekMom’s] presentation is on how to measure and correct for this backlash.

The EtchABot uses three small stepper motors. Two drive the drawing controls and the third flips the device forward to erase the previous drawing. The motors are each controlled by a ULN2003 stepper motor drivers. An Arduino Uno provides the intelligence. Optional components are a DS3231 Real Time Clock and a dual axis X-Y joystick for the clock and doodling capability. Laser cut wood creates a base for holding the Etch-A-Sketch and the electronics.

The write up and details for this project are impressive. Be sure to check out the other entries in [GeekMom’s] blog. Watch the complete spirograph video after the break.

Continue reading “Precision CNC Drawing With EtchABot”

Shmoocon 2016: Phishing For The Phishers

After years of ignoring the emails it’s finally time to get into a conversation with that Nigerian prince you keep hearing from. Robbie Gallagher — an Application Security Engineer with Atlassian in Austin, TX — wanted to find out where perpetrators of phishing emails actually live. Of course you can’t count on the headers of the emails they send you. A better way to track them down is to actually draw them into a conversations, and this means making yourself a juicy target.

Robbie gave an excellent talk on his project Honey-Phish at this year’s Shmoocon. Part of what made it stand out is his narrative on each step of exploring the social engineering technique. For instance, there is already a vibrant community that specializes in forming relationships with scammers. Those who frequent 419 Eater have literally made it into a sport called Scambaiting. The ultimate goal is to prove you’ve baited a scammer is to get the person to take a picture of themselves balancing something on their head. Now the image a the top of this post makes sense, right?

Writing personal emails to your scammer is a great system if you have a lot of time and only want to track down one scammer at a time. Robbie wants to catalog geographic locations for as many as possible and this means automation. Amusingly, the solution is to Phish for Phishers. By automating responses to phishing emails, and enticing the people originating those phishing scams to click on a link, you can ascertain their physical location.

Continue reading “Shmoocon 2016: Phishing For The Phishers”

GNU Radio Drives Oscilloscope

These days we are spoiled with a lot of cheap test equipment. However, you can do a lot of measurements with nothing more than an oscilloscope. Add something like a signal generator and you can do even more. One classic technique for frequency measurement, for example, is using a scope to display a Lissajous pattern. [Franz Schaefer] has a video showing how to generate these useful curves with GNU Radio.

As we pointed out earlier, GNU Radio doesn’t have to be about radio–it is really just a Python-based signal processing laboratory. [Franz] uses GNU Radio Companion to create blocks which in turn create the patterns on an old analog scope.

Continue reading “GNU Radio Drives Oscilloscope”

Hacklet 84 – Alarm Clocks

The stereotypical hardware hacker is a creature of the night. Some of us do our best work in the wee hours. The unfortunate side effect of this is that we have a hard time getting up in the morning. Sometimes life demands a hacker be up-and-at-em before noon though. In these cases, the only solution is an alarm clock. This week’s Hacklet features some of the best alarm clock projects on Hackaday.io!
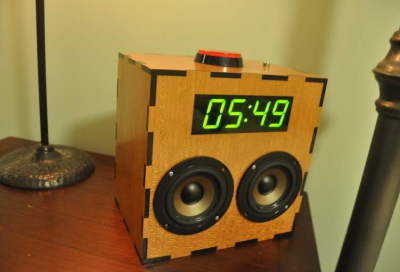
mercyWe start with [hberg32] and Merciless Pi Alarm Clock. Merciless is a good name for this Raspberry Pi based clock. We have to say it’s quite snazzy with its laser cut case and large seven segment LED face. When the alarm goes off though, this Pi bites back.

Titanium drivers powered by a 20 watt amplifier will wake even the heaviest sleepers. If that’s not enough, [hberg32] added a bed shaker to vibrate you out of the sack. The snooze button only works 3 times, after that you can press all you want, the music will still play. As if that wasn’t enough, this clock even has a pressure sensor. If you get back in bed, the alarm starts up again. Truly fitting of the name “merciless”.
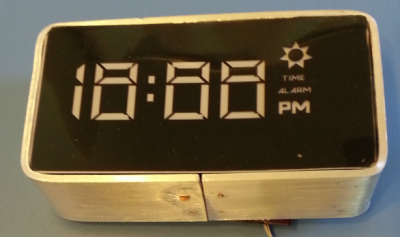
irss[Ceady] took the kinder, gentler route with Integrated Room Sunrise Simulator. This alarm clock simulates dawn, gently waking the user up. A Lutron Maestro series wireless dimmer allows the sunrise simulator to slowly increase the room’s light level over a period of 10 minutes, allowing [Ceady] to wake up silently.

The clock itself uses an ATmega168 for control. [Ceady] spent a considerable amount of time testing out different methods of creating a seven segment LED display. When casting with cornstarch and resin didn’t do the trick, he went to commercial LED diffuser film from Inventables. The film proved to be just what he was looking for.
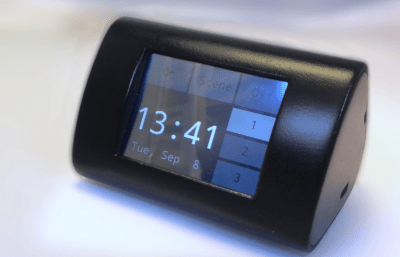
chumby2Next up is [Spiros Papadimitriou] with DIY Chumby-lite. Taking inspiration from [Bunnie Huang] and the Chumby project, [Spiros] created a friendly alarm clock with a touchscreen LCD. Much like the Chumby, this clock packs a WiFi module.

In this case though, the WiFi module is an ESP8266, whose on-board Xtensa microcontroller runs the whole show. [Spiros] programmed his Sparkfun ESP8266 Thing in C++. To keep costs down, [Spiros] left out anything unnecessary – like a real-time clock module. The Chumby-lite uses NTP to stay regular. The reductions paid off – this clock can be built for around $13.00, not including the very nice 3D printed case.
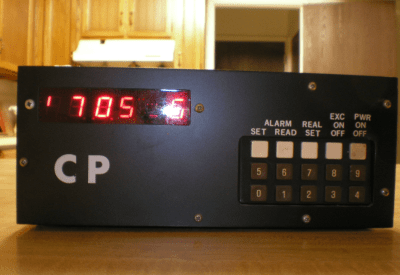
1983[Wanderingmetalhead] takes us all way back to 1983 with his 7 Day Alarm Clock. 32 years ago, this was [wanderingmetalhead’s] first embedded system project. As the name implies, this clock stores a different wake time for each day of the week. Actual numeric entry sure beats the old “hold two buttons and watch the numbers spin” system.

This is an oldie. The system is based upon a Motorola (which became Freescale, and is now NXP) 6802 micro. The code was written in assembly and cross-assembled on an Apple II. A 3.58MHz colorburst crystal divided down to 60 Hz provides the time base. This setup wasn’t perfect, but good down to a about a minute a month. The whole project lived and worked in an old amplifier case, where it dutifully woke [wanderingmetalhead] each day for 17 years.

If you want to see more alarm clock projects, check out our new alarm clocks list! If I didn’t wake up early enough to catch your project, don’t be shy, just drop me a message on Hackaday.io. That’s it for this week’s Hacklet. As always, see you next week. Same hack time, same hack channel, bringing you the best of Hackaday.io!

Why You Should Build A Clock For Social Good This Week

We’ve seen a wide range of emotional responses regarding [Ahmed Mohamed]’s arrest this week for bringing a clock he built to school. No matter where you fall on the political scale, we can all agree that mistaking a hobby engineering project for a bomb is a problem for education. People just don’t understand that mere mortals can, and do, build electronics. We can change that, but we need your help.

Our friends at NYC Resistor came up with a great idea. Why don’t we all build a clock? I want you to take it one step further: find a non-hacker to partner with on the project. Grab a friend, relative, or acquaintance and ask them to join you in building a clock from stuff you have on hand in order to promote STEM education.

Clocks have long been one of my favorite projects, and like the one shown above, most of my builds didn’t look anything like traditional clocks. Once you start getting into how clocks are built, you’ll be amazed at how accurate dirt-cheap clocks are and how difficult it can be to replicate that accuracy. Pass this knowledge on to your teammates. Teach them how to solder, or how to draw a schematic, or just how to open the case on some electronics without fear.

Post your project on hackaday.io and we’ll add it to the Clocks for Social Good list (message me with the link). If you decide to document it elsewhere just leave a link in the comments below. We’ll post a roundup of all these builds next week. I plan to repurpose the soldering workshop board I populated last week as the display for my clock. I’ll be helping a friend of mine learn to solder as part of the build!

Happy hacking, and thanks for helping to dispel fear and teach others about awesome engineering.

Need some inspiration to get going? You can always chat with others about it in the Hacker Channel. If you have an Arduino and some LED strips you can do something like this. Here’s a binary clock built with just a few LEDs. Or if you have a laser cutter at your disposal you can make a unique display with just a pair of motors.