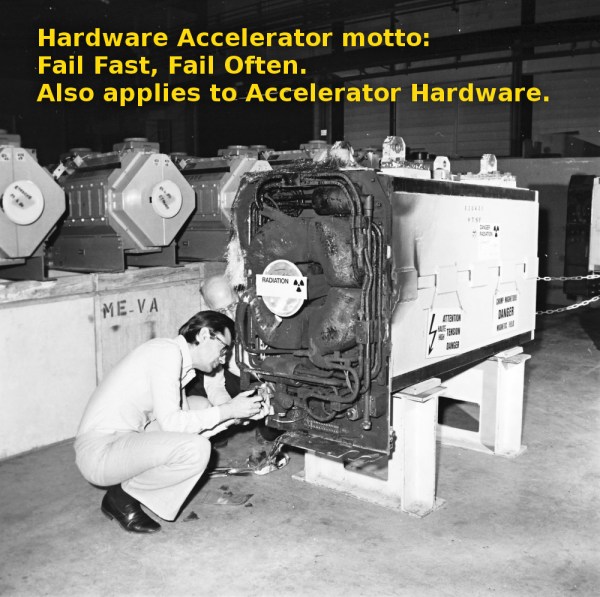
Arduino Vs. Phidgets – Dev Time Trials

Is developing on an Arduino too slow? Are Phidgets too expensive? When might you use one or the other? Hackaday regular [Ken] breaks down what he learned from three experimental time trials.

The main development differences between Arduino and Phidgets are a mix of flavor preferences and some hard facts. The Arduino is open source, Phidgets are proprietary. Arduino requires a mix of hard- and software where Phidgets only needs (and only allows) a connection to a full computer but enables high level languages – it is expected to get the job done sooner and easier. And finally, Arduinos are cheap, Phidgets are 3-5x the cost.

The three time trials were common tasks: 1. Blink an LED. 2. Use a pot to turn a servo. 3. Build a pedometer. For [Ken], the Phidgets won in each of the three experiments, but not significantly: 37%, 45%, and 25% respectively. The difference is only minutes. Even considering time value, for most hackers it is not worth the cost.

HAD - Phidgets3In context, the advantages of a mildly more rapid development on the simplest projects are wasted away by needing to rebuild a permanent solution. Chained to a PC, Phidgets are only useful for temporary or fixed projects. For many of our readers that puts them dead in the water. Arduinos may technically be dev kits but are cheap enough to be disposed of in the project as the permanent solution – probably the norm for most of us.

[Ken] points out that for the software crowd that abhor electronics, Phidgets plays to their preferences. Phidgets clips together their pricey peripherals and the rest is all done in code using familiar modern languages and libraries. We wonder just how large this group could still be; Phidgets might have been an interesting kit years ago when the gulf between disciplines was broader but the trend these days is towards everyone knowing a little about everything. Hackaday readers probably represent that trend more than most, but let us know if that seems off.

[Ken]’s article has much more and much better detailed explanations of the experiments and the tradeoffs between the platforms.

If you enjoy watching parallel engineering, see the time-lapse video below for a split screen of the time trials.

Continue reading “Arduino Vs. Phidgets – Dev Time Trials”

Upgrading DJI Flight Controllers

DJI, the company that gave us the far too popular Phantom line of quadcopters, doesn’t just make the most popular line of FPV quads. Their top of the line flight controller, The Naza V2, is very good, able to connect to flight planning software that will set waypoints, talk to peripherals over a CAN bus, and has improved flight algorithms. On the other hand, their ‘reduced price’ model, the Naza Light, can’t connect to these nifty CAN bus peripherals and has a bit of a problem with drifting the quad from one side or another.

The Naza V2 sells for around $300, and the Naza Light sells for about $170, both with a GPS module. The hardware inside the V2 and Light is exactly the same. We all know how this is going to go down, right?

[udnham] over on the RC Groups forum figured out a way to load the more capable Naza V2 firmware on the Naza Light, giving the cheaper flight controller features that were, until now, only found in the more expensive V2 hardware. The upgrades include better algorithms for GPS position and altitude hold, the ability to connect to DJI peripherals including the Bluetooth module, the iOSD, and camera gimbals, Octocopter support, the DJI datalink modem, and a bunch of other features.

Even though DJI is using the same hardware in the $170 Naza Light and the $300 Naza V2, upgrading the firmware requires an Internet connection to the DJI servers. [udnham] wrote a utility that modifies the /etc/hosts file on your computer, runs a service, and allows you to upgrade your firmware on the Naza Light. It’s basically a $130 firmware upgrade for a DJI flight controller that’s a single download away.

[udnham] set up a site where you can download the firmware flashing tool with a few videos showing the upgrade process and the improvement over the stock firmware. You can check those out below.

Continue reading “Upgrading DJI Flight Controllers”

800 X 600 VGA With The STM32F4

Generating VGA is a perennial favorite on the Hackaday tips line, and it’s not hard to see why. Low-res video games, of course, but sending all those pixels out to a screen is actually a pretty challenging feat of coding. The best most project have attained is the original VGA standard, 640×480. Now that we have fast ARMs sitting around, we can bump that up to 800×600, like [Karl] did with an STM32F4 Discovery board.

The problem with generating VGA on a microcontroller is the pixel frequency – the speed at which pixels are shoved out of the microcontroller and onto the screen. For an 800×600 display, that’s 36 MHz; faster than what the 8-bit micros can do, but a piece of cake for the STM32F4 [Karl] is using.

[Karl] started his build by looking at the VGA project Artekit put together. It too uses an STM32, but a 36-pin F103 part. Still, it was fast enough to generate a line-doubled 800×600 display. [Karl] took this code and ported it over to the F4 part on the Discovery board that has enough space for a full 800×600 frame buffer.

With all that RAM on board the F4 part, [Karl] was able to expand the frame buffer and create a relatively high-resolution display with DMA and about a dozen lines of code. It looks great, and now we just need a proper application for high-resolution VGA displays. Retrocomputing? A high-resolution terminal emulator? Who knows, but it’s a great use for the STM32.

If circles and some text aren’t your thing, Artekit also has Space Invaders running on the 36-pin STM32.

Sound Reactive Drums Of Trailing Light

If you’re going to be the drummer in a band for a Back to the Future themed New Years Eve party, you really need to add something to your gig that captures that kitschy futuristic ambiance as seen by the 80s. Rainbow LEDs will do the trick.

For his drum set’s reactive trailing light display, [Alec Smecher] was inspired by a similar project he’d seen in the past where Neopixels were added to a regular drum kit and activated with several individual microphones. Since the microphones ultimately heard all of the thundering noise from every drum and cymbal at once, there was a lot of bleed over in the response of the LEDs. To remedy this, [Alec] used piezo pickups which listen to discrete surface vibrations rather than sound in order to clean up the effect produced by the lights. Each of the five LED strips lining the stands of his cymbal and inside of his drums were programmed to react with a burst of light equal in brightness to the intensity of the vibration sensed by the piezo.

To insure everything kept together amidst all the constant motion and shaking during performance, [Alec] soldered his connections directly onto his Trinket’s pins as well as the fragile pickup of the piezo. The pickup of the sensors were taped directly against the skin of his drums and along the inside of each cymbal to maximize responsiveness. After ringing in the new year appropriately as the ‘band from the future’, [Alec] reports that his colorful addition worked fantastic the whole night.

Those interested in building their own can find a nice schematic on [Alec’s] blog as well as the code he used on github. Difficulty level taken into account, this is a great first project for a musician who has yet to dabble in electronics… and seeing that it’s a brand new year, there’s no better time to have a go at something new.

Continue reading “Sound Reactive Drums Of Trailing Light”

Digital To Analog To Digital To Analog To Digital Conversion

[Andy] had the idea of turning a mixing desk into a MIDI controller. At first glance, this idea seems extremely practical – mixers are a great way to get a lot of dials and faders in a cheap, compact, and robust enclosure. Exactly how you turn a mixer into a MIDI device is what’s important. This build might not be the most efficient, but it does have the best name ever: digital to analog to digital to analog to digital conversion.

The process starts by generating a sine wave on an Arduino with some direct digital synthesis. A 480 Hz square wave is generated on an ATTiny85. Both of these signals are then fed into a 74LS08 AND gate. According to the schematic [Andy] posted, these signals are going into two different gates, with the other input of the gate pulled high. The output of the gate is then sent through a pair of resistors and combined to the ‘audio out’ signal. [Andy] says this is ‘spine-crawling’ for people who do this professionally. If anyone knows what this part of the circuit actually does, please leave a note in the comments.

The signal from the AND gates is then fed into the mixer and sent out to the analog input of another Arduino. This Arduino converts the audio coming out of the mixer to frequencies using a Fast Hartley Transform. With a binary representation of what’s happening inside the mixer, [Andy] has something that can be converted into MIDI.

[Andy] put up a demo of this circuit working. He’s connected the MIDI out to Abelton and can modify MIDI parameters using an audio mixer. Video of that below if you’re still trying to wrap your head around this one.

Continue reading “Digital To Analog To Digital To Analog To Digital Conversion”

The Smallest Portable Pi

What do you get when you take an extremely small Raspberry Pi clone and stuff it inside a Game Boy Advance SP? We don’t know what to call it, but it’s probably one of the best portable gaming machines ever made, able to run emulators ranging from the Apple II to playing Quake III natively on a tiny flip-top display.

This isn’t the first time we’ve seen [frostedfires]’ work on a tiny system stuffed into a Game Boy. The initial post on this build over on the bacman forums just covered the basics – getting an Odroid W up and running, and putting Quake III on the tiny display. Now that the build is complete, we can get a look at what it takes to turn a Raspberry Pi clone into one of the smallest portable projects we’ve ever seen.

Using a Raspi clone as the only component in a tiny portable emulation station isn’t possible, so [frostefires] added a few other bits of electronics to make everything work. There’s a joystick from a PSP in there to work as the mouse, a few extra buttons in addition to the stock Game Boy ones, A USB hub, WiFi adapter, speaker and amplifier, a battery and the related charging electronics, and a Teensy 3.1 to handle all the input.

It’s a very impressive build that can run emulators ranging from the Apple II to later generation Nintendo consoles and handhelds (including the Game Boy Advance), but since the HDMI connector is availble on the outside of the case, [frostedfires] can also use this as a tiny, portable media center. Check out the video below to see this Game Boy in action, playing Mario Kart and 1080p video.

Continue reading “The Smallest Portable Pi”

Boeing 777 From Manilla Folders, A 6+ Year Effort

The closer you look the more you will be in awe of this shockingly intricate 777 replica. The fully-articulating landing gear alone has over 2,000 parts and 200 hours of assembly, not even including the penny-sized tires with individually-cut lug nuts. All carved from manilla office folders by hand.

HAD - 777 WingA high school art architecture class in 2008 inspired this build by teaching a few papercrafting techniques. When [Luca] got a hold of a precision Air India 777-300ER schematic, he started building this 5 foot long 1:60 scale model. His project has received a fair amount of media attention over the years, including some false reports that he was so focused on the build that he dropped out of college (he did, for 2 years, but for other reasons). 6.5 years in the making, [Luca] is rounding the homestretch.

HAD - 777 GearThe design is manually drawn in Illustrator from the schematics, then is printed directly onto the manilla folders. Wielding an X-acto knife like a watch-maker, [Luca] cuts all the segments out and places them with whispers of glue. Pistons. Axles. Clamps. Tie rods. Brackets. Even pneumatic hoses – fractions of a toothpick thin – are run to their proper locations. A mesh behind the engine was latticed manually from of hundreds of strands. If that was not enough, it all moves and works exactly as it does on the real thing.

Continue reading “Boeing 777 From Manilla Folders, A 6+ Year Effort”