Proper Debugging For Energia Sketches

Moving a sketch from Energia to Code Composer Studio

Energia is a tool that brings the Arduino and Wiring framework to Texas Instruments’ MSP430 microcontrollers and the MSP430 Launchpad development board. This allows for easy development in an Arduino-like environment while targeting a different microcontroller family.

One problem with Energia and Arduino is the difficulty of debugging. Usually, we’re stuck putting a Serial.println(); and watching the serial port to trace what our program is doing. Other options include blinking LEDs, or using external displays.

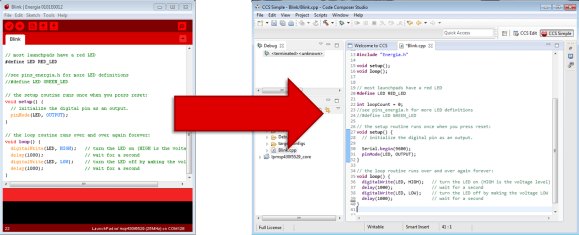
Code Composer Studio, TI’s official development tool, allows for line-by-line debugging of applications. You can set breakpoints, watch the value of variables, and step through an application one instruction at a time.

The good news is that the latest version of Code Composer Studio supports importing Energia sketches. Once imported, you can step through the code and easily debug your application. This is a huge help to people developing more complex software using Energia, such as libraries.

TI gives us an overview of the new feature in a video after the break.

[Thanks to Adrian for the tip!]

Continue reading “Proper Debugging For Energia Sketches”

A Fully Mechanical 3D Printer Is Mind Blowing

mechanical 3d printer

It’s been a while since we’ve been seriously impressed with a project like this one. [Daniël de Bruin], a student at the Art Academy in Utrecht has just put the final touches on his mechanical 3D printer.

That’s right. Mechanical.

No computers, no motors, just the power of gravity. It could have been built 100 years ago.

The machine uses a 15kg weight to power the mechanism — it does need to be reset during the print, but that’s a small price to pay for this kind of mechanical automation.

He uses a type of clay in a paste extruder that slowly deposits the material on the build platform. To program the machine, there is a small guiding mechanism that follows the contour of a bent aluminum wire. This allows you to make any number of symmetrical and circular objects.

[Daniël] says he was inspired to build this machine because he loves 3D printing — but at the same time, he feels like it’s kind of like cheating. Beyond pressing the print button, there’s no real human interaction.

I love technology but how can I reclaim ownership of my work? Perhaps by building the machine that produces the work. Perhaps by physically powering the machine, which I built, that produces the work. in hopes of rediscovering the sense of having created something, I create.

Continue reading “A Fully Mechanical 3D Printer Is Mind Blowing”

Pi Musicbox 0.5 Released

Pi MusicBox Logo


Have an extra Raspberry Pi kicking around? Pi MusicBox provides a way to quickly turn it into a standalone streaming device that can fetch music from tons of sources. The latest release of Pi MusicBox adds a bunch of new features.

We took a look at this software over a year ago, and noted that it made streaming Spotify easy, and had support for controlling tracks using Music Player Daemon (MPD). The newest release supports AirPlay, DNLA, Google Music, SoundCloud, and several other music sources.

Since the analog audio output on the Pi isn’t great, Pi MusicBox includes support for a variety of USB sound cards. It’s also possible to use the HDMI port for digital audio output, which can be connected into your home theatre system.

If you want to build a standalone music device, this looks like a great place to start. The user community has built a variety of projects that run this software, which are featured on the Pi MusicBox homepage.

Independent Wheel Drive R/C Car

4wdRcCar

The picture above looks like a standard four-wheel drive (4WD) touring car. As one looks closer, a few strange things start to pop out. Where’s the motor? 4 electronic speed controls? What’s going on here? [HammerFET] has created this independent drive R/C car (YouTube link) as a research platform for his control system. The car started off life as a standard Schumacher Mi5 1/10th scale Touring Car. [HammerFET] removed the entire drive system. The motor, differentials, belt drive, and ESC all made for quite a pile of discarded hardware.

He replaced the drive system with 4 Turnigy brushless outrunner motors, installed at the chassis center line. To fit everything together, he had to 3D print new drive cups from stainless steel. The Mi5’s CVD drive shafts had to be cut down, and new carbon fiber suspension towers had to be designed and cut.

The real magic lies in [HammerFET’s] custom control board. He’s using an STM32F4 ARM processor and an InvenSense  MPU-6050 IMU which drone pilots have come to know and love. Hall effect sensors mounted above each motor keep track of the wheel speed, much like an ABS ring on a full-scale car.

[HammerFET’s] software is created with MATLAB and SimuLink. He uses SimuLink’s embedded coder plugin to export his model to C, which runs directly on his board. Expensive software packages for sure, but they do make testing control algorithms much simpler. [HammerFET’s] code is available on Github.

Since everything is controlled by software, changing the car’s drive system is as simple as tweaking a few values in the code. Front and rear power offset is easily changed. Going from a locked spool to an open differential is as simple as changing a value from 0 to 1. Pushing the differential value past 1 literally overdrives the differential. In a turn, the outer wheel will be driven faster than it would be on a mechanical differential, while the inner wheel is slowed down. Fans of drifting will love this setting!

[HammerFET] is still working on his software, he hopes to implement electronic torque vectoring. Interested? Check out the conversation over on his Reddit thread.


Continue reading “Independent Wheel Drive R/C Car”

Google Cardboard VR

Google Cardboard VR Kit For Under $15

Craving some virtual reality goodness? Unsure of Oculus after Facebook purchased them? Well — why not make your own then!

At last weeks Google I/O conference, those lucky enough to attend received the Google Cardboard VR kit. It’s basically just a piece of cardboard, two lenses, a few magnets, an NFC tag and some velcro — but when you slide your phone into it and download the Cardboard app — you have virtual reality, on your phone.

This inspired [Wolfgang] to make his own variation of this, except instead of a phone, it fits a tablet much nicer. It really is just a cardboard box with the lenses glued in place — but it works! Of course you could 3D print a nice housing — but if you’re super excited to try out some VR apps — cardboard will do the trick as well!

Besides the Cardboard app there’s a few more Android VR applications worth a look — Tuscany Dive (explore Tuscany from the comfort of your chair), ViewR (a voice controlled experience), and Dive Volcano VR Demo (explore a volcano!).

Only trick is finding those pesky lenses…

Embedding Wireless Charging Into Your Laptop

Wireless charger in chromebook

Looking for a project to do [Jason Clark] thought it might be fun to integrate a spare wireless Qi charger into his HP Chromebook 14.

He started by cracking open the Qi charger — it’s held together by adhesive and four phillips screws hiding under the feet pads — all in all, not that difficult to do. Once the plastic is off, the circuit and coil are actually quite small making it an ideal choice for hacking into various things. We’ve seen them stuffed into Nook’s, a heart, salvaged for a phone hack…

Anyway, the next step was opening up the Chromebook. The Qi charger requires 5V at 2A to work, which luckily, is the USB 3.0 spec — of which he has two ports in the Chromebook. He identified the 5V supply on the board and soldered in the wires directly —  Let there be power!

While the coil and board are fairly small, there’s not that much space underneath the Chromebook’s skin, so [Jason] lengthened the coil wires and located it separately, just below the keyboard. He closed everything up, crossed his fingers and turned the power on. Success!

It’d be cool to do something similar with an RFID reader — then you could have your laptop locked unless you have your RFID ring with you!

DIY Optic Lens

One Small Step For Magnification, One Giant Leap For Home Lens Manufacturing

There are some types of projects that we see quite often here on Hackaday; 3D Printers, Development Boards and Video Game Hardware to name a few. Once in a while we see an optics-based project but those use pre-made lenses. [Peter] felt it was time to give home lens manufacturing a shot and sent in a tip about his experience.

The typical lens manufacturing process starts off by taking a piece of glass and manipulating it into a rough lens shape, either by removing material or heating the glass and forming it in a mold. These lens blanks are then lapped using progressively finer grits of abrasives until the final lens shape and surface finish are achieved. The tool used to lap the lens is very specialized and specific to one lens contour shape. This lapping process can be very time consuming (and therefore expensive) depending on the quality and size of the lens being made.

Continue reading “One Small Step For Magnification, One Giant Leap For Home Lens Manufacturing”