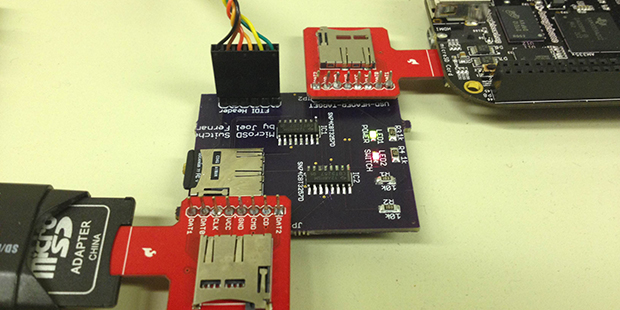
Fire Breathing Jack-O-Lantern Of Death

[Rick] is at it again, this week he has conjured up an even more dangerous Halloween hack. Thankfully [Rick] has included a warning of just how dangerous this hack can be, especially if children are around. Don’t do this hack unless you know what you’re doing and you can do it safely.

For [Rick]’s number four hack of the month he gives us the Fire Breathing Jack-O-Lantern of death! This isn’t a new idea but it is a very unique and simple implementation. We always love seeing the ingenuity of hackers to repurpose existing commercial products. In this case, [Rick] uses an automated air freshener which dispenses a flammable spray for the pumpkins breath if you dare get too close, but not so close as to get burned. The trigger distance is controlled by an Arduino and a Parallax Ping))) sensor so as to fire only when people are farther than 3 feet but closer than 5 feet. You can get a copy of the Arduino sketch from his blog posting.

A small candle is used to ignite the flammable spray, which shoots out 5 to 10 inches from the pumpkin’s mouth when triggered by the ultrasonic sensor. It couldn’t be simpler. The most challenging part was getting the large air freshener dispenser in the pumpkin with the flames coming out the mouth. A little extra whacking at the pumpkin fixed the fit, but planning for a larger pumpkin would be advised.

Theoretically the Arduino shouldn’t trigger and throw flames if people are too close, but when kids are running around they may come right into the target area unexpectedly. If this hack is used in the right place it would make for a great Halloween display item and could be used safely.

After the break you can watch [Rick’s] flame breathing Jack-o-Lantern build tutorial.

Continue reading “Fire Breathing Jack-O-Lantern Of Death”

A Very Professional Homemade CNC Router

[Benne] has a small workshop at home so he decided to make a very versatile CNC router for his final project at school. It took him around 6 months to arrive at the result you can see in the image above and what is even more impressive is that he was only 17 years old at the time.

[Benne] used the free cad program Google Sketchup to draw the different parts he needed around the linear rails and ball screws he already had lying around. The CNC’s travel is 730x650x150mm, uses Nema 23 (3Nm) steppers, 15mm thick aluminum plates and 30x60mm aluminum extrusions. In his article, [Benne] gives great advice to those who would like to design their CNC like his, providing very useful links to manufacturers. He estimated the cost of his CNC to be around 1500 euros (about $2000). We’ll let you browse the many lines of his very detailed build log, which makes us wish to be as talented as him even at our age…

Old Fax Machine Shows Signs Of Life

fax1

[Dmitry] is a Moscow based artist. He’s also a an avid circuit bender and hardware hacker. His latest project is entitled “signes de vie” or signs of life. [Dmitry] started with an Arduino and an old thermal fax machine. He removed the thermal print head and replaced it with a row of 10 LEDs. These old fax machines would use rolls of paper, cutting each sheet of as it was printed. [Dmitry] kept the roll system, but treated his paper with fluorescent dye. As the paper passes under the LEDs, it pauses for a moment and the LEDs are flashed. This causes a ghostly glow to remain on the paper for several minutes as the next rows are printed.

While [Dmitry] could have made this the world’s biggest tweet printer, he chose to go a more mathematical route. Each printed row of dots represents a generation of one-dimensional cellular automata. Cellular automation is a mathematical model of generations of cells. All cells exist on a grid, and can be alive or dead. The number of neighboring live cells determines if any given cell will live on to the next generation. One common implementation of cellular automation is Conway’s Game of Life. In [Dmitry’s] implementation, a bank of switches select which of the 256 common cellular automata rules controls the colony. A second bank selects how long each generation lasts – from 1 to 18 seconds.

We really like how the paper becomes a printed, yet temporary history of the colony. [Dmitry] doesn’t say if he’s using a single long strip of paper, or if he created a loop. We’re hoping for the latter. Finally a useful implementation of the old black fax loop prank.

Continue reading “Old Fax Machine Shows Signs Of Life”

A Much More DYI Air Gap Flash Unit

In reaction to the other air gap flash unit we featured a few days ago, [Eirik] sent us a tip about another one he recently made. In his setup, the duration of the flash peak intensity is around 300ns (1/3,333,333 of a second). As a reminder, an air flash unit consists of a circuit charging a high voltage capacitor, a circuit triggering a discharge on demand, a high voltage capacitor and the air flash tube itself. The flash tube contains two wires which are separated just enough to not spark over at max potential. Isolated from the other two, a third wire is placed in the tube. This wire is connected to a trigger/pulse transformer, which will ionize the gap between the two capacitor leads. This causes the gap to breakdown and a spark to form, thereby creating a flash of light.

[Eirik] constructed his flash tube using an olive jar and a glass test tube. As you can see from the (very nice) picture above, the spark travels along the glass test tube, making the quenching much faster than in an open air spark. [Eirik] built his own high voltage capacitor, using seven rolled capacitors of roughly 2nF each made with duct-tape, tin foil and overhead transparencies. For ‘safety’ they are stored in a PP-pipe. A look at the schematics and overall circuit shown on the website reveals how skilled [Eirik] is, making us think that this is more a nice creation than a hack.

Disclaimer: As with the previous airgap flash, high voltages are used here, so don’t do this at home.

Hackerspacing In Europe: WhiteSpace In Gent

IMG_0751 (Custom)

Welcome to the White Space, or as it is more fondly known, 0x20.

We’re glad we made it out to this one — it wasn’t even planned, but after visiting HSBXL, one of the members got us in touch and so we took a chance and got on a train to Gent, Belgium — just in case someone could show us around. We were in luck, and two members showed up to give us the grand tour!

Continue reading “Hackerspacing In Europe: WhiteSpace In Gent”

Fail Of The Week: Flaming Brushless Motor Controller

Yep, smoke and flames are usually a sign that your electronics aren’t functioning as expected. This is actually the second failure encountered while learning about brushless motor controllers.

[Michael Kohn] purchase the motor while working on a different project and it went unused for quite some time. When he came across it again he decided he should learn the not-so-dark art of BLDC control.

The first hurdle was to figure out how to drive the three-wire motor when he had been expecting only two. The answer required him to come up with switching mechanism that allows three states for each wire: positive, negative, and not connected. His solution was to use MOSFETs. It’s a good idea, but unfortunately during the first iteration they were under-spec’d and he scared the crap out of himself when one of them blew up during testing (clip #1 below). After sourcing a more robust set of MOSFETs [Micheal] went back to testing which is when this little fire broke out. The 22 gauge wires connecting the Lithium battery to the driver just couldn’t cut it. See for yourself in the second clip.

It’s been awhile since we’ve said it: Please remember the Fail of the Week is not about ridiculing the hacker who was gracious enough to document his or her failure. It’s about learning from the mistake and discussing alternatives that can help others in the future. For instance, in this case some advice in determining MOSFET specs and wire gauge for any type of motor would be quite helpful. Have at it in the comments.

Continue reading “Fail Of The Week: Flaming Brushless Motor Controller”

Trinket Contest Update #1

hackaday-trinket-contest-update-1

Entries for the Trinket contest are starting to roll in. The challenge was to slap the Hackaday logo onto something, with 20 of Trinket dev boards which Adafruit put up for grabs. Here’s five of the early entries, which we’ll describe in more detail after the jump. Get your entry in by Friday, November 1st for a chance at a prize.

Continue reading “Trinket Contest Update #1”