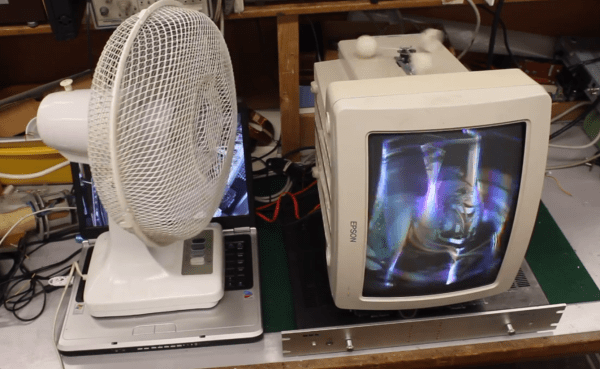
SNESoIP: It’s Exactly What It Sounds Like

prototype-small

Here’s a cool hack for those of you wishing to play some retro multiplayer SNES games online!

[Michael Fitzmayer] is a resident hacker at shackspace; der hackerspace in StuttgartHe’s come up with this clever little ethernet adapter network-bridge that can share local controller-inputs over the internet. The entire project is open-source, and readily available on github. It’s still in the early stage of development, but it is already fully functional. The firmware is small and will fit on an ATmega8, and by the looks of the component list it’s a fairly easy build.

He’s even integrated a switch mode (hold B and Y during boot), which avoids trying to figure out which controller will be player one! After all, don’t you remember untangling the controller cords, trying to figure out which one is which?

We know you had a favorite controller and would give the other “crappy” one to your guest.

Example video is after the break.

Continue reading “SNESoIP: It’s Exactly What It Sounds Like”

USB Ableton Foot Controller Reuses Old Keyboard

footLooper2

No, Hackaday hasn’t started advertising shoes, this is [Matlek’s] foot controller for Ableton Live.

Matlek plays guitar and needed an easy way to control Ableton Live, which he uses as a looper. Ableton normally expects keyboard input, so that’s exactly what he gave it.

An old dell keyboard was gutted down to its controller board. This exposes  the leads the keyboard uses to scan the key matrix.  From there it is simply trial and error connecting different pins together and seeing which keys are printed on the PC screen (A text editor works well for this). Only 8 characters are needed to control the looper, so [Matlek] chose digits 1-8.

Since some of the wires are going to be sharing pins, a small piece of stripboard comes in handy between the buttons and the keyboard controller. [Maltek] used basic momentary push buttons for his mini key matrix, though we think that box looks sturdy enough to support some larger stomp box style buttons.

Everything comes together inside a sturdy shoebox, which also serves to insulate the exposed keyboard PCB from shorting out.

The only major downside to the project is that the box is light enough that it slides easily on the floor when recording or triggering loops. Adding some heavy items (or dare we say, some shoes) would solve this problem. Self adhesive rubber feet on the bottom of the box would help too.

Continue reading “USB Ableton Foot Controller Reuses Old Keyboard”

Repurposing A Ceiling Fan Into A Pottery Wheel

The wheel goes round and round as does [Lou Wozniak]. He’s come back to us, this time hacking together a pottery wheel from a cheap ceiling fan. This is a great use for a discarded or inexpensive fan and the build should cost less than $50. As you watch the video you learn that repurposing the ceiling fan was no simple feat. Lucky for us [Lou] spins through detailed construction procedures and doesn’t fail to cover every tip and trick. He really does think outside the box or should we say inside the bucket and peanut butter jar. The fan gets dismantled as well as rewired inside a 5 gallon bucket which is used as the pottery wheel housing and stand. A plastic peanut butter jar was used as a makeshift electrical junction box inside the bucket. He remounted the motor’s string operated speed switch on the side of the jar and routed the pull string out the side of the bucket. The fan motor should have three or four switch speed settings which might be enough control. If continuous variable speed control is desired he could add in a controller similar to [Ben Krasnow’s] AC controller using one pin on a microcontrollerUPDATE: [AKA the A] tells us in a comment below that this controller won’t work with a ceiling fan, but we still really like [Ben’s] project so we’re leaving this link here.

Most potters use significant amounts of water to wet the clay while they throw, so we have reservations about having the high voltages and open motor design directly under the wheel with no shielding. We know [Lou] could easily hack in a splash pan and of course always plug into a ground fault protected receptacle when using electrical appliances around water.

We do get to see the wheel in operation at the end of the video, which you can watch after the break. However, [Lou] makes no claims at being a pottery artisan.

Continue reading “Repurposing A Ceiling Fan Into A Pottery Wheel”

Organizing Transistors

SAMSUNG

Late last year, [matseng] set up an interesting challenge for himself: design a new PCB every week, send it off to a fab house, and build a new project. It’s a grueling endeavor, but some of these projects are actually very useful and cool. One of the best so far is the TraId – a board that identifies a transistor type and pinout with a nice LED interface.

This build was partly inspired by Dangerous Prototypes’ Part Ninja, a board that determines the pinouts and values of transistors, resistors, caps, and diodes. The TraId is a much more cut down version usable only for transistors, displaying the orientation of the pins and type of transistor on a set of 8 LEDs.

Although the design is very sparse, we could imagine something like this being very useful in a hackerspace, lab, or anywhere else the gremlins of chaos come to reorganize parts drawers. If you’d like to build your own, all the required files are up on the gits.

A 23 Feet Tall Pyramid With 0.31 Mile Of LED Strips

This year the Disorient Camp at Burning Man built a 7m tall pyramid with over half a kilometer of LED strips. For this special occasion several artists had developed patterns for this massive LED display, animating the parties happening every night in front of this build.

To handle the dusty environment, a Toughbook was running the pyramid’s main code, which was rendering the animation frames to 24-bit bitmaps and sending them over UDP to the network. For each face of the pyramid, a $45 BeagleBone Black running a dedicated program was slicing the images into the individual panels. Finally, each panel composed of eight WS281x LED strips was driven by a Teensy 3.0 microcontroller, receiving the piece to display by USB from the BeagleBone. To power the pyramid, 5V 40A power supplies were used for the tall panels, 5V 30A power supplies for the smaller ones.

Unsurprisingly, many of the power supplies failed due to the heat and dust.  The adhesive holding the LED strips also failed, and some screw terminals rattled loose from the 25KW sound system, requiring constant maintenance. Nevertheless, the sixteen thousand LEDs sure made quite an impression.

If anyone attending Burning Man managed to capture video of this thing in action we’d love to see it. Leave a link in the comments.

Students Build A 3D Printed Plane

3d printed plane

A student team has successfully designed, built, and flown a 3D printed RC plane using only $16 of plastic with a consumer-grade 3D printer (Makerbot), plus the necessary electronics and motor.

The folks over at the Wright Brothers Institute (WBI) have a great program called the AFRL Discovery Lab which brings teams of students, businesses, researchers, and government together to work on a specific challenge or opportunity.

One of the programs this year was the Disposable Miniature Air Vehicle, or DMAV for short. The student interns [Nathan, Ben, and Brian] spent the first 5 weeks at Tec^Edge designing the plane. The team went through 5 revisions before they settled on a design they believed could fly. The final plane weighed 1.5 pounds, and on its first flight… plummeted into the ground. Good thing they printed a second copy! After some more practice [Stephen] got the hang of it and was able to fly and land the plane successfully.

According to the WBI, this is the first functional aircraft that has been fully 3D printed (sans electronics) using FDM technology, and the first low wing 3D printed plane to be flown. Hate to burst their bubble, but 3D printed quadcopters have been around for quite a while!

Test flight video is after the break.

Continue reading “Students Build A 3D Printed Plane”

A Bitcoin Vending Machine

bitcoinVendingMachine

Accessibility is one of the biggest hurdles facing the Bitcoin revolution, so [Mathias] found a way to give BTCs some market penetration by converting an old condom vending machine. The machine was 30 years old and required some clean up. [Mathias] also worked in a plywood adapter that attaches to the mount on the back so it can install on a wider variety of surfaces. This is an electricity-free alternative to selling coins: the machine is purely mechanical and it vends custom-made vouchers rather than the coins themselves, which you then redeem on the Kondocoin website.

The transaction isn’t as instant or snazzy as the Bitcoin briefcase converter from Defcon this year, but it still provides the advantage of an up-to-date exchange rate, as the vouchers themselves are valued at amount of Euros spent rather than a set amount of coins. The exchange rate is consulted later, when you punch in your voucher key. [Mathias] wants to share the wealth, too, and offers up the server software on github along with a detailed explanation of the process.