Zelda Is The Princess, Now Link Is Too

[Mike] is a huge fan of The Legend of Zelda: The Wind Waker and now that he has a daughter it’s a great time to pass this epic quest down to the next generation. There’s a problem with explaining the plot to her daughter, though: even though the player can name the character after themselves, there’s no way to change the gendered pronouns. Yes, it’s a problem that could have been solved by a cameo by Professor Oak asking, “Are you a boy or a girl?’ but [Mike] came up with a better solution: changing all the pronouns with a ROM hack.

There are a few ‘problems’ with altering the dialogue with a ROM hack. Most importantly, all the new pronouns need to be the same length as the words they replace. [Mike] is using the word ‘milady’ to replace ‘my lad’ and ‘master,’ but also had to take a page from critiques of modern epics and replace ‘swordsman’ with ‘swordmain.’

So far, everything is working as planned and the [Mike]’s daughter [Maya] is enjoying seeing herself sail her dragon ship and battle foes. It’s a great effort to bring some semblance of gender neutrality to a classic game, and an awesome project for a really great dad.

Thanks to [Guillaume] for sending this one in.

The Band’s Name In Lights, RGB LEDs To Be Exact.

A few of [michu]’s friends formed a band named Kalikut Now and needed an awesome stage show. The band made a few 80cm-high letters of their band name, cut a few pieces of acrylic, and wired them up with a few LED modules. The work of connecting these letters to a computer and programming them fell on [michu], and we’ve got to say he did a pretty good job.

You may remember [michu] from his StripInvaders and PixelInvaders projects, basically a few RGB LED modules that can communicate with an Arduino over an SPI interface. With these huge letters, [michu] ran into a problem: he had 11 meters of cabling between the clock and data lines, far beyond the maximum recommended length for any datasheet.

[michu] looked around the Internet for common problems with SPI interfaces and found a lot of good advice from a lot of very smart people. The issue with the SPI bus was eventually solved by correctly wiring the grounds of his LED modules, building a few dead-simple SPI buffers, and reducing the clock speed of the SPI bus.

After countless hours, the band’s name is in lights, and RGB LEDs to boot. Everything can be controlled with Abelton Live, and looks absolutely fantastic as seen in the video after the break.

Continue reading “The Band’s Name In Lights, RGB LEDs To Be Exact.” →

Raspberry Pi Gets RISC OS, Can Now Play Elite

The processor in the Raspberry Pi – an ARM11 built by Broadcom – actually has a long and storied history. Much as how the Intel i7 in a top-of-the-line desktop can still run code written for the original IBM PC, the ARM chip in the Raspberry Pi is also based on decades-old technology.

The first ARM-based computer was the Acorn Archimedes, a mid-80s computer with 512kB of RAM and no hard drive. The Archimedes ran RISC OS, a very nice graphical operating system written explicitly for the ARM architecture. RISC OS is now available for the Raspberry Pi, finally bridging the gap between educational computers from 1987 and 2012.

Of course, a very much updated version of 25-year-old operating system running on a Raspberry Pi doesn’t mean much without a ‘killer app,’ does it? For the original Acorn Archimedes the killer app – and one of the best video games of the 80s – was Elite, a space trading and combat game that featured vector-style ships. [Pete Taylor] downloaded the Raspi RISC OS image and got Elite running using an Archimedes emulator and, of course, the Archimedes port of Elite.

It’s a pretty neat development if you’re in to alternative OSes and one of the best space-based games ever made. Well worth a download, at the very least.

Bust-a-Move Physical Controller

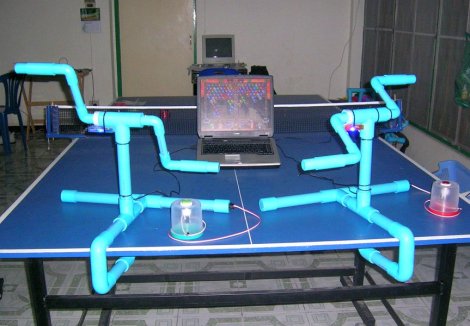
This set of PVC cranks make you work for your game of Puzzle Bobble, also known as Bust-a-Move. It uses a little cannon centered at the bottom of the screen to pop bubbles based on like colors. There is a cartoon character that cranks as hard as it can to aim that cannon, and this hack brings that effort into the real world.

The controllers are made from PVC. A bit of creative use of joints and different pipe diameters make for a freely rotating rig. Rotation is monitored via the optical encoder wheel from an old mouse. Above you can also see the plastic container that hosts the ‘fire’ button. Since the mouse is already an input device, there’s no other electronic work to be done. Just plug the controllers in and map the wheel/buttons to the game you want to play. Make sure to check out the demo video embedded after the break.

If Angry Birds is more of what you’re playing these days you should consider building your own slingshot controller.

Continue reading “Bust-a-Move Physical Controller” →

Arduino MP3 Jukebox

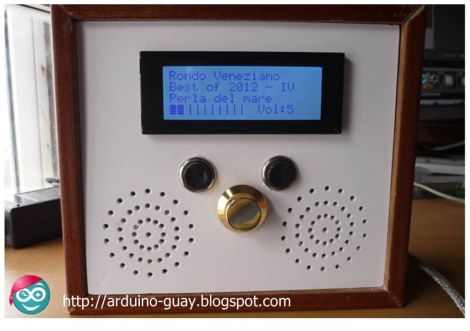
Here’s an inexpensive Arduino-based MP3 Jukebox (translated) which [Jose Daniel Herrera] put together.

He spent some time making sure that it looked great sitting on a shelf with his other audio equipment. This started with a wooden box which is some reused packaging. We’re not familiar with the ‘iNFUSiONES’ product; perhaps it’s tea or tobacco? At any rate, to this he added a custom face plate to host the character LCD, rotary encoder, two buttons, and to act as a grill for the two speakers.

The speakers and their accompanying amplifier circuitry were pulled from a portable speaker set. He combined them with a VS1002d MP3 decoder module, SD card breakout board, and the Arduino itself. In addition to the overview post linked above, there is also a collection of assembly photos, and a post discussing the way he arranged the code for the control systems (translated). See and hear the unit in action in the clip after the break.

Continue reading “Arduino MP3 Jukebox” →

More CRT Fun With The Scope Clock

That’s a sexy way to use parts from an old oscilloscope. [Aaron] took his inspiration from another project that was using CRTs from old oscilloscopes. Now he’s giving back with a site dedicated to sharing information about the Scope Clock. This project is along the same lines as the one we saw a few days ago.

The image above shows his first build in its new home in Hong Kong. The clock is housed in two clear acrylic containers, paired through a surprisingly beefy military grade connector. You can see the journey that it took to get to this polished finish by going to the Prototype tab at the top of the page linked above. One of the images shows some fast captures of the screen redraw. It lets you see the vectors which are being traced on the phosphor screen by the electron gun. This gives an image that we think is far more pleasing than the row scanning of a traditional CRT monitor.

Of course you don’t have a to start from scratch either. Here’s a clock project that just augments a functional CRT scope.

Hands Free Hot Air Station

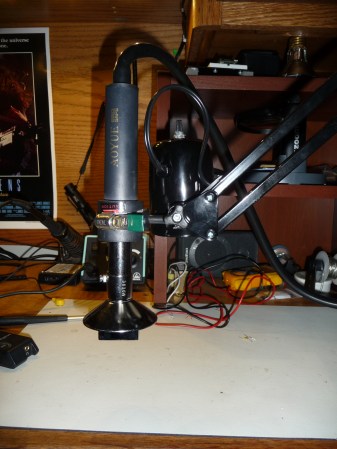
In an effort to ease the process of soldering Ball Grid Array (BGA) chips at home [Roger] rigged up a hands-free solution for his hot air equipment.

The main component in the build is an Aoyue hot air rework station that he already had in his workshop. He wanted an adjustable mount that would hold it steady when reflowing parts so he hit Amazon and bought a $14 articulated lamp. After ditching the funnel-shaped shade he bolted a cable clamp to the socket housing. This can be tightened on the hot air wand, with the spring tension of the lamp making it easy and quick to reposition the nozzle. [Roger] sent this project directly to our tips line and we’ve embedded the rest of the project images after the break.

If you’re looking for a more DIY rework solution you should checkout this hot air pencil hack. It uses a desoldering iron, a fish pump, and some metal mesh as a heat sink to put out a stream of very hot air.

Continue reading “Hands Free Hot Air Station” →