Desktop Siege Weapon: Fireball Cannon

Looking for a harmless way to really step up your office warfare game? Why not build a nitrocellulose desktop cannon!?

On of our favorite science DIY YouTube channels, [NightHawkInLight] shows us how he made this awesome cannon — with interchangeable cannon cartridges! It even has a bit of a steampunk feel to it.

Nitrocellulose, or flash cotton as it’s more commonly known, is used by magicians for fireball magic tricks. Similar to flash paper, it burns up very fast and leaves almost no ash or residue. Creating the fireball effect is as simple as igniting it inside a tube — expanding gases take care of launching it out quite violently.

All the action is in the 3/4″ copper tube cartridges that come complete with home-made glow-plugs made from nichrome wire harvested from a broken hairdryer. These interchangeable cartridges allow [NightHawkInLight] to load up ahead of time and fire them off in quick succession.

Continue reading “Desktop Siege Weapon: Fireball Cannon”

Hacklet 85: Alternative Audio Amplifiers

When you think of amplifiers, you’re probably thinking of audio or some big ‘ol power amps for radios. While interesting, there are some very interesting ‘alternative’ amplifiers floating around hackaday.io that are more than just power amps, and exceedingly useful, to boot.

1601181393316190625[Ronald] bought an XMS amplifier a few years ago, and although it worked well, every time he changed the input, the loudness had to be toggled. One thing led to another, and he realized this amplifier had a four-channel audio processor that could be controlled by I2C. This was the beginning of his Network Amplifier.

Inside the box is a Raspberry Pi that controls a PT2314-based amplifier. Also included is a 2×16 character LCD, a few LEDs, switches, and a rotary encoder.  There was an Android app that controlled the amplifier, but this was discarded for a better looking web-based solution. Now [Ronald] has every audio source available over WiFi.

973501443636885535What if you want an audio amplifier without a speaker? Wait, what? That’s what [DeepSOIC] is doing with his experiments in ion wind loudspeakers.

‘Ion wind lifters’ have been around for decades now, mostly in the labs of slightly off-kilter people who believe this is the technology aliens are using to visit earth. Nevertheless, ion wind lifters produce an airflow, and if you make that wind variable, you get sound. Pretty cool, huh?

The amplifier for this project uses a tube to modulate kilovolt supply through the ion ‘blower’. Does it work? Sure does. [DeepSOIC] got a piece of 0.2 mm nichrome wire to discharge ions into the air, after which the ions drift into the second electrode. The result is sound, and the entire project is built deadbug style. It really doesn’t get cooler than this.
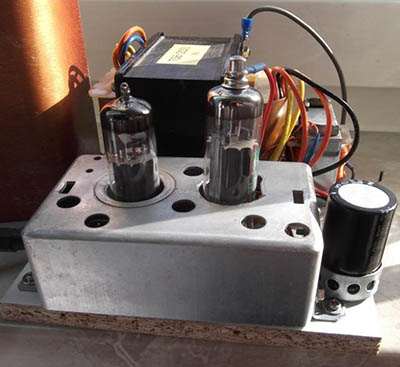
 

2981611414932529525Continuing with the tube amp trend, [Marcel] built the cheapest little tube amp around.

The design of an audio tube amp is fairly simple business. First, you start with a big ‘ol transformer, and rectify the AC into DC. This gets fed into a preamp tube, and this is fed into a bigger power tube.

In about 50 years of development, tube designers had the technology down pat by the mid 1950s, and triode/pentode tubes were created. This allowed tube designers to condense two amplifier stages into a single tube. While this setup was usually used for cheap, toy-like electronics, you can still buy the ECL82 tube today.

[Marcel] took one of these tubes, added a rectifier tube, transformer, and big cap to create the simplest possible tube amp. Use it for guitars, use it for hi-fis, it’s all the same. It’s not going to sound great, but it is a very easy amp to build.

All of these interesting audio amplifier projects are curated on this new list! If you have a build that amplifies sound in an interesting way, don’t be shy, just drop [Adam] a message on Hackaday.io and he’ll add it. That’s it for this week’s Hacklet. As always, see you next week. Same hack time, same hack channel, bringing you the best of Hackaday.io!

Skarp Laser Razor Kickstarter Suspended, Jumps To Indiegogo

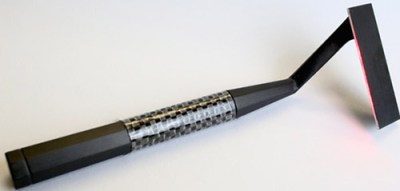
An irritation-free razor that gives a close shave has been a dream for thousands of years. [Gillette] came close, and with multiple blades came even closer, but all razors today are still just sharpened steel dragged across the skin. This is the 21st century, and of course there’s a concept for a laser razor pandering for your moola. We recently covered the Skarp laser razor and its Kickstarter campaign, and today the campaign has been shut down.

The email sent out to all contributors to the Skarp campaign follows:

Hello,

This is a message from Kickstarter’s Integrity team. We’re writing to notify you that the Skarp Laser Razor project has been suspended, and your pledge has been canceled.

After requesting and reviewing additional material from the creator of the project, we’ve concluded that it is in violation of our rule requiring working prototypes of physical products that are offered as rewards. Accordingly, all funding has been stopped and backers will not be charged for their pledges. No further action is required on your part. Suspensions cannot be undone.

We take the integrity of the Kickstarter system very seriously. We only suspend projects when we find evidence that our rules are being violated.

Regards, Kickstarter Integrity Team

It only took eight hours for the Skarp team to relaunch their crowdfunding campaign on Indiegogo. As of this writing, over 900 people (ostensibly from the 20,000 backers of the original Kickstarter campaign) have pledged to the new campaign.

Although we will never know exactly why Kickstarter suspended the original Skarp campaign, the reason given by the Kickstarter Integrity Team points to the lack of a working prototype, one of the requirements for technology campaigns on Kickstarter. Interestingly, Skarp did post a few videos of their razor working. These videos were white balanced poorly enough to look like they were filmed through green cellophane, a technique some have claimed was used to hide the actual mechanism behind the prototype’s method of cutting hair. A few commenters on the Skarp Kickstarter campaign – and here on Hackaday – have guessed the Skarp prototype does not use lasers, but instead a heated length of nichrome wire. While this would burn hair off, the color of the wire would be a dull red when filmed in any normal lighting conditions. It is assumed the poor quality of the Skarp prototype videos is an attempt to hide the fact they do not have a working prototype.

The Skarp laser razor. Source

Skarp’s move to Indiegogo has been lauded by some – mostly in the comments section of the Indiegogo campaign – and has been derided on every other forum on the Internet. Indiegogo is commonly seen as the last refuge of crowdfunding scam artist, but there are a few legitimate reasons why a campaign would choose to go to Indiegogo. Kickstarter is not available for campaign founders in all countries, and for some, debiting a card immediately, instead of after the campaign end like Kickstarter does, is a legitimate crowdfunding strategy.

But for a crowdfunding campaign to be suspended on Kickstarter and immediately move to Indiegogo? This almost never ends well. One of the most famous examples, the Anonabox, had its Kickstarter campaign suspended after it was found the creator was simply rebadging an off-the-shelf router. The Anonabox then moved over to Indiegogo where it raised over $80,000. Already the campaign for the Skarp Laser Razor has raised $135,000 USD from Indiegogo, after having its Kickstarter campaign raised over $4 Million. No, Skarp won’t be one of the most successful technology Kickstarter campaigns of all time. We can only hope it won’t be one of Indiegogo’s most successful campaigns.

3D Printing Has Evolved Two Filament Standards

We’re far beyond the heyday of the RepRap project, and the Hackaday tip line isn’t seeing multiple Kickstarters for 3D printers every week. In a way, this is a bit of a loss. The rapid evolution of the low-cost 3D printer seen in the first half of this decade will never be matched, and from now on we’ll only see incremental improvements instead of the revolutionary steps taken by the first Prusa, the first Printrbot, and even the Makerbot Replicator.

This doesn’t mean everything is standardized. There’s still enough room for arguing over deltas versus Cartesians, beds moving on the Y axis versus moving along the Z, and a host of other details that make the current crop of printers so diverse. One of these small arguments is especially interesting: the diameter of the filament. Today, you can get any type of plastic you want, in any color, in two sizes: 1.75 and 3mm. If you think about it, it’s bizarre. Why on Earth would filament manufacturers, hot end fabricators, and even printer manufacturers decide to support two different varieties of the same consumable? The answer is a mix of a historical choice, engineering tradeoffs, and an absolutely arbitrary consequence of what 3D printers actually do.

Continue reading “3D Printing Has Evolved Two Filament Standards”

“Easy Bake” Vacuformer

One of our favorite things about Hackerspaces is people tend to spend a lot of time building tools, or repairing/upgrading older ones. This is a case of the former. The vacuum former.

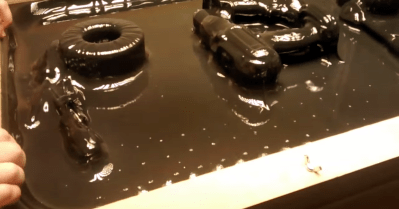
[Adam] wrote in to tell us about this vacuum forming machine which he and few other members built for FizzPOP, a hackerspace in Birmingham, England. The device is used to suck hot sagging plastic around a mold. This is accomplished in two parts, the vacuum table and the heating mechanism to put the sheet of plastic into that sagging state.

vacuum-forming-signThe vacuum part of these tools has been easy to DIY for a long time. Pegboard makes for a very good table surface, with some type of vacuum motor (usually a shopvac or two) in an enclosure below the surface. This design adheres to that common formula.

On the other hand, the heating mechanism is more difficult to solve. The plastic is unwieldy and fragile when hot so a frame is very common. Following the example of commercially available models, the FizzPOP crew built a frame that slides along four vertical rails (envision table legs) extending above the vacuum surface. These legs also hold up the heating element. Often this is a nichrome wire array, but not this time. They went with an array of 70 halogen bulbs in a 10×7 orientation. A PCB was milled for each, with a system of bus-bars connecting them all. The trial run showed that the intensity of the bulbs made hotspots directly below each. But a bit more testing helped them solve the issue by keeping the frame further from the array in the heating phase.

The team’s 13-seconds of fame are found after the break. A black sheet of High-Impact Polystyrene (HIPS) is formed around a compilation of tools spelling out the name of the hackerspace.

Continue reading ““Easy Bake” Vacuformer”

Review: Printrbot Assembled Simple Metal

Hackaday is getting back into the swing of doing reviews, and with that comes reviews of the tool du jour, 3D printers. I have some reservations about reviewing a 3D printer; they’re a new technology, and what may be standard today could be hopelessly outdated in a few months time. Remember geared extruders? The new hotness is, apparently, direct drive extruders.

This is a review of the Printrbot Assembled Simple Metal. If you need any evidence that reviews of 3D printers have a shelf life, you only need to look at the Getting Started guides for this printer. When I bought my Simple Metal, the Printrbot recommended software stack was Slic3r and Repetier-Host. Barely three months later, Cura is now the Printrbot recommended software stack. If you think a simple change in software is inconsequential, check out these prints:

prusa parts
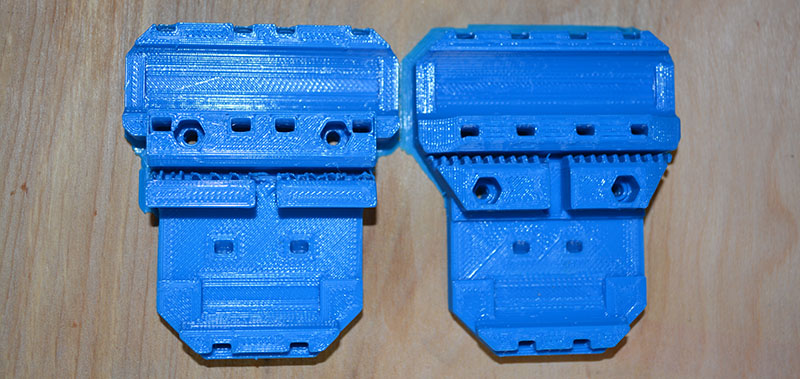
Prusa i3 X-carriages. Left sliced by Slic3r, right sliced by Cura

The print on the left was sliced with Slic3r. The print on the right was sliced with Cura. Notice the small teeth that grip the timing belt on each of these prints. With the Cura-sliced print, everything is fine. The Slic3r-sliced print is a complete failure, not of the machine, but the recommended software for the machine.

Therefore, if the goal of writing a review is to have a definitive opinion of a piece of equipment, a number of questions must be addressed. Since most 3D printing software is open source, should software be included in the review? Is the value proposition of a 3D printer simply a function of price to build volume (this seems to be the standard metric now), or are there intangibles? Should the review cover the quality of prints out of the box, or should the review only focus on print quality after dozens of hours of tweaking? I simply don’t know the answers to these questions, and I suspect you couldn’t get any two people to agree on the answers to these questions.

With that said, I feel I have used this printer enough to make a judgment call as to if this printer was a good buy.

Continue reading “Review: Printrbot Assembled Simple Metal”

Taste The Rainbow One Color At A Time

It’s the end of another fall semester of Bruce Land’s ECE4760 class at Cornell, and that means a fresh crop of microcontroller-based student projects. For their project, [Alice, Jesse, and Mikhail] built a Skittle-sorting miniature factory that bags and seals same-colored candies into little pouches of flavor.

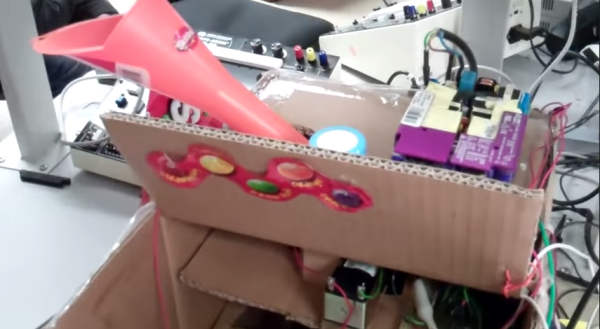
Their design is split into three stages, which are visually delineated within the all-cardboard housing. Skittles are loaded into a funnel at the top that leads to the color detection module. The color is determined here with an RGB LED and OPT101 photodiode driven by an ATMega1284.  Because the reflected RGB values of red and orange Skittles are so similar, the detector uses white light to make the final determination.

Once the matchmaking is over, a servo in the second stage rotates to the angle that corresponds with the color outcome. The Skittle then slides down a cardboard chute, passes through a hole in a cardboard disk, and drops into a hanging bag. Once the bags have reached the predetermined capacity, another servo moves the carousel of bags to a nichrome wire sealing rig. Lead factory worker [Jesse] must intervene at this point to pull the bags off the line. You can see the full walk-through and demonstration of this Skittle flavor separator after the break.

Continue reading “Taste The Rainbow One Color At A Time”