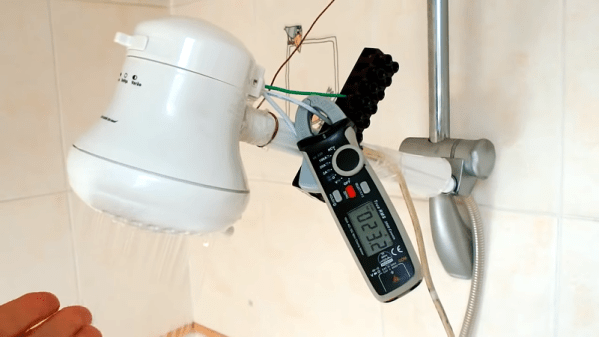
Be The Electronic Chameleon

If you want to work with wearables, you have to pay a little more attention to color. It is one thing to have a 3D printer board colored green or purple with lots of different color components onboard. But if it is something people will wear, they are going to be more choosy. [Sdekon] shows us his technique of using Leuco dye to create items that change color electrically. Well, technically, the dye is heat-sensitive, but it is easy to convert electricity to heat. You can see the final result in the video, below.

The electronics here isn’t a big deal — just some nichrome wire. But the textile art processes are well worth a read. Using a piece of pantyhose as a silk screen, he uses ModPodge to mask the screen. Then he weaves nichrome wire with regular yarn to create a heatable fabric. Don’t have a loom for weaving? No problem. Just make one out of cardboard. There’s even a technique called couching, so there’s lots of variety in the textile arts used to create the project.

Continue reading “Be The Electronic Chameleon”

Simple Jig Gives Plastic Homes To Orphaned Projects

Look around your bench and chances are pretty good that there’s a PCB or scrap of perfboard or even a breadboard sitting there, wires and LEDs sprouting off it, doing something useful and interesting. Taking it to the next level with a snazzy enclosure just seems too hard sometimes, especially if you don’t have access to a 3D printer or laser cutter. But whipping up plastic enclosures can be quick and easy with this simple acrylic bending outfit.

At its heart [Derek]’s bending rig is not much different from any of the many hot-wire foam cutters we’ve featured. A nichrome wire with a tensioning spring is stretched across a slot in a flat work surface. The slot contains an aluminum channel to reflect the heat from the wire upward and to protect the MDF bed; we wonder if perhaps an angle section set in a V-groove might not be more effective, and whether more vertical adjustment range would provide the wider heating area needed for wider radius bends. It works great as is, though, and [Derek] took the time to build a simple timer to control the heating element, for which of course he promptly built a nice looking enclosure.

We can imagine the possibilities here are endless, especially if you use colored acrylic or Lexan and add in some solvent welding. We’ve covered acrylic enclosure techniques before; here’s a post that covers the basics.

Continue reading “Simple Jig Gives Plastic Homes To Orphaned Projects”

Hackaday Prize Entry: An Open Source Kiln

For his Hackaday Prize entry, [Matt] is building a small kiln for melting metals and firing clay.  He’s making this kiln out of materials anyone can acquire — dirt and a bit of nichrome wire.

Most kiln builds you’ll find on the Internet use fancy refractory bricks and other materials you may not have in your back yard. [Matt]’s project is entirely DIY, and starts with a large pile of dirt and rocks. Aftter shaking off the sifted dirt, washing the rocks, straining off the gravel, getting rid of the sand, and siphoning off the water, [Matt] has a big bag of wet clay. This clay is mixed with perlite, an insulating, refractory material, molded into bricks, and fired. The result is a brick that looks good enough to be made into a kiln.

[Matt] has already put a lot of work into the calculations required to figure out the heat transfer of this kiln. At best, this kiln is going to take 14 hours to get up to temperature. That’s incredibly slow, but then again, this kiln will be electric, and will only use 1500 Watts. That’s nothing compared to a commercial electric kiln, but it is a build [Matt] designed himself without any outside help, using only parts he can easily acquire. In any event, this is an excellent project for the Hackaday Prize.

PrusaControl: The Beginner’s Slicer

There are two main applications for managing 3D prints and G-Code generation. Cura is a fantastic application that is seeing a lot of development from the heavy hitters in the industry. Initially developed by Ultimaker,  Lulzbot has their own edition of Cura, It’s the default software packaged with thousands of different printers. Slic3r, as well, has seen a lot of development over the years and some interesting hacks. Do you want to print non-planar surfaces? Slic3r can do that. Slic3r and Cura are two sides of the CAM part of the 3D printing coin, although Cura is decidedly the prettier side.

The ability to combine the extensibility of Slic3r with the user interface of Cura has been on our wish list for a while now. It’s finally time. [Josef Prusa] has released PrusaControl, a 3D printing CAM solution that combines the best of Slic3r into a fantastic, great looking package. What are the benefits? What’s it like? Check that out below.

Continue reading “PrusaControl: The Beginner’s Slicer”

MRRF 17: A Working MakerBot Cupcake

The Midwest RepRap Festival is the best place to go if you want to see the latest in desktop 3D printing. This weekend, we saw full-color 3D printers, a printer with an infinite build volume, new extruders, a fantastic development in the pursuit of Open Source filament, and a whole bunch of D-bots. If you want the bleeding edge in 3D printing, you’re going to Goshen, Indiana.

Of course, it wasn’t always like this. In 2009, MakerBot released the Cupcake, a tiny printer that ushered in the era of democratized 3D printing. The Cupcake was a primitive machine, but it existed, it was open source, and it was cheap – under $500 if you bought it at the right time. This was the printer that brought customized plastic parts to the masses, and even today no hackerspace is complete without an unused Cupcake or Thing-O-Matic sitting in the corner.

The MakerBot Cupcake has not aged well. This should be expected for a technology that is advancing as quickly as 3D printing, but today it’s rare to see a working first generation MakerBot. Not only was the Cupcake limited by the technology available to hackers in 2009, there are some pretty poor design choices in these printers. There’s a reason that old plywood MakerBot in your hackerspace isn’t used anymore – it’s probably broken.

This year at MRRF, [Ryan Branch] of River City Labs brought out his space’s MakerBot Cupcake, serial number 1515 of 2,625 total Cupcakes ever made. He got his Cupcake to print a test cube. If you’re at all familiar with the Cupcake, yes, this is a hack. It’s a miracle these things ever worked in the first place.

Continue reading “MRRF 17: A Working MakerBot Cupcake”

Converting An Easy Bake Oven To USB

[Jason] converted an Easy Bake Oven to USB. If you have to ask why you’ll never know.

Easy Bake Ovens have changed a lot since you burnt down your house by installing a 100 Watt light bulb inside one. Now, Easy Bake Ovens are [bigclive] material. It’s a piece of nichrome wire connected through a switch across mains power. Part of the nichrome wire is a resistor divider used to power a light. This light assembly is just a LED, some resistors, and a diode wired anti-parallel to the LED.

This is a device designed for 120 V, but [Jason] wanted it to run on USB-C. While there are USB-C chargers that will supply enough power for an Easy Bake Oven, the voltage is limited to 20V. Rather than step up the USB-C voltage, [Jason] added some nichrome wires to divide it into six equal segments, then wired all the segments in parallel. This lowers the voltage by one sixth and increases the current by a factor of six. Good enough.

The power supply used for this hack is the official Apple 87W deal, with a USB-C breakout board (available on Tindie, buy some stuff on Tindie. Superliminial advertising) an Arduino Uno connected to the I2C pins. A few bits of code later, and [Jason] had a lot of power coming over a USB cable.

With the Easy Bake Oven fully converted, [Jason] whipped up a batch of cookie mix. After about 15 minutes the cookies crisped up and started to look almost appetizing.

While the result is weird — who on Earth would ever want a USB-powered Easy Bake Oven — this is honestly a fantastic test of [Jason]’s USB-C PHY breakout board. What better way to test a USB-C than a big resistive load, and what better resistive load is there than an Easy Bake Oven? It’s brilliant and hilarious at the same time.

Ugly DIY Portable Soldering Iron

If you’ve ever wanted a battery-operated soldering iron and you just can’t stand the thought of buying one, you might check out the video below from [Just5mins]. In it, he takes a candy tube, some scrap materials, a lithium ion battery, a nichrome wire, a USB charger, and a switch and turns it into an apparently practical soldering iron.

Paradoxically, [Just5mins] used a soldering iron to build this one, so it probably can’t be your only soldering iron, although we suppose you could figure something out in a pinch. Maybe in rep-rap style, make a poor quality one with no soldering and use it to solder up the next one.

Continue reading “Ugly DIY Portable Soldering Iron”