A Simple Method For Expanding Arduino IO Capacity

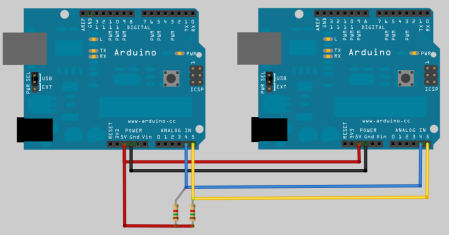
Although there are other ways to do this, [Rod] has decided to write up his method of using two Arduinos and the I2C protocol to expand an Arduino’s IO capacity. As seen in the picture above, you’ll sacrifice 2 analog pins, but if you happen to need IO and have an extra Arduino lying around, this could really help. [Rod] also notes that this method could be used with many Arduino’s in parallel if the situation called for it. The code for this simple hack is included as well, so be sure to check out his site if you want to try this idea.

Some other solutions for extra IO would be to buy an Arduino Mega with 54 digital IO pins or the Muxshield which gives you 48 IO (and is stackable for other shields). An advantage of using the two Arduinos, is that if they are needed to be split in the future for different projects, this could be done. It’s good to have options for your IO needs as every hack is different.

Check out the video after the break to see everything being hooked up.

Continue reading “A Simple Method For Expanding Arduino IO Capacity” →

Hackaday Now Officially Has A G+ Page

There was a recent announcement that G+ opened the doors to businesses and organizations for g+ pages. This means we can have an official G+ page with google’s blessing. We’ve opened one up here. We plan on having “hangouts” from time to time so people can show off what they’ve done. Don’t worry if you’re not into the g+ thing. All stories will still be published here on the site. Maybe we can take a page from Adafruit’s book and record some online “show and tell” sessions to share with you guys.

Of course, sometimes it can be more fun to follow the writers individually, since we are more prone to post opinions and things that aren’t official hackaday info, you can find me,( Caleb Kraft ), pretty easily. For the others, you’ll have to search for their names. None of them are online right now so I can ask permission to link to them.

Announcing Our Next Theme: Kitchen Hacks

Here’s a theme that has the Hackaday staff quite excited; Kitchen hacks. This is a wide-ranging subject that can include anything having to do with food, food preparation, kitchen implements, and enhancements.

We’ve seen quite a few fantastic examples of this theme already. How about a kitchen island the mixes cocktails to order? Perhaps you’d prefer an AI that keeps track of your shopping list or just a computer kiosk that’s nicely integrated. Of course there’s already an iPod dock for that! You might be looking to supe up a pressure cooker, or add a Sous Vide machine to your culinary arsenal. We shouldn’t leave out the ability to ‘print’ images on toast.

Speaking of toast… we’re still waiting for someone to build a laser bread slicer that toasts as it goes. You get the point. Ladies and Gentleman, grab a computer, document your Kitchen hacks, and send them our way!

G-35 Christmas Lights Do Make A Great LED Matrix

This fully-addressable RGB LED matrix was built by [John Graham-Cummings]. He didn’t start from scratch, but wisely repurposed a strand of GE Color Effect lights and built a pleasant looking case in which to mount the G-35 hardware.

We’ve seen this hardware used in a similar way before. Because each ‘bulb’ has its own microcontroller, color data is shifted in via a serial bus. Orient the modules in any pattern you choose and account for that layout in software.

Since the strings have 50 bulbs, [John] simply cut off the one on the end to form his 7×7 matrix with the remaining 49 units. A square of plywood with a grid of holes holds each in place. Cord mess is not a problem as the extra was cut out and the remainders were soldered together again. [John] uses an Arduino Pro to feed in the data, which you can see for yourself in the clip after the break.

Continue reading “G-35 Christmas Lights Do Make A Great LED Matrix” →

This Panavise Jr. Speed Winder Should Be In Every Maker’s Toolbox

panavise-jr-power-winder

Like many makers, [Chris] has a Panavise Jr. on his workbench that he uses for just about everything. The tiny vise is great for all sorts of tasks, and is often considered an indispensable tool. The only problem with the vise is the amount of time it takes to open and close the thing.

[Chris] estimates that it takes somewhere between 2 and 3 million turns of the crank to move the vise’s jaws from fully open to the fully closed position. He figured that his drill is far better at mindlessly turning circles than he is, so he sat down and designed a bit in Google Sketchup to spin the vise’s crank knob.

He fired up his MakerBot and printed out his first “Speed Winder” drill bit. It was decent, but he thought it could be better. After a handful of revisions, he was finally happy with the results. He says it works great, and has posted the model on Thingiverse so that everyone can print one of their own.

Continue reading to see how [Chris] created the bit along with how much time this thing saves him. Continue reading “This Panavise Jr. Speed Winder Should Be In Every Maker’s Toolbox” →

Ikea Wine Rack Originally Sold As A Mattress Holder

[Jeremy Walworth] has been dumpster diving again. He noticed that his neighbor had a bucked of nice-looking wood out at the curb for garbage collection. He inquired about it and learned that it was an Ikea bed that had broken, and that the original hardware was still there in a separate bag. He dragged it to his lair and built this wine rack out of the parts.

The reused rails and hardware provide five shelves for the bottles. [Jeremy] wanted each vessel to stay in place if the shelf wasn’t full, so he grabbed a piece of mill work from the home store and cut dividers which were glued in place. Now he’s able to show off up to sixty bottles for just a couple of bucks in material expense.

It seems like Ikea is able to sell furniture for less than the cost of the materials sourced locally. We think this is a fantastic way to find parts for your own hacks, as the components that break can often be cut down to undamaged pieces. We also make sure to check the As-Is section on each visit for the ‘leftovers’ that are usually sold for pennies. Who know’s maybe you’ll find the parts you need to build a camera mount for documenting projects.

HEX Out Reveals The Secrets Your Data Bus Holds

[Quinn Dunki] is looking to augment the tools she has available at her electronics bench and built the HEX Out as a mock-logic sniffer. The device reads 8 or 16-bit inputs, showing the current state of those connections on a 7-segment display. This requires that you’re comfortable reading Hex codes, but if you’re not it’s almost like studying flash cards; before long you’ll be able to read them without thinking about it.

She’s blogging about the design and build process in three parts. The link above is the first installment where she shares the development process for the top layer which hosts the display hardware. The other two parts should be up for your enjoyment in the next couple of weeks.

You’ll notice her design on this portion of the project still requires a lot of point-to-point soldering, even though she etched her own circuit boards. We didn’t look too closely, but it seems this would be worth going to the trouble of etching a double-sided board if you can.

UPDATE: Part Two is now available