AT-ST High Chair Elevates Lucky Jedi Youngling

As a new parent, there’s lots you have to do. You have to buy a car seat, get the baby’s room ready, figure out daycare; all the boring but unavoidable minutiae of shepherding a tiny human. But for the more creative types, that list might include warming up the 3D printer or putting a fresh bit in the CNC, as there’s no better way to welcome a little one into the world than giving them some custom gear to get started with.

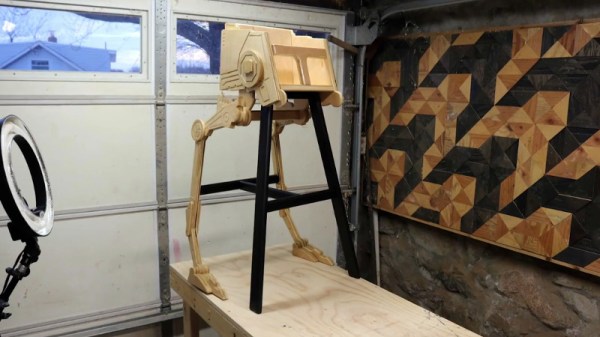
That’s certainly been the plan for [Matthew Regonini], who’s been showering his son with DIY playthings. He recently wrote in to tell us about his awesome AT-ST high chair build that manages to turn the drudgery of getting a baby to eat into an epic worthy of a John Williams score.

This isn’t the first time [Matthew] has turned dead trees into Imperial hardware. Last year we covered his fantastic AT-AT rocker which utilized the same construction techniques. The parts are cut out of plywood with his CNC, separated, cleaned up on a spindle sander, and finally assembled with wood glue and a few strategic fasteners. The depth and level of detail he’s able to achieve when the individual pieces are stacked up is exceptionally impressive. If builds like these don’t get you thinking about adding a CNC to your workshop, nothing will.

As with the AT-AT, the finish on the high chair is simply a healthy application of polyurethane. This keeps the wood from being porous (important as this build will be seeing its fair share of food and liquids) while retaining a natural look. Some might be tempted to paint it up in appropriate Imperial colors, but that might be a bit imposing considering its intended occupant.

Really, the only downside with this build is how quickly his son will outgrow it. The obvious solution to the problem is a constant supply of fresh babies to pilot it, but that’s one type of creation that we don’t generally detail here on Hackaday. If you have questions, ask your parents.

Incidentally, it’s starting to look like we’ve got a plywood arms-race going on. We’re excited to see somebody take it to the next level. A little scared, but mainly excited.

Continue reading “AT-ST High Chair Elevates Lucky Jedi Youngling”

Repairs You Can Print: Fixing Pegboard Clips That Break Too Easily

Right now, we’re running the Repairs You Can Print Contest, where one lucky student and one lucky organization will win the fancy-schmancy Prusa i3 MK3, with the neato multi-extrusion upgrade. [Budiul] is a student, so he figured he would repair something with a 3D printer. Lucky for him, the pegboard in his workshop was completely terrible, or at least the pegboard hooks were. These hooks were made out of PVC, and after time, more and more hooks broke. The solution? Print his own, and make them stronger in the process.

[Budiul] started his fix by taking the remaining, unbroken hooks on his pegboard wall organizer and measuring the relevant dimensions. These were modeled in Creo 4.0, printed out, and tested to fit. After many errors and failed models, he finally got a 3D printable version of his plastic pegboard hooks.

Of course, replacing PVC pegboard hooks with ABS hooks really isn’t that great of a solution. To fix this problem of plastic pegboard hooks for good, he printed the hooks in halves, with a channel running down the middle. This channel was filled with some steel wire and acetone welded together. The result is a fantastically strong pegboard hook that will hold up to the rigors of holding up some tools.

While printing out pegboard hooks might not seem like the greatest use of time, there are a few things going for this hack. Firstly, these aren’t the pegboard hooks made out of steel rod we all know and love; this is some sort of weird proprietary system that uses plastic molded hooks. If they’re made out of plastic anyway, you might as well print them. Secondly, being able to print your own pegboard hooks is a severely underrated capability. If you’ve ever tried to organize a workbench, you’ll know that you’ll never be able to find the right hook for the right spot. There is, apparently, a mystical superposition of pegboard hooks somewhere in the universe.

This is a great hack, and a great entry for the Repairs You Can Print contest. You can check out a video of the hack below.

Continue reading “Repairs You Can Print: Fixing Pegboard Clips That Break Too Easily”

Repairs You Can Print: Floor Lamp Is Now Several Shades Better

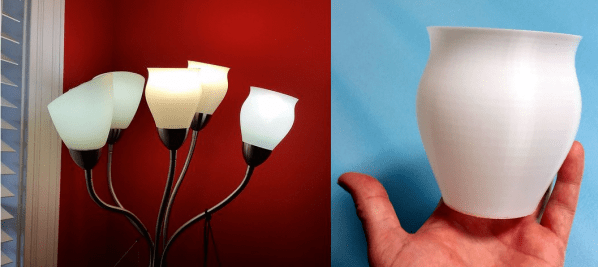
We all have that one possession—maybe more than one—that we’ve had forever and refuse to let go of, even though it has seen better days. When that something is a useful appliance, it can be heartbreaking to watch it deteriorate. For [Elmojo], that thing is a 10+ year old Medusa-style floor lamp. It still looks and works great, but the plastic shades are crumbling. The good news: [Elmojo] has a 3D printer.

Here’s where things get exciting. Not only did [Elmojo] have a pretty good chance of making new shades that would work, he had a chance to change the design, and he did. He could have made ’em look like those twisted or low-poly vases that everybody loves to print. And he still could do that. See, that’s one of the best things about 3D printers. Not only can you rejuvenate beloved objects, you can do it your way. Experiment. You could print out a whole collection and change the shades once a week. Different shapes, different colors. Glow-in-the-dark shades!

[Elmojo] printed the new shades with white BAMTack! (emphasis theirs), and they have been going strong for a while now. The two on the left are the original shades, and the three on the right were printed.

There’s still plenty of time to enter our Repairs You Can Print contest, which runs until high noon Pacific time on February 20th. Don’t forget—we’re giving away TWO Prusa i3 Mk3s plus the multi-material upgrade—one to the best student entry and the other to the best entry from an organization. Isn’t there something you’ve been meaning to fix?

Repairs You Can Print: Fixing A Rat-Attacked Mic Cord

We’ve all been there — a steamy night in the rainforest of Papua New Guinea, sweaty slumber disturbed by the unmistakable sounds of gnawing. In the morning we discover that a rodent of unusual tastes has chewed the microphone cable of our transceiver right half in two, leaving us out of touch with base camp. If we had a nickel for every time that’s happened.

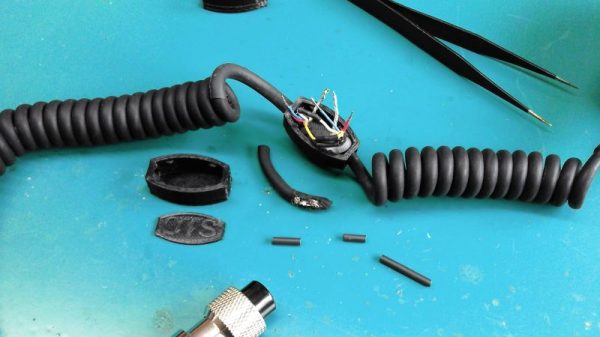
It may sound improbable, but that’s the backstory behind [Marius Taciuc]’s 3D-printed mic cord repair. Even with more mundane failure modes, the retractile cords on microphones are notoriously difficult to fix. Pretty much any of the usual suspects, like heat-shrink tubing or electrical tape, are going to do very little to restore the mechanical stability lost once that tough outer jacket is breached. [Marius]’s solution was to print as small an enclosure as possible to mechanically support the splice. The fit is tight, but there was just enough room to solder the wires and stuff everything back in place. Cable ties provide strain relief where the cord exits the splice, and a liberal squirt of hot glue pots the joint. It’s not perfect — we’ll bet the splice acts as a catch point and gets a little annoying after a while — but if it gets you back on the air fast and cheap, it probably makes sense.

[Marius] entered this rat-race beating hack into the Repairs You Can Print contest. Do you have an epic repair that was made possible by a 3D printer? Let the world know about it and you might just win a prize.

Continue reading “Repairs You Can Print: Fixing A Rat-Attacked Mic Cord”

Repairs You Can Print: Model Coal Car Fix

Model railways are a deep and rewarding hobby, and the mechanisms involved can be both surprisingly intricate and delightful. A great example that may surprise the unfamiliar is that of model train carriages, such as coal cars, that are capable of both receiving and dumping a load at various points on a model layout. This adds realism and, if we’re honest, just plain old fun.

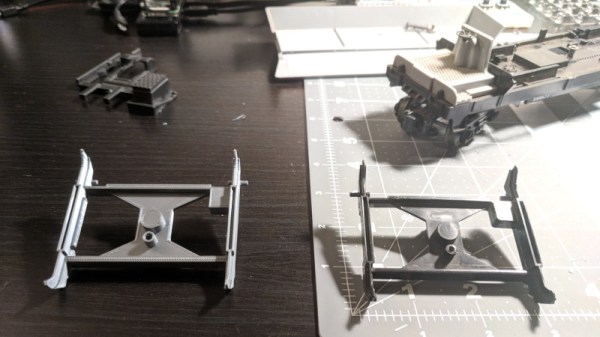
When [Phil]’s father received his Lincoln coal car from eBay, it was unfortunately damaged, and incapable of dumping properly. Instead of throwing it away, a replacement part was developed and 3D printed. The part was iterated on until the coal hopper could dump and retract smoothly.

This is the perfect example of a tidy repair executed through 3D printing. The broken part was extremely detailed and would be difficult and expensive to repair or fabricate through other measures. However, through the power of 3D printing, all that’s required is a 3D modelling job and a few hours to print it.

It’s a great entry into our Repairs You Can Print challenge, and covers the fundamentals of modelling and iterative design well. Got a neat repair you’ve done yourself? Document it on Hackaday.io and enter yourself!

Repairs You Can Print: A Little Love For The Glove Box

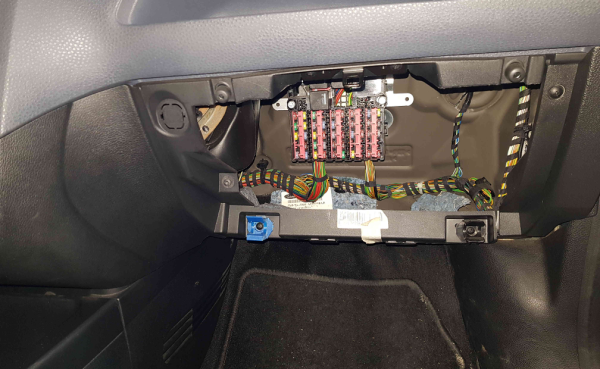
A few years ago, [Brieuc]’s car blew a fuse. He went to replace it, which unfortunately means removing the entire glove box. In his haste to get his baby back on the road, he accidentally broke one of the clips that holds the glove box on the dashboard.

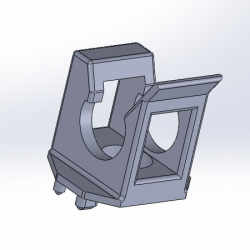
[Brieuc] tried to just glue the thing back together, but it didn’t hold because the part has to flex a little bit for people who need to get into the fuse box. No one seems to offer a replacement for this small but vital hunk of plastic, though he did find someone offering total glove box replacements at highway robbery prices. Since there was still one good clip, he used it to design and print a strong ABS replacement.

This is a great example of the one-off utility of 3D printers. [Brieuc] didn’t need an exact copy, and since he was replacing an injection-molded part with additive manufacturing, he had the freedom to start with a bare-bones design, make adjustments as needed, and iterate until he got it right. It didn’t take long. The layer orientation of the first print made the legs too weak, but that’s a simple fix. The second version has lasted for three years and counting.

We get it. You don’t have the same car as [Brieuc], so this particular fix doesn’t sway you. But someday in the future when your zipper breaks or your dishwasher detergent cup won’t latch, 3D printing will be there to help.

Repairing A Wounded Mantis

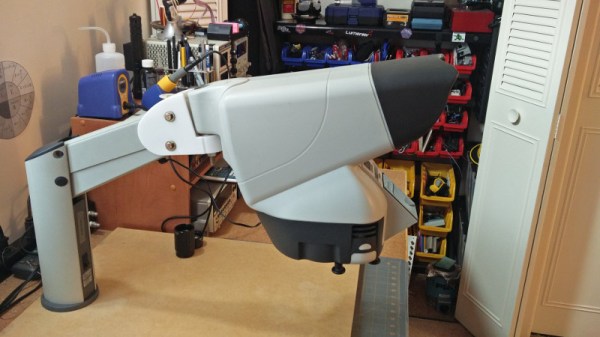
While it’s true that we didn’t specifically say making Hackaday staff exceedingly jealous of your good fortune would deduct points from your entry into our ongoing “Repairs You Can Print Contest”, we feel like [Sam Perry] really should have known better. During a recent dumpster dive he found an older, slightly damaged, but still ridiculously awesome Mantis stereo inspection microscope. Seriously, who’s throwing stuff like this away?

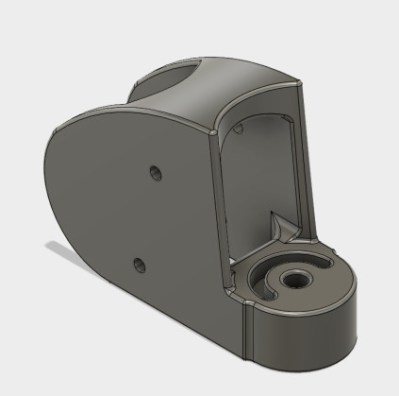
Rendered replacement mount in Fusion 360

Apparently, the microscope itself worked fine, and beyond some scratches and dings that accumulated over the years, the only serious issue was a completely shattered mount. Luckily he still had the pieces and could get a pretty good idea of what it was supposed to look like. After what we imagine was not an insignificant amount of time in Fusion 360, he was able to model and then print a replacement.

The replacement part was printed on a Tronxy P802M in PLA. Even at 0.3mm layer height, it still took over 10 hours to print such a large and complex component. A few standard nuts and bolts later, and he had a drop-in replacement for the original mount.

Whether it’s due to how big and heavy the Mantis is, or a slight miscalculation in his model, [Sam] does mention that the scope doesn’t sit perfectly level; he estimates it’s off by about 5 degrees.

We’re somewhat suspicious that mentioning an error of only 5 degrees is a stealth-brag on the same level as telling everyone you found a Mantis in the trash. But if [Sam] gives us the GPS coordinates of the dumpster in which people are throwing away high-end lab equipment, all will be forgiven.

There’s still plenty of time to get your entry into the “Repairs You Can Print” contest! The top twenty projects will receive $100 in Tindie store credit, and the top entries in the Student and Organization categories will each receive a Prusa i3 MK3 with the Quad Material upgrade kit: arguably one of the best 3D printers currently on the market. If you were considering going back to school, or finally leaving your basement and joining a hackerspace, now would definitely be the time.