Lithium-Ion Batteries Power Your Devboards Easily

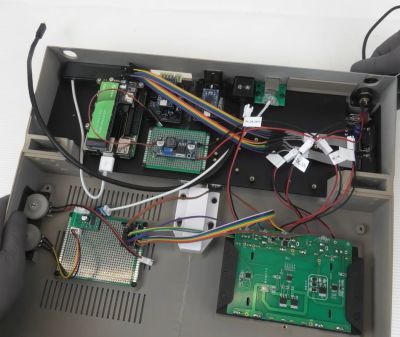
Last summer, I was hanging out with a friend from Netherlands for a week, and in the middle of that week, we decided to go on a 20 km bike trip to a nearby beach. Problem? We wanted to chat throughout the trip, but the wind noise was loud, and screaming at each other while cycling wouldn’t have been fun. I had some walkie-talkie software in mind, but only a single battery-powered Pi in my possession. So, I went into my workshop room, and half an hour later, walked out with a Pi Zero wrapped in a few cables.

I wish I could tell you that it worked out wonders. The Zero didn’t have enough CPU power, I only had single-core ones spare, and the software I had in mind would start to badly stutter every time we tried to run it in bidirectional mode. But the battery power solution was fantastic. If you need your hack to go mobile, read on.

Continue reading “Lithium-Ion Batteries Power Your Devboards Easily”

High-Voltage Fun With An Inexpensive Power Supply

It used to be that nearly every home had at least one decent high-voltage power supply. Of course, it was dedicated to accelerating electrons and slamming them into phosphors so we could bathe ourselves in X-rays (not really) while watching Howdy Doody. These days the trusty tube has been replaced with LEDs and liquid crystals, which is a shame because there’s so much fun to be had with tens of thousands of volts at your disposal.

That’s the impetus behind this inexpensive high-voltage power supply by [Sebastian] over at Baltic Labs. The heavy lifting for this build is done by a commercially available power supply for a 50-watt CO2 laser tube, manufactured — or at least branded — by VEVOR, a company that seems intent on becoming the “Harbor Freight of everything.” It’s a bold choice given the brand’s somewhat questionable reputation for quality, but the build quality on the supply seems decent, at least from the outside. [Sebastian] mounted the supply inside a rack-mount case, as one does, and provided some basic controls, including the obligatory scary-looking toggle switch with safety cover. A pair of ammeters show current and voltage, the latter with the help of a high-voltage resistor rated at 1 gigaohm (!). The high-voltage feedthrough on the front panel is a little dodgy — a simple rubber grommet — but along with the insulation on the high-voltage output lead, it seems to be enough.

The power supply’s 30 kV output is plenty for [Sebastian]’s current needs, which from the video below appear to mainly include spark gap experiments. He does mention that 50 kV commercial supplies are available too, but it would be tough to do that for the $150 or so he spent on this one. There are other ways to go, of course — [Niklas] over at Advanced Tinkering recently shared his design for a more scratch-built high-voltage supply that’s pretty cool too. Whatever you do, though, be careful; we’ve been bitten by a 50 kV flyback supply before and it’s no joke.

Continue reading “High-Voltage Fun With An Inexpensive Power Supply”

A Compact SCARA Arm Plotter

If you’re unfamiliar with SCARA robots, the acronym stands for Selective Compliance Assembly Robot Arm. This refers to the fact that the arms are rigid in the Z axis but somewhat compliant in the X and Y axes, and that they’re often used for assembly tasks. In any case, you can spend a great deal of money equipping your factory with these robots, or you can build your own for the fun of it. If you’re not endowed with a seven-figure investment for opening a production plant, consider exploring [tuenhidiy’s] project instead.

The build enlists an Arduino Mega as the brains of the operation. It’s paired with a RAMPS controller for running a pair of NEMA 17 stepper motors that actually move the arm in the X-Y plane. Additionally, a tray eject mechanism from a CD/DVD drive is enlisted to act as the Z axis. The frame is assembled from PVC plumbing components and a small amount of aluminium T-slot profile.

The resulting arm isn’t fast in the video we see of the build, but it works as a basic plotter without too much complaint. The benefit of the Z-axis in this case is obvious, as it allows the pen to be lifted off the page where necessary.

We’ve seen plenty of good plotter designs around these parts before, too. Video after the break.

Continue reading “A Compact SCARA Arm Plotter”

Two ICL PERQ 1 workstation computers, Department of Computer Science, North Machine Hall, James Clerk Maxwell Building, University of Edinburgh. (Credit: J. Gordon Hughes)

The Flex Computer System: UK’s Forgotten Capability Computer Architecture

During the 1970s many different computer architectures were being developed, many of them focused on making computer systems easier and more effective to use. The Flex Machine developed at the UK Ministry of Defence’s Royal Signals and Radar Establishment (RSRE) was one of them, falling in the category of Capability Architectures. These architectures required hardware with programmable microcode, which required either custom hardware, or computer systems like the Xerox Alto-inspired ICL PERQ (pictured). What’s interesting about Flex is that it didn’t just remain in the 1980s as a quaint footnote, but as detailed by [Martin C. Atkins] – who worked on the system – evolved into the Ten15 system, which later got renamed to TenDRA.

Capability architectures have a long history – including the Intel iAPX 432 and more recent implementations – but they all have in common is that they effectively implement an object-based memory architecture, rather than the low-level, flat memory space that we usually see with computer systems. These object-based capabilities, as they were termed, provides a level of memory protection and security that would be hard to implement otherwise. The book Capability-Based Computer Systems by [Henry M. Levy] forms a good introduction here.

Continue reading “The Flex Computer System: UK’s Forgotten Capability Computer Architecture”

Gentle Introduction To White Light Interferometry

Screenshot of the Zygo white light interferometry microscope software. (Credit: Huygens Optics)

White light interferometry (WLI) is a contact-free optical method for measuring surface height. It uses the phase difference between the light reflected off a reference mirror and the target sample to calculate the height profile of the sample’s surface. As complex as this sounds, it doesn’t take expensive hardware to build a WLI microscope, as [Huygen Optics] explains in a detailed introductory video on the topic. At its core you need a source of white light (e.g. a white LED), with a way to focus the light so as to get a spatially coherent light source, like aluminium foil with a pin hole and a lens.

This light source then targets a beam splitter, which splits the light into one beam that targets the sample, and one that targets the reference mirror. When both beams are reflected and return to the beam splitter, part of the reflected light from either side ends up at the camera, which captures the result of the reference and sample beams after their interference (i.e. combination of the amplitudes). This creates a Michelson interferometer, which is simple, but quite low resolution. For the demonstrated Zygo Newview 100 WLI microscope this is the first objective used, followed by a more recent innovation: the Mirau interferometer, which integrates the reference mirror in such a manner that much higher resolutions are possible, down to a few µm.

Continue reading “Gentle Introduction To White Light Interferometry”

FLOSS Weekly Episode 774: Let’s Get Rusty

This week, Jonathan Bennett chats with Herbert Wolverson about Rust! Is it really worth the hype? Should you have written that in Rust? What’s up with “if let some” anyways? And what’s the best way to get started with this exciting language? We also cover comparisons with other languages like Ada, what drives us crazy about Cargo, and the fascinating world of kernel development!

Continue reading “FLOSS Weekly Episode 774: Let’s Get Rusty”

Goldilocks Beverage Coaster Tells You When It’s Just Right

If you ask us, morning is the only excuse we need for a hot caffeinated beverage — weather be damned. Wherever [gokux] is, they may be experiencing actual winter this year, given that they are out there getting cozy with a hot cup of what-have-you. But how do they know it’s at the right temperature for drinking? Enter the temperature-monitoring smart coaster.

At the heart of this build is a GY-906 infrared temperature sensor, which senses the warmth (or lack thereof) and displays the degrees on a small OLED screen thanks to a Seeed Xiao SAMD21. To make things simple, there is also an ideogram that corresponds to the current temperature — snowflake for too cold, danger sign for too hot, and thumbs up for that just-right range. Although this coaster is mostly 3D-printed, the mug sits on a slotted piece of aluminium that is removable for easy cleaning. This would be a good-looking and useful addition to any desk.

This is isn’t the first temperature-indicating beverage coaster we’ve seen. The most recent one ultimately used a probe, which is likely about as accurate (and messy) as you can get with these things.