Stuffing A 32-Pin Chip Into A 28-Pin Socket

What’s the difference between a 64k ROM in a 28-pin DIP and a 128k ROM in a 32-pin DIP? Aside from the obvious answers of “64k” and “four pins,” it turns out that these two chips have a lot in common, enough so that it only takes a little bodging to make them interchangeable — more or less.

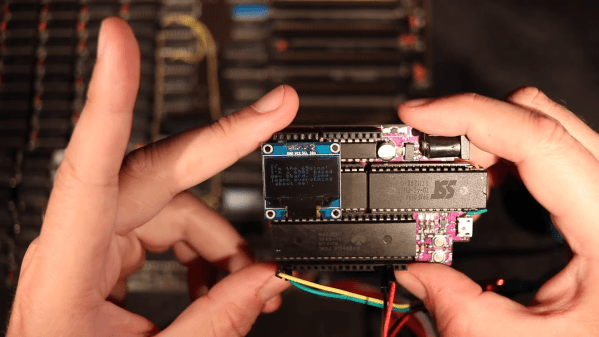
For a variety of reasons revealed in the video below, [Anders Nielsen] use the SST39SF010, a Flash ROM in a 32-pin DIP, in place of the old standby W27C512, an EEPROM in a 28-pin DIP. To deal with those pesky extra pins on the Flash ROM, [Anders] dug into the data sheets and found that thanks to JEDEC standards, almost everything about the pinouts of the two chips is identical. The only real difference is the location of Vcc, plus the presence of a 16th address bus line on the more capacious Flash ROM.

Willing to sacrifice the upper half of the Flash chip’s capacity, [Anders] set about bodging the 32-pin chip to work in a 28-pin socket. The mods include a jumper from pin 32 to pin 30 on the Flash chip, which puts Vcc in the right place, and adding a couple of pull-up resistors for write-enable and A16. Easy enough changes, but unfortunately, [Anders] chose a Flash ROM with heavily oxidized pins, leading to some cold solder joints and intermittent problems while testing. There’s also the fact that not all boards have room for overhanging pins, a problem solved by adding a socket to create a little vertical clearance.

We found this to be a neat little hack, one that should make it a bit easier to use the wrong chip for the job. If you want to see where [Anders] is using these chips, check out his 6502 in an Arduino footprint or the bring-up of an old XT motherboard.

Continue reading “Stuffing A 32-Pin Chip Into A 28-Pin Socket”

Modern Demo For A Casio PB-700 Pocket Computer Plotter

[Fred] has a Casio PB-700 pocket calculator / computer, complete with the companion docking station featuring a four-color pen plotter, model FA-10, and a microcassette tape recorder, model CM-1. He really wanted to see what this plotter could do, but there were no demos that he could find. So despite only having one working pen, [Fred] took matters into his own hands and proceeded to make his own.

What if I made a program where I type what I want to draw and the PB-700 just draws it?

Penguin from Penguindrum eating Popcorn

[Fred] succeeds, shoehorning several sub-projects into a single convoluted work flow: request an image from the PB-700 and after a long pause the plot emerges. The cute microcassette recorder is too much of a hassle, so he emulates the audio interface on a PC using a utility called casutil that reads and writes .wav files in PB-700 format. Much of his effort is spent figuring out how to request an image from Midjourney without being banned, but eventually comes up with a workable but shaky solution. The last steps are to convert the image into a line drawing, and then wrap up all those X-Y coordinates into a Basic program and send it back down to the PB-700 for plotting.

You can read more details in the PloTTY GitHub repository. There were several of these pocket computers with plotters coming out of Japan in the 1980s. In addition to this Casio, the Radio Shack TRS-80 PC-1 and PC-2 come to mind, which were re-branded versions of the Sharp PC-1211 and PC-1500 models. We wrote about them last year. This author had a PC-2 in 1985 and used it to plot antenna patterns at his desk, bypassing the IT department’s red tape. Have you ever used any of these pocket plotters? If so, let us know in the comments below. Thanks to [Altomare] for send us the tip.

Opening A Curta — With Great Care

We’ve always admired Curta mechanical calculators, and would be very hesitant to dismantle one. But [Janus Cycle] did just that — and succeeded. A friend sent him a Curta Model 2 calculator that was frozen up. Just opening the case involved percussive force to remove a retaining pin, and once inside he discovered the main shaft had been slightly bent. No doubt this calculator had suffered a drop at some point in the past.

I’m sticking to the rule of doing no harm — I’d rather not be able to fix this than do something that causes more problems.

Inside the Curta

But surprisingly, he was able to get it substantially back in working order without completely taking apart all 600+ parts. Most of the issues were shafts whose lubrication had become gummy, and one carry lever was slightly bent. There is still a little more work, but soon this calculator will once again be cranking out results.

Has anyone dismantled a mechanical contraption this complicated before, for example a teletype machine? Let us know in the comments. If you want to brush up on your Curta knowledge, check out the Curta Calculator Page. We also wrote a Retrotechtacular about the Curta before. Thanks to [mister35mm] for sending in this tip.

Continue reading “Opening A Curta — With Great Care”

Liquid Metal Battery Goes Into Production

The news is rife with claims of the next great thing in clean energy generation, but most of these technologies never make it to production. Whether that’s due to cost issues, production, or scalability, we’re often teased with industry breakthroughs that never come to fruition. Multi-layered solar panels, wave and tidal energy, and hydrogen fuel cells are all things that are real but can’t seem to break through and overtake other lower cost, simpler, and proven technologies. One that seems to be bucking this trend is the liquid metal battery, which startup Ambri is putting into service on the electrical grid next year.

With lithium ion battery installations running around $405 per kilowatt-hour, Ambri’s battery technology is already poised to be somewhat disruptive at a cost of about half that. The construction method is simpler than lithium as well, using molten metal electrodes and a molten salt electrolyte. Not only is this more durable, it’s also not flammable and is largely immune to degradation over time. The company’s testing results indicate that after 20 years the battery is expected to still retain 95% of its capacity. The only hitch in scaling this technology could be issues with sourcing antimony, one of the metals needed for this type of construction.

Even though Ambri can produce these batteries for $180 to $250 per kilowatt-hour, they need to get the costs down to about $20 for the technology to be cost-competitive with “base load” power plants (an outdated term in itself). They do project their costs to come down significantly and hit this mark by 2030, which would put electrical grids on course to be powered entirely by renewables. Liquid metal batteries aren’t the only nontraditional battery out there trying to solve this problem, though. Another promising interesting energy storage technology on the horizon is phase-change materials.

Bench Power Supply Turned Realistic Flight Sim Panel

Flight simulator software has been available for about as long as desktop PCs have been a thing, but modern incarnations such as 2020’s Microsoft Flight Simulator have really raised the bar — not only graphically, but in terms of interactivity. There’s a dizzying array of switches and buttons that you can fiddle with in your aircraft’s virtual cockpit, but doing it with the same keyboard that you use to hammer out code or write Hackaday articles doesn’t do much for immersion.

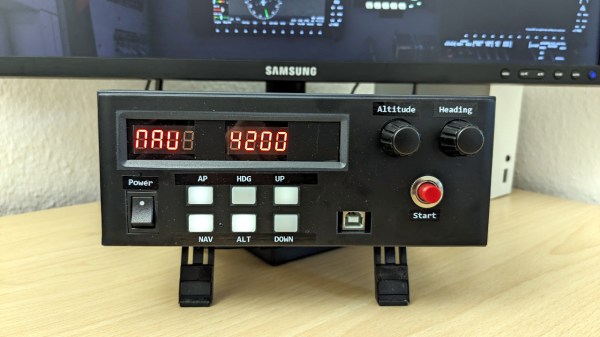
Looking to improve on the situation without having to shell out for an expensive sim panel, [Michael Fitzmayer] decided to convert a broken Manson SSP-8160 lab power supply into a fairly good approximation of the KAP 140 autopilot system which is used in one of his favorite aircraft, the Pilatus PC-6 Turbo-Porter.

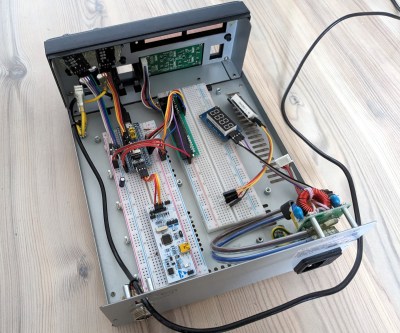
[Michael] gutted the piece of equipment pretty thoroughly, only leaving behind the case itself and the illuminated button panel on the front. The original displays were replaced with TM1637 seven-segment LEDs, and a pair of new rotary encoders are mounted where the stock knobs were. The whole show is run by a STM32F103 Blue Pill, which conveys the button pressing and knob spinning to the game by mimicking a USB Human Interface Device.

A fascia applied to the front of the power supply blocks the original text and labels, and really makes the finished unit look the part. [Michael] admits it’s not 100% accurate to the layout of the real hardware, but it’s certainly better than trying to enter heading and altitude information with the controller.

Oh that’s right, did we mention he’s actually using this on the Xbox Series S? While we generally see this sort of sim hardware hooked up to a tricked out gaming computer, we appreciate that he’s trying to bring some of that same experience to the console world. While the one-way communication of USB HID does bring with it some limitations — for example the hardware needs to be manually reset at the beginning of each flight to make sure the physical displays match what’s shown in the virtual cockpit– there’s still a lot of potential here.

For example, you could design and build your own flight yoke, pedals, and throttles rather than spending hundreds on a commercial version. It sounds like [Michael] is just getting started in the world of affordable console-based flight simulation, and we’re very eager to see where he goes from here.

Blackberry Pi Puts Desktop Linux In Your Pocket

Let’s face it — Android wasn’t what most of us had in mind when we imagined having Linux running on our phones. While there’s a (relatively) familiar kernel hiding at the core of Google’s mobile operating system, the rest of the environment is alien enough that you can’t run Linux software on it without jumping through some hoops. While that’s fine for most folks, there remains a sizable group of users who still dream of a mobile device that can run a full Linux operating system without any compromises.

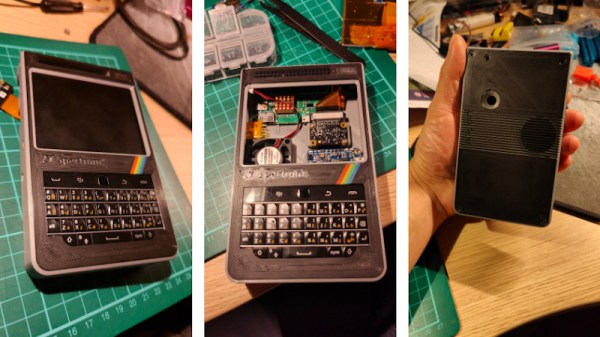
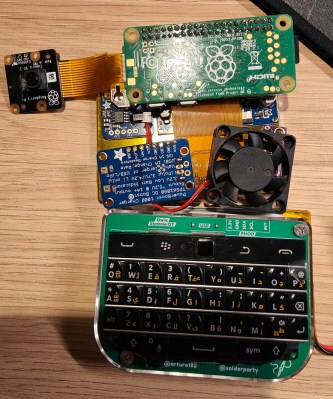
Judging by the work put into the Blackberry Pi, we’re willing to bet that [IMBalENce] falls into that camp. The custom handheld combines the Raspberry Pi Zero, a 320×240 LCD, and the BBQ20KBD keyboard from Solder Party with a 2500 mAh LiPo pouch cell and associated charging circuitry. Optionally, it also supports modules such as the Raspberry Pi Camera, a Real-Time-Clock, a ADS1015 ADC to read the battery voltage, and even a USB hub — although you can’t have all the goodies installed at once as it draws too much current.

Everything is packed into a 3D printed case that looks roughly like an original DMG-01 Game Boy if somebody replaced the bottom half with a tiny keyboard. We appreciate the ZX Spectrum theme, even if it’s not immediately clear how it relates to the project other than being an excuse to play around with multi-color printing. [IMBalENce] says the final product works quite well, though the relatively limited keys on the BlackBerry keyboard does make it tricky to use the device for writing code.

Interested in mobile Linux, but not trying to build the hardware yourself? We recently took a look at the SQFMI Beepy, which is fairly similar in terms of hardware, but very much in need of some talented penguin wranglers who are willing to come in and work on the software and documentation. Think you’re up for the challenge?

Inside A Cordless Soldering Station

There was a time when soldering stations were unusual in hobby labs. These days, inexpensive stations are everywhere. [Kerry Wong] looks at the TS1C station, which is tiny and cordless. As he points out, cordless irons are not new, but modern battery technology has made them much more practical. However, this iron doesn’t actually have a battery.

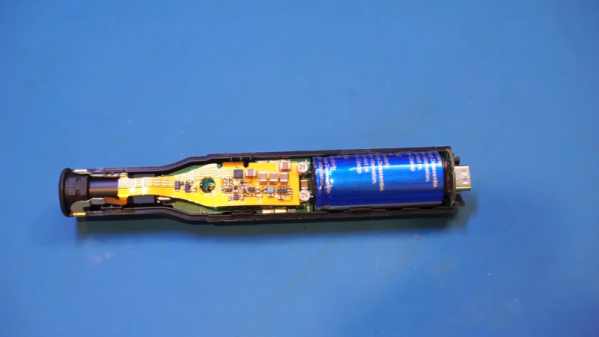
The iron has a large 750 Farad supercapacitor. This has advantages and disadvantages. On the plus side, a supercapacitor charges quickly and doesn’t get weaker with each charging cycle like a conventional battery. On the minus side, the large capacitor makes the unit bulky compared to normal irons. [Kerry] notes that it is ergonomic, though, and he felt comfortable holding it. Also, the supercapacitor limits the amount of charge available while soldering.

It is somewhat of a balance, though. If you want to take the iron and climb a tower, you might be very interested in a longer running time. But if you return the unit to the base every few minutes, the fast charging of the cap will compensate for the lower capacity, and you’ll probably never notice it go flat.

The iron itself doesn’t display any data. The display is on the base, meaning the devices must be paired via Bluetooth. It also requires a PD-enabled USB-C connection, so you can’t just wire it to a battery. You can plug a power supply right into the iron if you prefer, but you still can’t use a simple power connection.

Of course, you assume it does an adequate job of soldering. We wanted to see inside! And [Kerry] didn’t disappoint. If you want to see soldering, skip to about the 10-minute marker. The teardown starts at around 16 minutes.

Honestly, for the bench, we’d probably stick with a wired iron. You don’t always want a base and a PD power supply for a portable iron. But if you absolutely hate cords, this could be a reasonable answer. We’ve seen another review of this iron that didn’t like the plastic casings. Maybe it is like Jedi and lightsabers: you should just build your own.

Continue reading “Inside A Cordless Soldering Station”