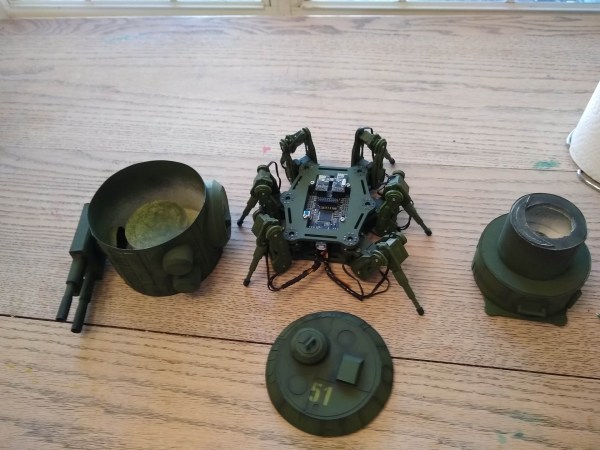
Fresh-Squeezed OJ Served In Orange Peel-Ay

Though it’s really more apple cider weather here at Hackaday HQ, freshly-squeezed OJ is a treat that knows no season. Sure generates a lot of peel, though. Not something you think about when you’re used to buying it in jugs at the grocery store. What a waste, huh?

Italian design firm [Carlo Rotti] teamed up with global energy company [Eni] to develop “Feel the Peel”, a 10-foot-tall real-time juice bar that celebrates the orange by using the entire thing. Fifteen hundred juicy orbs move single-file down the circular track toward their total destruction. One at a time, they are severed in half and wrung out by the machine, and their peels are dropped into a clear bin for all to see. Once the peels dry out, they are shredded, mixed with PLA, and fed into a delta printer that prints juice cups right there on site.

This live process of reuse is pretty interesting to watch — check it out after the break. [Eni] touts this as completely circular, but that really depends on what happens to the cups. If they collect the empties and compost them, great. Anyway, it seems way more sustainable than the Juicero.

Continue reading “Fresh-Squeezed OJ Served In Orange Peel-Ay”

3D Scanner For Tiny Objects Uses Blu-Ray Parts

There’s plenty of different methods to build a 3D scanner, with photogrammetry being a particularly accessible way to do it. This involves taking a series of photos from different angles to build up the geometry of the model. If you want to do this with something small, instead of a camera, just substitute a microscope! [NoseLace’s] LadyBug does just that.

It’s a 3D scanner built in a very hacker fashion. The X-Y stage that moves the sample is from a KES-400a Blu-Ray drive, salvged from the original “fat” Playstation 3. The Z axis is then created using the linear stepper motor from the optical pickup of the same drive. A rotary stepper motor is added on to the Z-axis to allow the sample to be rotated. It’s all combined with a basic USB microscope to take the images, and a Raspberry Pi which handles running all the stepper motors with some add-on driver boards.

[NoseLace] uses the device to create 3D models of insects, but it would work just as well with other small objects. The benefit of this approach is that it creates both the 3D model and the requisite texture, too. There’s plenty of open-source tools available if you’d like to try it for yourself. Video after the break.

Continue reading “3D Scanner For Tiny Objects Uses Blu-Ray Parts”

Peep These Ultra-Real 3D-Printed Eyeballs

For humans, life is in the eyes. Same deal with automatons. The more realistic the eyes, the more lifelike (and potentially disturbing) the automaton is. [lkkalebob] knows this. [lkkalebob] is so dedicated to ocular realism in his ultra-real eyeballs that he’s perfected a way to make the minuscule veins from a whisper of cotton thread.

First he prints an eyeball blank out of ABS. Why ABS, you ask? It has a semi-translucence that makes it look that much more real. Also, it’s easier to sand than PLA. After vigorous sanding, it’s time to paint the iris and the apply the veins. [lkkalebob] shaves strands of lint from red cotton thread and applies it with tweezers to smears of super glue.

Here comes our favorite part. To make the whole process easier, [lkkalebob] designed a jig system that takes the eyeballs all the way through the stages of fabrication and into the sockets of the automaton. The hollow eye cups pressure fit on to prongs that hold it in place. This also gives the eyeball a shaft that can be chucked into a drill for easy airbrushing. In the build video after the break, he uses the eye-jig to cast a silicone mold, which he then uses to seal the eyes in resin.

Don’t have a printer or any desire to make human automata? It doesn’t take much to make mesmerizing mechanisms.

Continue reading “Peep These Ultra-Real 3D-Printed Eyeballs”

Perler Printer Pushes Pixel-Art Like No Sprite Artist Could

There’s something oddly soothing about the practice of laying down Perler Beads on a casual weekend to make your favorite classic Nintendo characters. But seriously, why use our grubby hands like a caveman when we could leverage a machine to do the heavy-lifting for us? That’s exactly what [knezuld11] did! They’ve built a 64-color Bead Sprite Printer including an automatic cooking feature for fusing the result. (Video, embedded below.)

From the top, up to 64 unique bead colors are stashed into cartridges at the top. A bulk agitator does the work of passing these beads into tubes for the lower-stage bead selector. At this level, beads colors are serialized into a single tube that feeds into the output “nozzle.” The entire process of directing the bead pattern is driven by a Python script that takes images as input and approximates their colors to the available bead palette. When the bead “printing” is done, the machine ramps up its heated bed and cooks the bottoms of the beads, fusing them together in a way that [knezuld11] says works actually better than the typical ironing method.

We simply love how feature-complete this system is. While [knezuld11] mentioned that the Bead Sprite Printer was an attempt at beating a world record, we imagine that there are dozens of other ways this machine could lead to some whimsical engagements. Quite frankly, we’d love to see this machine at an Artist Alley making on-demand art.

If you managed to spill all your beads from sheer excitement watching this video, fret not! This automatic bead sorter from our past is just the thing to help you out.

Continue reading “Perler Printer Pushes Pixel-Art Like No Sprite Artist Could”

There’s More To The 3D Print Than The Eye Can See

If you thought CADing designs for 3D printing was hard enough, wait until you hear about this .stl trick.

[Angus] of Maker’s Muse recently demoed a method for creating hidden geometries in .stl files that are only revealed during the slicing process before a 3D print. (Video, embedded below.) The process involves creating geometries with a thickness smaller than the size of the 3D printer’s nozzle that still appear to be solid in a .stl editor, but will not be rendered by a FDM slicer.

Most 3D printers have 0.4 mm thickness nozzle, so creating geometries with a wall thinner than this value will result in the effect that you’re looking for. Some possible uses for this trick are to create easter eggs or even to mess with other 3D printing enthusiasts. Of course, [Angus] recommends not to use this “deception for criminal or malicious intent” and I’d have to agree.

There’s a few other tricks that he reveals as well, including a way to create a body that’s actually a thin shell but appears to be solid: great for making unprintable letters that reveal hidden messages.

Nevertheless, it’s a cool trick and maybe one of those “features not bugs” in the slicer software.

Continue reading “There’s More To The 3D Print Than The Eye Can See”

Replacing The 3D Printer And Router: A Tool For Manufacturing Human-Scale Forms

The purpose of Geometer becomes apparent when you realize its simplicity: [David Troetschel]’s project is to create an easily understandable design tool that encourages goal-oriented design. The kit comes with physical components and digital counterparts that can be combined in a modular way. They each have a specific geometry, which provide versatility while keeping manufacturing simple.

For the prototyping phase, small snap-on parts 3D printed on a Formlabs printer mimic the module components on a smaller scale. Once a design is conceived and the Geometer Grasshopper program finalizes the module arrangement necessary for the model, the larger pieces can be used as a mold for a concrete or hydrocal mold casting.

The present set of modules is in its seventh iteration, initially beginning as a senior thesis for [Troetschel]. Since then, the project itself has had an extensive prototyping phase in which the components have gone from being injection-molded to 3D printed.

The overall process for prototyping is faster than 3D printing and more cost-effective than sending to a third-party shop to build, which adds to the project’s goal of making manufacturing design more accessible. This is an interesting initiative to introduce a new way of making to the DIY community, and we’re curious to see this idea take off in makerspaces.

Using TL Smoothers For Better 3D Prints

Some 3D printers will give you prints with surfaces resembling salmon skin – not exactly the result you want when you’re looking for a high-quality print job. On bad print jobs, you can usually notice that the surface is shaking – even on the millimeter scale, this is enough to give the print a bumpy finish and ruin the quality of the surface. TL smoothers help with evening out the signal going through stepper motors on a 3D printer, specifically the notoriously noisy DRV8825 motor drivers.

Analyzing the sine wave for the DRV8825 usually shows a stepped signal, rather than a smooth one. Newer chips such as the TMC2100, TMC2208, and TMC2130 do a much better job at providing smooth signals, as do cheaper drivers like the commonly used A4988s.

[Fugatech 3D Printing] demonstrates some prints from a D-Force Mini with an MKS Base 1.4 smoother-based control board, which is easier to use and smarter than Marlin. On the two prints using smoothers, one uses a board with four diodes, while the other was printed with a board with eight diodes. [Mega Making] compares how the different motor drivers work and experimentally shows the stuttering across the different motors before and after connecting to the smoothers.

The yellow and pink traces are the current for each phase of the motor. The blue and green traces are the voltages on each terminal of the phase with the yellow current. [via Schrodinger Z]
A common problem with DRV8825 motors is their voltage rating, which is lower than most supplies. When a 3D printer is moving slower than 100mm/min, the motor is unable to move smoothly.


[Schrodinger Z] does a bit of digging into the reason for the missing microsteps, testing out different decay modes in DRV8825s and why subharmonic oscillations occur in the signals from the motor.

The driver consequently has a “dead zone” where it is unable to produce low currents. Modifying the motor by offsetting the voltage by 1.4V (the point where no current flow) would allow the dead zone to be bridged. This also happens to be the logic behind the design for smoothers, although it is certainly possible to use different diodes to customize the power losses depending on your particular goal for the motor.

Debugging signal problems in a 3D printer can be a huge headache, but it’s also gratifying to understand why microstepping occurs from current analysis.

Continue reading “Using TL Smoothers For Better 3D Prints”