Origami Butterfly: A Flex PCB Adventure Unfolds

Flexible circuits have been around longer than you might expect, although they only recently rounded the bend and bounced into the hobbyist’s toolbox. When Boldport fanatic [Laura Lindzey] found out about them, her immediate dream project was to make an origami butterfly that does something cool, though she wasn’t sure what.

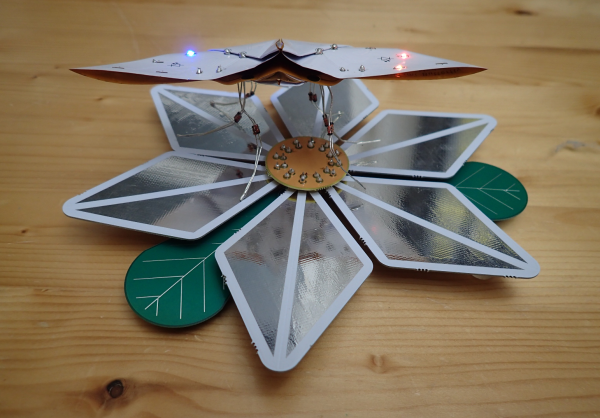
The idea she landed on is this: when the butterfly alights on a power-providing flower, it draws electrical nectar through its diode legs and lights up the LEDs on its wings. As long as one leg touches a ground petal and another touches a VIN petal, there will be light.

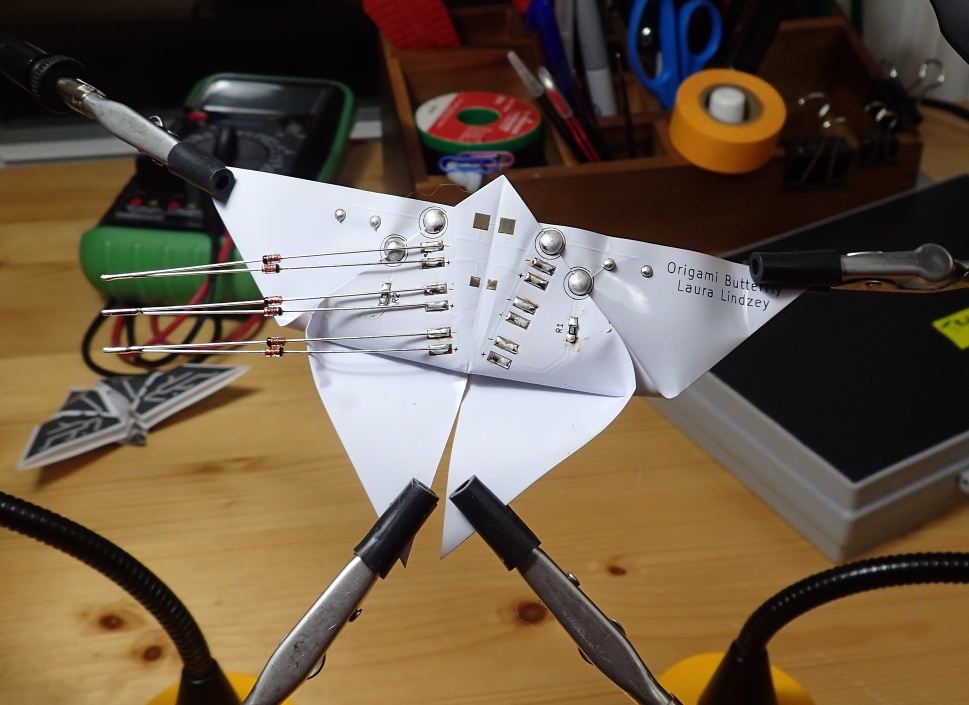
Though the idea may be simple, it’s the execution that’s mind-bending. After meticulous planning and a lot of paper prototyping, she sent off the gerbers and got version one back. The circuit worked, but assembly was tedious — not what you want when you’re trying to stay friendly with the other people in your PCB exchange club.

We imagine that hard creases are probably not what the flexible PCB purveyors have in mind, but this origami butterfly is an awesome exercise in what can be done with flexible PCBs. Not only that, it’s a great insight into some design rules where almost none exist, learned through firsthand experience. Every technology can benefit from trailblazers like [Laura].

If you want to do some flexible prototyping at home, just print your own pliable PCBs.

Printing Liquid Concrete

In the world of additive manufacturing, there’s always need materials being added to the list of potential filaments to use for printing objects. A method of rapid liquid printing of concrete designed by [Anatoly Berezkin] of Stoneflower 3D makes it possible to print a large variety of shapes from concrete while avoiding the negative effects of fast dehydration. The technique is based on an approach to printing polyurethanes, developed by MIT in 2017. This technique requires physically drawing a 3D object within a gel suspension using a chemical curing process. The gel allows gravity to not affect the printing process, as well as helping out with the curinng. Berezkin, an engineer and hobbyist working out of his garage, has published other work including print heads, ceramic printing, and micro printing sets.

One might be skeptical of whether the weight of the material could cause potential collapse during the printing process, or whether it is simply unrealistic to print objects given the time needed for the concrete to dry. Their demo shows the process being done in household items – bowls and tupperware – combining affordable items such as clay, concrete, and sand for the matrix and mortar. The viscous clay is strong enough to act as a good scaffold for keeping the concrete structure in place as it is being printed. As their video demonstrates, at least for simply objects, the process seems relatively fast.

RLPC doesn’t require toxic chemicals or proprietary components such as gels and suspensions. Its immersion of the final printed object in a humid environment is also superior to the standard process of liquid deposition for hardening concrete. Moreover, the process simply requires clay or retarded mortar for the matrix and mortar paste for turning into concrete. It’s advertised as eco-friendly, but just the simplicity of the materials needed for the matrix and mortar make this a promising technique.

Continue reading “Printing Liquid Concrete”

The Newbie’s Guide To JTAG

Do you even snarf?

If not, it might be because you haven’t mastered the basics of JTAG and learned how to dump, or snarf, the firmware of an embedded device. This JTAG primer will get you up to snuff on snarfing, and help you build your reverse engineering skills.

Whatever your motivation for diving into reverse engineering devices with microcontrollers, JTAG skills are a must, and [Sergio Prado]’s guide will get you going. He starts with a description and brief history of the Joint Test Action Group interface, from its humble beginnings as a PCB testing standard to the de facto standard for testing, debugging, and flashing firmware onto devices. He covers how to locate the JTAG pads – even when they’ve been purposely obfuscated – including the use of brute-force tools like the JTAGulator. Once you’ve got a connection, his tutorial helps you find the firmware in flash memory and snarf it up to a file for inspection, modification, or whatever else you have planned.

We always appreciate guides like these that cover the basics, since not everyone is in the same place in their hardware hacking journey. This puts us in the mood to crack something open and start looking for pins, if for no other reason than to get some practice.

[Thumbnail image source: LufSec]

Stomp Switches Let You Skip Tracks Hands-Free

You’ve (probably) got four limbs, so why are you only using half of them when you’re working on the computer? Just because your toes don’t have the dexterity to type (again, probably) doesn’t mean your feet should get to just sit there doing nothing all day. In a recent project, [MacCraiger] shows you just how easy it can be to put some functionality under foot by building a pair of media control stomp switches.

Crimp pin connectors grant +50 professionalism.

If the devices pictured above look a lot like guitar effects, that’s because they share a lot of parts. [MacCraiger] used the same sort of switch and aluminum case that you might see on a pedal board, as he figured they’d be better suited to a lifetime of being stepped on than something he 3D printed.

Up on the desk, and this time in a printed case, is the Arduino Leonardo that they connect to. The wiring for this project is very straightforward, with the switches connected directly to the GPIO pins. From there, the Arduino firmware emulates a USB Human Interface Device and fires off the appropriate media control keystrokes to skip to the next track or pause playback depending on which switch has been engaged.

This hardware isn’t exactly breaking any new ground here, but we did like how [MacCraiger] used standard 3.5 mm audio cable and the associated jacks to connect everything up. It’s obviously on-theme for what’s essentially a music project, but more importantly, gives the whole thing a very professional look. Definitely a tip to mentally file away for the future.

For the more accomplished toe-tapper, our very own [Kristina Panos] recently recently took us through the construction of her macro slinging footstool. Between these two examples of bespoke peripherals, you should have everything you need to create your own custom input devices. We suppose you could even make one that’s hand operated if you’re into that sort of thing.

Continue reading “Stomp Switches Let You Skip Tracks Hands-Free”

Bitluni Brings All The ESP-32 Multimedia Hacks To Supercon

Of all the people I was looking forward to meeting at Supercon, aside from my Hackaday colleagues with whom I had worked for five years without ever meeting, was a fellow from Germany named Matthias Balwierz. The name might not ring a bell, but he’ll certainly be familiar to Hackaday readers as Bitluni, the sometimes goofy but always entertaining and enlightening face of “Bitluni’s Lab” on YouTube.

I’d been covering Bitluni’s many ESP32 hacks over the years, and had struck up a correspondence with him, swapping ideas and asking for advice on the many projects I start but somehow never finish. Luckily for us, Bitluni is far better on follow-through than I am, and he brought that breadth and depth of experience to the Design Lab stage for that venue’s last talk of the 2019 Superconference, before the party moved next door for the badge-hacking presentations.

Continue reading “Bitluni Brings All The ESP-32 Multimedia Hacks To Supercon”

New Part Day: Ooh, The Things You Can Do With A CLUE

There’s a new development board in town from Adafruit, and it’s called the CLUE. This tiny board can be programmed in Arduino or CircuitPython, and it is absolutely stuffed with sensors and functionality, including Bluetooth. It’s essentially a BBC Micro:bit with more sensors, a screen, and a much beefier processor. Sound interesting? Let’s get out the magnifying glass and take a look, shall we?

(Editor’s note: Adafruit ran out of the first alpha run of the hardware. While we didn’t run into any bugs, the next versions will presumably have even fewer, but will also cost $40 instead of $30. That said, they’re giving out 3,000 of them to attendants of PyCon in April, so you might also get your hands on one that way.)

And Bit:Bot takes the checkered flag! Image via Seeed Studio

First and foremost, there’s the form factor — if that bottom edge looks familiar, that’s because the CLUE is designed to work with micro:bit robot kits and anything else with that edge connector, like the CRICKIT for micro:bit, or the Bit:Bot from Seeed Studios. This is big news for the micro:bit ecosystem, and not just because the CLUE brings tons of sensors and a screen to the scene, although a 1.3″ screen at 240×240 resolution is nothing to sneeze at.

The main brain is a Nordic nRF52840, so you can pair it to your phone and stream your collected data. Or, use it to get two CLUE boards talking to each other. This is a major upgrade from the micro:bit’s nRF51822 — the CLUE is four times faster, has four times the flash memory, and has sixteen times as much RAM. We hope someone can find a way to make them into short-range messaging machines with Q10 keyboards.

Continue reading “New Part Day: Ooh, The Things You Can Do With A CLUE”

Hacking USB Hack Chat

Join us on Wednesday, February 26 at noon Pacific for the Hacking USB Hack Chat with Kate Temkin!

For all its aggravating idiosyncrasies, the Universal Serial Bus has been a game-changer in peripheral connections for nearly a quarter of a century now. What was once simply a means to connect a mouse and a keyboard to a computer has been extended and enhanced into something so much more than its original designers intended. The flexibility that led to these innovative uses for USB also led to its ubiquity, with some form of the connector sprouting from nearly every imaginable device.

Kate Temkin is well-versed in the intricacies of the Universal Serial Bus. As a software lead for Great Scott Gadgets, Kate has developed software and firmware for GSG’s products, like GreatFET and HackRF. Kate also contributes to and maintains a number of open-source projects, including the FaceDancer project. And when she’s not busy with all of this, she can be found sharing her deep knowledge with USB security training courses, where she shows how USB is vulnerable to attack, and what to do to prevent it.

Join us for the Hacking USB Hack Chat this week, where Kate will discuss anything and everything about USB. Come learn about what the future holds for the USB standard, and what you can do to keep your USB project on track.

join-hack-chatOur Hack Chats are live community events in the Hackaday.io Hack Chat group messaging. This week we’ll be sitting down on Wednesday, February 26 at 12:00 PM Pacific time. If time zones have got you down, we have a handy time zone converter.

Click that speech bubble to the right, and you’ll be taken directly to the Hack Chat group on Hackaday.io. You don’t have to wait until Wednesday; join whenever you want and you can see what the community is talking about. Continue reading “Hacking USB Hack Chat”