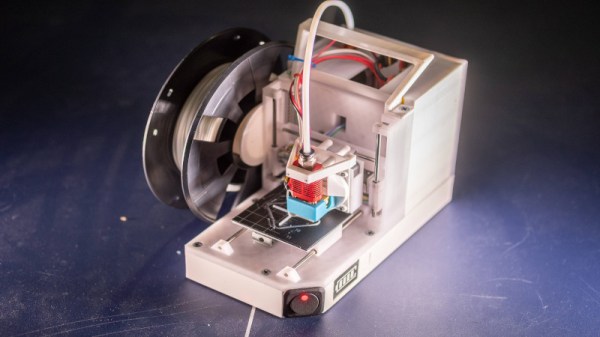
There’s More To The 3D Print Than The Eye Can See

If you thought CADing designs for 3D printing was hard enough, wait until you hear about this .stl trick.

[Angus] of Maker’s Muse recently demoed a method for creating hidden geometries in .stl files that are only revealed during the slicing process before a 3D print. (Video, embedded below.) The process involves creating geometries with a thickness smaller than the size of the 3D printer’s nozzle that still appear to be solid in a .stl editor, but will not be rendered by a FDM slicer.

Most 3D printers have 0.4 mm thickness nozzle, so creating geometries with a wall thinner than this value will result in the effect that you’re looking for. Some possible uses for this trick are to create easter eggs or even to mess with other 3D printing enthusiasts. Of course, [Angus] recommends not to use this “deception for criminal or malicious intent” and I’d have to agree.

There’s a few other tricks that he reveals as well, including a way to create a body that’s actually a thin shell but appears to be solid: great for making unprintable letters that reveal hidden messages.

Nevertheless, it’s a cool trick and maybe one of those “features not bugs” in the slicer software.

Continue reading “There’s More To The 3D Print Than The Eye Can See”

Replacing The 3D Printer And Router: A Tool For Manufacturing Human-Scale Forms

The purpose of Geometer becomes apparent when you realize its simplicity: [David Troetschel]’s project is to create an easily understandable design tool that encourages goal-oriented design. The kit comes with physical components and digital counterparts that can be combined in a modular way. They each have a specific geometry, which provide versatility while keeping manufacturing simple.

For the prototyping phase, small snap-on parts 3D printed on a Formlabs printer mimic the module components on a smaller scale. Once a design is conceived and the Geometer Grasshopper program finalizes the module arrangement necessary for the model, the larger pieces can be used as a mold for a concrete or hydrocal mold casting.

The present set of modules is in its seventh iteration, initially beginning as a senior thesis for [Troetschel]. Since then, the project itself has had an extensive prototyping phase in which the components have gone from being injection-molded to 3D printed.

The overall process for prototyping is faster than 3D printing and more cost-effective than sending to a third-party shop to build, which adds to the project’s goal of making manufacturing design more accessible. This is an interesting initiative to introduce a new way of making to the DIY community, and we’re curious to see this idea take off in makerspaces.

Using TL Smoothers For Better 3D Prints

Some 3D printers will give you prints with surfaces resembling salmon skin – not exactly the result you want when you’re looking for a high-quality print job. On bad print jobs, you can usually notice that the surface is shaking – even on the millimeter scale, this is enough to give the print a bumpy finish and ruin the quality of the surface. TL smoothers help with evening out the signal going through stepper motors on a 3D printer, specifically the notoriously noisy DRV8825 motor drivers.

Analyzing the sine wave for the DRV8825 usually shows a stepped signal, rather than a smooth one. Newer chips such as the TMC2100, TMC2208, and TMC2130 do a much better job at providing smooth signals, as do cheaper drivers like the commonly used A4988s.

[Fugatech 3D Printing] demonstrates some prints from a D-Force Mini with an MKS Base 1.4 smoother-based control board, which is easier to use and smarter than Marlin. On the two prints using smoothers, one uses a board with four diodes, while the other was printed with a board with eight diodes. [Mega Making] compares how the different motor drivers work and experimentally shows the stuttering across the different motors before and after connecting to the smoothers.

The yellow and pink traces are the current for each phase of the motor. The blue and green traces are the voltages on each terminal of the phase with the yellow current. [via Schrodinger Z]
A common problem with DRV8825 motors is their voltage rating, which is lower than most supplies. When a 3D printer is moving slower than 100mm/min, the motor is unable to move smoothly.


[Schrodinger Z] does a bit of digging into the reason for the missing microsteps, testing out different decay modes in DRV8825s and why subharmonic oscillations occur in the signals from the motor.

The driver consequently has a “dead zone” where it is unable to produce low currents. Modifying the motor by offsetting the voltage by 1.4V (the point where no current flow) would allow the dead zone to be bridged. This also happens to be the logic behind the design for smoothers, although it is certainly possible to use different diodes to customize the power losses depending on your particular goal for the motor.

Debugging signal problems in a 3D printer can be a huge headache, but it’s also gratifying to understand why microstepping occurs from current analysis.

Continue reading “Using TL Smoothers For Better 3D Prints”

Coffee Makes 3D Printing Better

While we know some 3D printer operators who need coffee, Washington State University is showing an improved PLA material that incorporates used coffee waste. Regular PLA is not known for being especially strong, though It isn’t uncommon for vendors to add things to their PLA to change its characteristics.

The new material containing about 20% coffee waste showed an over 400% increase in toughness (25.24 MJ/m3) versus standard PLA. Why coffee waste? We aren’t sure. They didn’t add grounds, but rather a dry and odorless material left over after coffee grounds are processed for biodiesel production.

Continue reading “Coffee Makes 3D Printing Better”

What Better Than A Hexapod?

What’s more awesome than a normal hexapod robot? What about a MEGA hexapod?

Max the Megapod, a six-legged 3D-printed walking robot, is an open source, Arduino-based, Bluetooth controlled, Scratch programmable creation made possible by [Steven Pendergrast]. The design for Max was based on a previous hexapod project, Vorpal the Hexapod, which has since been built at hundreds of schools worldwide.

Max clocks in at two feet in diameter, expanding to three when sprawled out on the ground. In addition, the hexapod is able to dance, walk, and run as fast as the smaller version, covering ground at twice the speed due to its size.

The scaling for the project – about 200% from the original hexapod – required some creativity, as the goal was for the components to be printed on a modest-sized printer with an 8 inch cube bed. In addition, since Max weighs 9 pounds on average, real bearings (608 Skate bearings) needed to be used for the servo mounts.

The electrical system had to be changed to account for the larger currents drawn by the larger servos (MG958s). and the power distribution harness needed to be redesigned. The current harness take about two hours to build for the larger hexapod, compared to 15 minutes for the original design.

The results are both hilarious and adorable, especially given the endless modifications made to give Max a unique flair. Perhaps a GIGApod could be coming up next?

Continue reading “What Better Than A Hexapod?”

A (Mostly) 3D Printed Servo/Gear Reduction

This servo/gear reduction was assembled with almost all 3D-printed parts. Apart from a brushed 36 V DC-motor, a stainless steel shaft, and screws for holding the servo together, the only other non-printed part is the BTS7960B motor driver.

Some interesting stats about the plastic servo – its stall torque is about 55 kg/cm, reaching a peak current draw of 18 A when using a 6s LiPo battery outputting 22-24 V. The shaft rotates using two 20 mm holes and lubrication. (Ball bearings were originally in the design, but they didn’t arrive on time for the assembly.)

The holes of the gears are 6.2 mm in diameter in order to fit around the shaft, although some care is taken to sand or fill the opening depending on the quality of the 3D print.

This isn’t [Brian Brocken]’s only attempt at 3D-printing gears. He’s also built several crawling robots, a turntable, and a wind up car made entirely from acrylic. The .stl files for the project are all available online for anyone looking to make their own 3D-printed servo gears.

Continue reading “A (Mostly) 3D Printed Servo/Gear Reduction”

Prusa Unveils New Mini 3D Printer, Shakes Up The Competition

For the last couple of years, consumer desktop 3D printer choices in the under $1,000 USD range have fallen into two broad categories: everything bellow $500 USD, and the latest Prusa i3. There are plenty of respectable printers made by companies such as Monoprice and Creality to choose from on that lower end of the scale. It wasn’t a luxury everyone could justify, but if you had the budget to swing the $749 for Prusa’s i3 kit, the choice became obvious.

Of course, that was before the Prusa Mini. Available as a kit for just $349, it’s far and away the cheapest printer that Prusa Research has ever offered. But this isn’t just some rebranded hardware, and it doesn’t compromise on the ideals that have made the company’s flagship machine the de facto open source FDM printer. For less than half the cost of the i3 MK3S, you’re not only getting most of the larger printer’s best features and Prusa’s renowned customer support, but even capabilities that presumably won’t make it to the i3 line until the MK4 is released.

Josef Průša was on hand to officially unveil his latest printer at the 2019 East Coast Reprap Festival, where I got the chance to get up close and personal with the diminutive machine. While it might be awhile before we can do a full review on the Mini, it’s safe to say that this small printer is going to have a big impact on the entry-level market.

Continue reading “Prusa Unveils New Mini 3D Printer, Shakes Up The Competition”