Time Sync Through Your VGA Connector

While it might be in its twilight years, the venerable VGA video connector conceals a versatile interface that  can still provide the experimenter with the opportunity for a variety of hacks. We’ve not seen anything quite like [flok]’s one, in which he uses the VGA interface to insert timing information from which an NTPd instance gets its reference.

If this seems counter-intuitive because a VGA interface is an analogue output rather than a digital input, then you are correct to smell a rat. And he comes clean in his first sentence, as he’s not using the VGA lines themselves but the I2C interface that is a feature of all but the most basic of VGA cards. This is the means by which a plug-and-play operating system can identify a monitor’s capabilities, but there’s little to stop it being used for other purposes. In this case an Arduino fed by a 1-pulse-per-second timing signal from a temperature compensated crystal oscillator provides the I2C peripheral which is polled by NTPd.

This project should be of interest to any tinkerer because of its invaluable information on identifying and using the I2C interface on a VGA socket. So if you’ve used your VGA card as an SDR you might find it interesting, but hurry or you could have missed the boat entirely.

VGA plug image: Swift.Hg [CC BY-SA 3.0]

DIY Electrolysis Tank: Removing Rust While You Sleep

Anyone who’s done a bit of metalworking will know how quickly your stockpile will pick up a coating of rust with even just a bit of humidity. While welding requires only a bit of wire brushing at the joint areas, cleaning a large frame for paint is a completely different story. The projects [Make it Extreme] gets himself into tend to involve a lot of steel, so he built his own electrolysis tank for rust removal.

Electrolytic rust removal involves placing the piece of steel to be cleaned into an alkaline electrolyte solution (water and washing soda) with a sacrificial steel anode and connecting a low voltage DC supply over the two pieces. [Make it Extreme] started with an old plastic container, around which he built a very neat trolley frame. He obviously put some thought into how the tank will be cleaned, since it can be removed by unscrewing six bolts and removing the top part of the frame.

The high current, low voltage power supply that is required for the process was built using an old microwave transformer. The secondary coil is removed and replaced with coil of thick insulated wire, to convert it into a step down transformer. After the rewinding the transformer outputs about 13 VAC, which is then run through beefy bridge rectifier modules to get a DC current. A custom machined copper bolt terminal is mounted through the side of the tank to attach the sacrificial anode plate to the positive lead of the power supply, while the negative lead is clamped to the rusty steel to be cleaned.

[Make it Extreme]’s projects never get old, with everything from rideable tank tracks to rotary electric guns. Check out the video after the break to see the build and an impressive demo. Continue reading “DIY Electrolysis Tank: Removing Rust While You Sleep”

Hackaday Links Column Banner

Hackaday Links: November 10, 2019

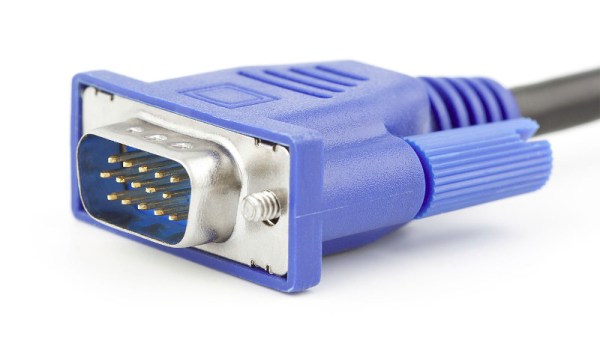
In the leafy suburbs of northern Virginia, a place ruled by homeowner’s associations with tremendous power to dictate everything from the color of one’s front door to the length of grass in the lawn, something as heinous as garage doors suddenly failing to open on command is sure to cause a kerfuffle. We’ve seen this sort of thing before, where errant RF emissions cause unintentional interference, and such stories aren’t terribly interesting because the FCC usually steps in and clears things up. But this story is a little spicier given the source of the interference: Warrenton Training Center, a classified US government communications station located adjacent to the afflicted neighborhood. WTC is known to be a CIA signals intelligence station, home to spooks doing spooky stuff, including running high-power numbers stations. The interference isn’t caused by anything as cloak-and-dagger as that, though; rather, it comes from new land-mobile radios that the Department of Defense is deploying. The new radios use the 380-400 MHz band, which is allocated to the Federal Government and unlicensed Part 15 devices, like garage door remotes. But Part 15 rules, which are clearly printed on every device covered by them, state that the devices have to accept unwanted interference, even when it causes a malfunction. So the HOA members who are up in arms and demanding that the government buy them new garage door openers are likely to be disappointed.

Speaking of spooks, if you’re tired of the prying electronic eyes of facial recognition cameras spoiling your illusion of anonymity, have we got a solution for you. The Opt-Out Cap is the low-tech way to instantly change your face for a better one, or at least one that’s tied to someone else. In a move which is sure not to arouse suspicion in public, doffing the baseball cap deploys a three-piece curtain of semi-opaque fabric, upon which is printed the visage of someone who totally doesn’t look creepy or sketchy in any way. Complete instructions are provided if you want to make one before your next trip to the ATM.

It’s always a great day when a new Ken Shirriff post pops up in our feed, and his latest post is no exception. In it, Ken goes into great detail about the history of the 80×24 (or 25) line standard for displays. While that may sound a bit dry, it’s anything but. After dispelling some of the myths and questionable theories of the format’s origin – sorry, it’s not just because punch cards had 80 columns – he discusses the transition from teletypes to CRTs, focusing on the very cool IBM 2260 Display Station. This interesting beast used an acoustic delay line made of 50′ (15 m) of nickel wire. It stored data as a train of sound pulses traveling down the wire, which worked well and was far cheaper than core memory, even if it was susceptible to vibrations from people walking by it and needed a two-hour warm-up period before use. It’s a fascinating bit of retrocomputing history.

A quick mention of a contest we just heard about that might be right up your alley: the Tech To Protect coding challenge is going on now. Focused on applications for public safety and first responders, the online coding challenge addresses ten different areas, such as mapping LTE network coverage to aid first responders or using augmented reality while extricating car crash victims. It’s interesting stuff, but if you’re interested you’ll have to hurry – the deadline is November 15.

And finally, Supercon starts this week! It’s going to be a blast, and the excitement to hack all the badges and see all the talks is building rapidly. We know not everyone can go, and if you’re going to miss it, we feel for you. Don’t forget that you can still participate vicariously through our livestream. We’ll also be tweet-storming and running a continuous chat on Hackaday.io to keep everyone looped in.

Watch A 3D Printer Get Designed From The Ground Up

Too often when you see a build video, you only get to see the final product. Even if there’s footage of the build itself, it’s usually only the highlights as a major component is completed. But thankfully that’s not the case with the “V-Baby” CoreXY 3D printer that [Roy Berntsen] has been working on.

Watching through his playlist of videos, you’re able to see him tackle his various design goals. For example he’d like the final design to be both machinable and printable, which is possible, but it certainly adds complexity and time. He also transitions from a triangular base to a rectangular one at some point. These decisions, and the reasons behind them, are all documented and discussed.

Towards the end of the series we can see the final testing and torturing process as he ramps up to a final design release. This should definitely demystify the process for anyone attempting their first 3D printer design from scratch.

3D Print Your Very Own Mechanical Computer

Most Hackaday readers are familiar with computers from the 70s and 80s, but what about ones even older than that? The Digi Comp 1 was a commercially available computer from the 1960s that actually cost less than a modern-day microcontroller. The catch? It was mechanical rather than electrical. Thanks to retro-wizard [Mike Gardi], now anyone can build a replica of one.

Admittedly the Digi Comp 1 was more of a toy than a tool, but it was still a working computer. It contained three flip-flops (memory) and had a lever that acted as a clock, allowing the user to perform boolean operations and some addition and subtraction. Certainly not advanced, but interesting nonetheless. [Mike]’s version of the Digi Comp 1 has an extra bit when compared to the original and includes some other upgrades, but largely remains faithful to the original design.

If you want to print one of these on your own, [Mike] has made all of the files available on Thingiverse. He has also experimented with other mechanical computers as well, including the sequel Digi Comp 2. We’ve seen some recent interest in that mechanical computer lately as well.

Continue reading “3D Print Your Very Own Mechanical Computer”

An Atari Graphics Chip, Ready For You To Build

The most notable of the home computer and console hardware from the 8-bit golden era didn’t get their impressive sound and graphics from off-the-shelf silicon, instead they relied on secretive custom chipsets to get the edge over their competitors. Unfortunately for vintage gaming aficionados, those chips are now long out of production and in many cases there’s little information to be had about their operation.

Which makes discovery of the schematics (PDF link) for the “Tia Maria” graphics chip found in the Atari 7800 console an unusual occurrence, and one which should be of special interest to the emulation community. They can be found alongside the rest of the Atari Museum’s 7800 information.

That such a useful document is available at all is due to a lucky find in a dumpster following the demise of Atari, when a treasure trove of documents was discarded. It seems that the existence of these schematics has been known within the Atari community for some time, and we expect before long this information will find its way into FPGA implementations of the 7800; especially since the system features nearly complete backwards compatibility with the massively successful Atari 2600.

When that happens we hope we’ll be able to bring it to you, but it’s not the first time someone’s made an Atari on an FPGA.

Via RetroRGB

Header image: Bilby [CC BY 3.0]

Accessibility Apps Get Help From Bluetooth Buttons

Ever hear of Microsoft Soundscape? We hadn’t, either. But apparently it and similar apps like Blindsquare provide people with vision problems context about their surroundings. The app is made to run in the background of the user’s mobile device and respond to media controls, but if you are navigating around with a cane, getting to media controls on a phone or even a headset might not be very convenient. [Jazzang] set out to build buttons that could control apps like this that could be integrated with a cane or otherwise located in a convenient location.

There are four buttons of interest. Play/pause, Next, Back, and Home. There’s also a mute button and an additional button you can use with the phone’s accessibility settings. Each button has a special function for Soundscape. For example, Next will describe the point of interest in front of you. Soundscape runs on an iPhone so Bluetooth is the obvious choice for creating the buttons.

To simplify things, the project uses an Adafruit Feather nRF52 Bluefruit board. Given that it’s Arduino compatible and provides a Bluetooth Human Interface Device (HID) out of the box, there’s almost nothing else to do for the hardware but wire up the switches and some pull up resistors. That would make the circuit easy to stick almost anywhere.

Software-wise, things aren’t too hard either. The library provides all the Bluetooth HID device trappings you need, and once that’s set up, it is pretty simple to send keys to the phone. This is a great example of how simple so many tasks have become due to the availability of abstractions that handle all of the details. Since a Bluetooth HID device is just a keyboard, you can probably think of many other uses for this setup with just small changes in the software.

We covered the Bluefruit back when it first appeared. We don’t know about mounting this to a cane, but we do remember something similar attached to a sword.

Continue reading “Accessibility Apps Get Help From Bluetooth Buttons”