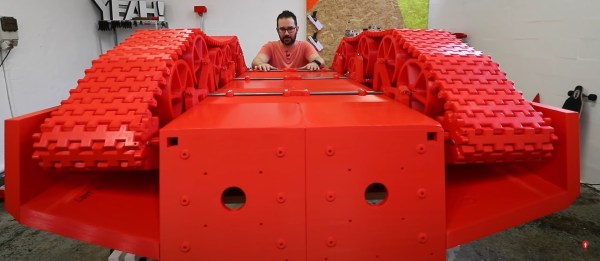
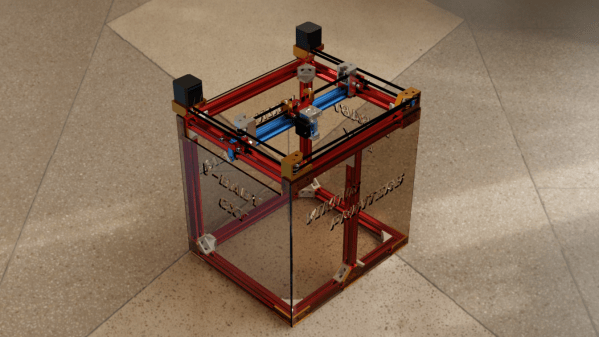
3D Printing Logic Gates

It may seem a paradox, but in the future tiny computers may dump electronics and return to their mechanical roots. At the macroscale, mechanical computers are fussy and slow, but when your area is down to a few molecules, electronics have trouble working but mechanical systems do just fine. In addition, these devices don’t use electricity directly, don’t generate electronic signatures, and may be less sensitive to things like radiation that damage electronics. A recent paper in Nature Communications discusses how to 3D print common logic gates using both macro-scale 3D printing techniques and a much smaller version with microstereolithography. You can see a video of gates in action below.

The gates use a bistable flexible mechanism. The larger gates use ABS plastic and measure about 250mm square. The smaller gate measures less than 25 mm square. They also use a special technique to make gates as small as 100 microns theoretically possible, although some of that is future work for the team.

Continue reading “3D Printing Logic Gates”

Pack Your SD Cards Swiss Army Style

SD cards have largely supplanted most other card-based storage devices, in all but a few niches. Available in standard, micro, and the rather obscure mini sizes, they’re used in everything from digital cameras to car stereos and console ROM carts. For most users, storing them consists of tossing them in a bag, occasionally in a plastic case that’s barely any bigger than the card itself for a little extra protection. This can get frustrating when carrying multiple cards, but [Dranoweb] has a solution.

[Dranoweb]’s design is similar to a Swiss Army knife, repurposed with many fingers, each with slots for holding everyone’s favourite storage devices. All the parts barring the screw are 3D printed. There are various designs of the storage fingers, allowing the build to be customized to suit varying quantities of SD and microSD cards. There’s even a deep-pocketed piece for USB drives and small adapters, and an oversized design for Nintendo DS carts.

It’s a tidy design that makes it that much less likely you’ll lose your microSD in the bottom of your backpack. Now, if you need to interface with an SD card, we can help you there too.

A Modular Mounting System Via 3D Printing

When working with cameras or other tools, it can often be useful to have some manner of stand or tripod to hold things in position, freeing up one’s hands for other tasks. Unfortunately, when it comes to smaller cameras and devices like smartphones and tablets, there are few standardized solutions. [yyh1002] has skirted the problem by creating a customizable modular mounting system, and it’s taken the 3D-printing world by storm.

The system was inspired by GoPro mounts, which are a system of plastic arms and screws that can effectively position the small devices in all manner of orientations. [yyh1002]’s system is GoPro-compatible, using the same fasteners and similar geometry, and tons of other modelers have added on.

The parts are 3D printed and consist of a series of arms, clamps and joints that can be configured to suit the task at hand. Source files are available, which allows custom version to be made. This is useful for modifying parts like phone holders to suit different models, to avoid fouling buttons or interfering with camera placement. Thus far, the community has contributed parts as diverse as G-clamps, camera mounts, and parts to mate to Playstation controllers. (Editor’s note: I’m actually printing out a Pi Zero case from this series as I edit this post. Coincidence!)

It’s a useful system, and we look forward to seeing more parts uploaded in future. Meanwhile, don’t forget – it’s remarkably easy to tripod mount just about anything.

Spot This DIY Electronic Load’s Gracefully Hidden Hacks

Sometimes it’s necessary to make do with whatever parts one has on hand, but the results of squashing a square peg into a round hole are not always as elegant as [Juan Gg]’s programmable DC load with rotary encoder. [Juan] took a design for a programmable DC load and made it his own in quite a few different ways, including a slick 3D-printed enclosure and color faceplate.

The first thing to catch one’s eye might be that leftmost seven-segment digit. There is a simple reason it doesn’t match its neighbors: [Juan] had to use what he had available, and that meant a mismatched digit. Fortunately, 3D printing one’s own enclosure meant it could be gracefully worked into the design, instead of getting a Dremel or utility knife involved. The next is a bit less obvious: the display lacked a decimal point in the second digit position, so an LED tucked in underneath does the job. Finally, the knob on the right could reasonably be thought to be a rotary encoder, but it’s actually connected to a small DC motor. By biasing the motor with a small DC voltage applied to one lead and reading the resulting voltage from the other, the knob’s speed and direction can be detected, doing a serviceable job as rotary encoder substitute.

The project’s GitHub repository contains the Arduino code for [Juan]’s project, which has its roots in a design EEVblog detailed for an electronic load. For those of you who prefer your DIY rotary encoders to send discrete clicks and pulses instead of an analog voltage, a 3D printed wheel and two microswitches will do the job.

Threading 3D Printed Parts: How To Use Heat-Set Inserts

We can make our 3D-printed parts even more capable when we start mixing them with some essential “mechanical vitamins.” By combining prints with screws, nuts, fasteners, and pins, we get a rich ecosystem for mechanism-making with capabilities beyond what we could simply print alone.

Today I’d like to share some tips on one of my favorite functional 3D-printing techniques: adding heat-set inserts. As someone who’s been installing them into plastic parts for years manually, I think many guides overlook some process details crucial to getting consistent results.

Make no mistake; there are a handful of insert guides already out there [1, 2]. (In fact, I encourage you to look there first for a good jump-start.) Over the years though, I’ve added my own finishing move (nothing exotic or difficult) which I call the Plate-Press Technique that gives me a major boost in consistency.

Join me below as I fill in the knowledge gaps (and some literal ones too) to send you back to the lab equipped with a technique that will give you perfectly-seated inserts every time.

Continue reading “Threading 3D Printed Parts: How To Use Heat-Set Inserts”

Ten 3D Printed Gadgets That Just Can’t Stay Still

There was a time, not so very long ago, when simply getting a 3D printer to squirt out an object that was roughly the intended shape and size of what the user saw on their computer screen was an accomplishment. But like every other technology, the state of the art has moved forward. Today the printers are better, and the software to drive them is more capable and intuitive. It was this evolution of desktop 3D printing that inspired the recently concluded 3D Printed Gears, Pulleys, and Cams contest. We wanted to see what hackers and makers can pull off with today’s 3D printing tools, and the community rose to the challenge.

Let’s take a look at the top ten spinning, walking, flapping, and cranking 3D printed designs that shook us up:

Continue reading “Ten 3D Printed Gadgets That Just Can’t Stay Still”

Infinite Build Volume With RepRap On Wheels

The average 3D printer is a highly useful tool, great for producing small plastic parts when given enough time. Most projects to build larger 3D printed objects use various techniques to split them into smaller parts which can fit inside the limited build volume of most Cartesian-based printers. However, there’s no reason a printer need sit inside a box, and no reason a printer can’t roam about, either. Hence, we get the RepRap HELIOS on wheels.

[Nicholas Seward] created the HELIOS and entered it into the Hackaday Prize in 2017, using a SCARA arm to build a printer with a large build volume and no moving steppers. One of [Nicholas]’s students then did a test, in which the HELIOS was mounted on an angled motorized cart, giving the printer potentially infinite build volume in one axis.

[Nicholas] expects the current basic setup to be capable of prints 200mm wide, 100mm high, and theoretically infinite length. There’s also potential to enable the device to create large curved parts by allowing the printer to steer itself with independently controlled motors.

There’s more work to be done, particularly to allow the printer to locate itself relative to its work space to avoid dimensional issues on large prints, but the preliminary results are highly impressive. We’ve seen other infinite volume printers, too – like this build using a conveyor belt design. Video after the break.

[Thanks to smerrett79 for the tip!]

Continue reading “Infinite Build Volume With RepRap On Wheels”