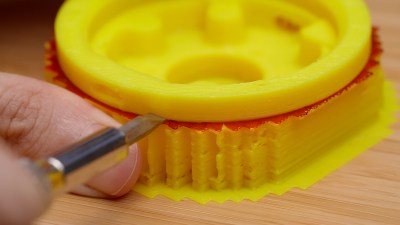
3D Printed Electronics Breadboard

The printed breadboard cover, seen from the bottom. (Credit: CHEP, YouTube)
The printed breadboard cover as seen from the bottom. (Credit: CHEP, YouTube)

Does it make sense to make your own breadboards rather than purchasing off the shelf ones? As [Chuck Hellebuyck] notes in a recent video on DIY, 3D-printed breadboards, there’s a certain charm to making a breadboard exactly the size you need, which is hard to argue with. The inspiration came after seeing the metal breadboard spring clips on sale by [Kevin Santo Cappuccio], who also has a 3D printable breadboard shell project that they fit into. This means that you can take the CAD model (STEP file) and modify it to fit your specifications before printing it, which is what [Chuck] attempts in the video.

The models were exported from TinkerCAD to Bambu Lab Studio for printing on a Bambu Lab A1 Mini FDM printer. After a failed first print (which the A1 Mini, to its credit, did detect), a model was printed on a Creality K1 Max instead. Ultimately [Chuck] traced this back to the Bambu Lab Studio slicer failing to add the inner grid to the first layer, which the Creality slicer did add, caused by the ‘wall generator’ setting in the Bambu Lab slicer being set to ‘Classic’ rather than ‘Arachne,’ which can vary line width.

After this, the models printed fine and easily fit onto the spring clips that [Chuck] had soldered down on some prototyping board. A nice feature of these spring clips is that they have a bit of space underneath them where an SMD LED can fit, enabling functional (or just fancy) lighting effects when using a custom PCB underneath the contraption. As for whether it’s worth it depends on your needs. As [Chuck] demonstrates, it can be pretty convenient for a small breadboard on an add-on card (with or without custom lighting) like this, but it’s unlikely to replace generic breadboards for quick prototyping. We can, however, imagine a custom breadboard with mounting points for things like binding posts, switches, or potentiometers.

If we had that kind of custom breadboard, we wouldn’t need these. People were making custom breadboards back in 1974, but they didn’t look like these.

Continue reading “3D Printed Electronics Breadboard”

V-Slot Wheels Or Linear Rails?

In the early days of 3D printers, most builds used smooth rods and bearings that rode on them. But these days, printers are shipping with either V-slot extrusions with Delrin wheels or linear rails. Which is best? Everyone seems to have an opinion, but [Spencer] decided to compare them using some well-defined experiments, and he shares his results in the video below.

Common wisdom is that linear rails create a better print quality, but [Spencer] didn’t really find that much difference. He does admit, however, that he isn’t an expert on setting up linear rails, so perhaps there’s something he could have done better. He did note that the rails were quieter but that, for both cases, the noise generated by the moving rails was only a small fraction of the total noise generated by the printer. The rails were also more stable in terms of resonance. Input shaping can help overcome that, though, so it probably isn’t that important in a modern printer.

What do you think? Are linear rail upgrades worth it? Let us know in the comments. We’ve been 3D printing long enough that we are hard-pressed to complain much about any of the prints we produce today on printers that cost a fraction of what we spent on our first ones.

Of course, you could go with string. Putting rails together with or without slots is its own art form.

Continue reading “V-Slot Wheels Or Linear Rails?”

Simulating Air Flow For 3D Printing

You’ve probably heard that a 3D printer is capable of producing its own replacement parts. Sometimes, that even includes upgraded or improved versions of the parts it was originally built with. But sometimes, it’s hard to figure out what improved really means. Think about air ducts that cool the part after printing. In theory, it should be easy to design a new duct. But how does it perform? Empirical testing can be difficult, but [Mike] shows how you can simulate the airflow so you can test design changes and validate assumptions before you print the actual part.

Of course, this wouldn’t only apply to printer ducts. You might also get some tips if you want to model airflow for PC cooling, hot air soldering, or other air-related projects. The free version of the software has some limitations, but it was surprisingly capable.

We also enjoyed how [Mike] used fluid to visualize the actual patterns and compared it to the simulation. The trick is using a compound from a kid’s science project kit, and it seems to work very well. Of course, you could just grab your smartphone. This might be worth thinking about if you are building a laser cutter air assist, too.

Continue reading “Simulating Air Flow For 3D Printing”

Using A 2D Scanner To Make 3D Things

[Chuck Hellebuyck] wanted to clone some model car raceway track and realised that by scanning the profile section of the track with a flatbed scanner and post-processing in Tinkercad, a useable cross-section model could be created. This was then extruded into 3D to make a pretty accurate-looking clone of the original part. Of course, using a flatbed paper scanner to create things other than images is nothing new, if you can remember to do it. A common example around here is scanning PCBs to capture mechanical details.

The goal was to construct a complex raceway for the grandkids, so he needed numerous pieces, some of which were curved and joined at different angles to allow the cars to race downhill. After printing a small test section using Ninjaflex, he found a way to join rigid track sections in curved areas. It was nice to see that modern 3D printers can handle printing tall, thin sections of this track vertically without making too much of a mess. This fun project demonstrates that you can easily combine 3D-printed custom parts with off-the-shelf items to achieve the desired result with minimal effort.

Flatbed scanner hacks are so plentiful it’s hard to choose a few! Here’s using a scanner to recreate a really sad-looking PCB, hacking a scanner to scan things way too big for it, and finally just using a scanner as a linear motion stage to create a UV exposure unit for DIY PCBs.

Continue reading “Using A 2D Scanner To Make 3D Things”

You Can 3D Print Yourself Some Simple Magnetic Switches

Permanent magnets aren’t typically switchable. They’re always doing their magnet thing. However, if you align them with a bunch of other magnets in just the right way, you can create a permanent magnet that you can effectively switch on and off. [Andrew Klein] has done just that with his 3D-printed magnetic switch design.

The concept is simple enough. The design consists of a 3D-printed housing in two parts, top and bottom. When set into one orientation, the housing holds two arrays of magnets in opposite orientations. This effectively cancels out their magnetic fields and allows you to move the assembly around as if it’s pretty much not magnetic at all. However, rotate the device to its alternative orientation, and the magnets poles are aligned. This effectively combines their magnetic fields and makes the assembly act as one big large magnet.

These devices are useful if you want to create magnetic clamps or fixtures that can be attached and detached at will from ferrous surfaces. Being able to effectively “switch the magnet off” is much easier than trying to wrench a powerful magnet from a metal plate, after all.

You can do something similar with electromagnetic techniques, too! Video after the break.

Continue reading “You Can 3D Print Yourself Some Simple Magnetic Switches”

UC Berkeley Prints Glass Nanoparticles

In a recent video, [Joel] of 3D Printing Nerd interviews a researcher at University of California, Berkeley about their work with glass 3D printing technology. A resin is impregnated with tiny glass nanoparticles and produces green parts. An oven burns away the resin and then another heating step produces the actual silica glass part. You can see a video about the process below.

As you might expect with glass, the temperatures are toasty. The first burn is at 1100 C and the fusing burn is at 1300 C. The nanoparticles are about 40 nanometers across. The resulting parts are tiny with very small feature sizes. The technology to do this has been around for a few years, and the University continues researching this form of computed axial lithograph (CAL) 3D printing. These parts are so small that it uses an adaptation called microCAL that produces much smaller parts at high precision. However, the equipment available today won’t produce very large objects. The video talks about the uses for some of these small glass items.

We wonder how much the firings in the ovens change the tiny tolerances. They obviously work, so either they account for that or it doesn’t shrink much.

If you want your own 3D printed glass, a laser system might be more practical. If you just want transparent plastic, your FDM printer can do that. Really.

Continue reading “UC Berkeley Prints Glass Nanoparticles”

Stemfie, The 3D-Printable Construction Set

Construction kit toys are cited by many adults as sparking great creativity and engineering talent in their youth. LEGO, Meccano, K’NEX, Lincoln Logs—these are all great commercial options. But what about printing your very own construction kit at home? Meet Stemfie.

Fundamentally, Stemfie isn’t that different from any other construction kit you might have seen before. It has various beams and flat plates that are full of holes so they can be assembled together in various ways. It also uses bolts, spacers, and small plastic nuts that can be tightened using a special hand tool. Think of a mixture between LEGO Technic and Meccano and that will get you in the ballpark. It includes neat motion components too, including gears, wheels, and even a large flat spring!

What can you build with it? Well, as every construction kit toy says, you’re only limited by your imagination! However, if your imagination is especially small, you can just use the Stemfie 3D YouTube channel for inspiration. It features everything from a ping pong ball catapult to a rubber-band driven car. Plus, since it’s all 3D printed, you can simply scale up the parts and build even bigger designs. Like a giant catapult that can hurl entire water jugs. Fun!

We’ve seen other projects in this vein before. One of our favorites is [Ivan Miranda]’s giant 3D printed assembly kit that he uses to build big monster toys.

Continue reading “Stemfie, The 3D-Printable Construction Set”