Oh Snap! 3D Printing Snapping Parts Without Breakage

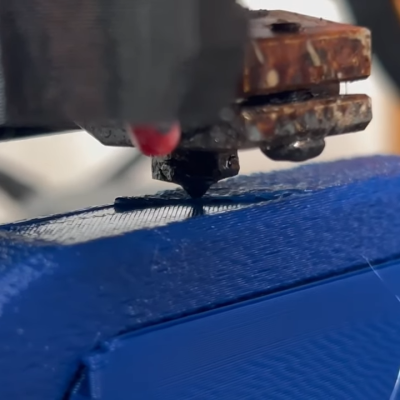
One of the great things about plastic is that it can be relatively flexible. We see things all the time that snap together, but when 3D printing, you don’t often run into snap fit designs. [Engineers Grow] has a video to help you design snap fittings that don’t break.

In the first video that you can see below, he covers three parameters that can help. The first is the length of the snap element. Secondly, the undercut size can be reduced. You can also try making the snap; as thin as possible, although in the example he went too thin and wound up breaking the snap anyway.

The final suggestion, covered in detail in the second video below, is to change the material you use. The key parameter is known as elongation at break. For PLA the typical value for this is 8%. ABS is 10%, PETG is 24% and Nylon is 100%. Simplistically, you could assume that a PETG piece could deform up to 25% before breaking. That may be true, but it will permanently deform long before that. The video suggests using 10 or 15% of the value to assure the part doesn’t lose its shape.

In the third video, you’ll learn, too, that print orientation counts. Making the hooks grow off the build plate leads to a weak hook as you might expect.

We’ve looked at the mechanics behind these before. You can find a lot of detailed technical data about joints, too.

Continue reading “Oh Snap! 3D Printing Snapping Parts Without Breakage”

Upgrading A Line Trimmer With 3D Printed Parts

Many have complained about the hassle of rewinding their weed whackers with fresh trimmer line. Manufacturers responded by making models with solid plastic blades instead. Some of these suck, though, like this Ozito model belonging to [Random Sequence]. 3D printing was the way forward, adapting the blade trimmer to use traditional line.

The design is simple. [Random Sequence] created a small plastic tab which matches the attachment tab of the Ozito trimmer’s plastic blades. On the end of the tab, in lieu of a blade is a round slot into which a length of trimmer line can be inserted. The trick is to use a cigarette lighter to slightly melt a bulb onto a length of trimmer line so that it doesn’t pull through the slot. Centrifugal force (argue about it in the comments) keeps the line from falling out.

[Random Sequence] prints them in PETG, but notes that the part could benefit from additional strength. They do break when hitting tough objects, much like the stock trimmer blades do. Also, unlike a bump-feed trimmer head, there’s no way to auto-feed more line. Instead, one must simply assemble more of the tab-adapters with fresh line manually.

Overall, though, it’s a great way to fit stronger, more capable trimmer line to a weed whacker otherwise hamstrung by weak blades. It’s reported to work with Ozito and potentially Bosch tirmmers, and parts are on Thingiverse for those wishing to print their own.

Just as string trimmer line was once used as 3D printing filament, you can also go the other way, turning old plastic bottles into trimmer line. If you’ve whipped up your own fun hacks for tools in the garden, don’t hesitate to let us know.

Sound off with your best name for a weed whacker in the comments, too. The Australians may hold the title with “whipper snipper,” but we’re open to other submissions!

An M1 Mac mini sits next to a white Wii on a wooden table. In the background are various Edison-style LED light fixtures with an incadescent-like light profile.

This Wii Has An Apple M1 Inside

The conveniently tiny logic board of the M1 Mac mini has lead to it giving the Mini ITX format a run for its money in case mods. The latest example of this is [Luke Miani]’s M1 Wii. (Youtube via 9to5Mac)

[Miani] chose the Wii as a new enclosure for this Mac mini given its similar form factor and the convenient set of doors in the top to maintain access to the computer’s I/O, something he wasn’t able to do with one of his previous M1 casemods. The completed build is a great stealth way to have a Mac mini in your entertainment center. [Miani] even spends the last several minutes of the video showing the M1 Wii running Wii, GameCube, and PS2 games to really bring it full circle.

A Microsoft Surface power brick was spliced into the original Wii power cable since the Wii PSU didn’t have enough wattage to supply the Mac mini without significant throttling. On the inside, the power runs through a buck converter before making its way to the logic board. While the Mini’s original fan was too big to fit inside the Wii enclosure, a small 12V fan was able to keep performance similar to OEM and much higher than running the M1 fanless without a heat spreader.

If you’d like to see some more M1 casemods, check out this Lampshade iMac or the Mac Mini Mini.

Continue reading “This Wii Has An Apple M1 Inside”

Nanoassembly With Water

Water is sometimes known as the universal solvent. But researchers at Harvard want to use water to put things together instead of taking them apart. Really small things. In the video below, you can see a simple 3D-printed machine that braids microscopic fibers.

The key appears to be surface tension and capillary action. A capillary machine uses channels that repel floating objects. By moving the channel, materials move to avoid the channel, and by shaping the channel, various manipulations can occur, including braiding. This is one of those things that is easier to understand when you see it, so if it doesn’t make sense, watch the video below. The example uses tiny Kevlar fibers.

Continue reading “Nanoassembly With Water”

3D Printer Tuning: An Engineering Approach

[MirageC] is a bit of a contrarian. Instead of taking pictures of 3D printed objects that show them in their best light, he takes pictures that show them at their worst. The reason? He wanted to figure out why he was seeing a strange artifact in his printer when using a direct extruder. Just at a quick glance, you might think the problem was Z wobble, but, in this case, it was something else. You can see the fine detective work in the video below.

There were a few odd things about the problem. First, it scaled with the part size. Secondly, the problem got better when he switched to a Bowden tube setup. We don’t want to give away the ending, but you can guess from that clue that the problem had something to do with the extrusion system.

The resulting analysis led [MirageC] to work with BMG to create a special gear which — surprisingly, didn’t help as much as he thought it would. However, it did help point the way to the correct solution.

Along the way, you can learn a lot from following along, and maybe you’ll even improve the quality of your prints. We always enjoy these detailed analyses of printer issues, like the ones from [Stefan], for example. If you want to go hardcore engineering on your 3D prints, you can always do finite element analysis on your infill.

Continue reading “3D Printer Tuning: An Engineering Approach”

Thin Client And Smartphone Step In For 3D Printer’s Raspberry Pi And Touchscreen

It’s no secret that Raspberry Pi’s are a little hard to come by these days. Unless you had the foresight to stock up before the supply dried up — and if you did, we want to talk to you — chances are good that you’ve got a fair number of projects that use the ubiquitous SBC on indefinite hold. And maybe that’s got you thinking about alternatives to the Pi.

That’s apparently what was on [Crimson Repair]’s mind lately, the result being the discovery that an old thin client PC makes a dandy stand-in for a Raspberry Pi, at least in some cases. The video below is on the long side, true, But it’s chock full of command-by-command instructions for getting a Dell Wyse 3040, a thin client that can be found on the secondary market for $25 or so, up and running as a Klipper alternative for a 3D printer. These machines, which usually see use in point-of-sale applications and the like, sport a 1.4-GHz Intel Atom processor and a couple of gigs of RAM, and the form factor is just right for tucking into the base of an Ender 3.

Getting one up and running is a matter of getting a Debian image onto a USB key and configuring the thin client to boot from USB. After that it’s a simple matter of installing Klipper and wiring up a buck converter to power the machine. It’s not exactly rocket surgery, but why muddle through the process when someone has already been down the path ahead of you? And if you want to take it further, the second video below walks you through all the steps needed to add a touchscreen using an old Android phone. With a 3D printed bracket, the whole thing is a nicely complete printer control solution.

Continue reading “Thin Client And Smartphone Step In For 3D Printer’s Raspberry Pi And Touchscreen”

The Best Threaded Holes For Resin Parts

Threaded inserts are great for melting into FDM prints with a soldering iron. The process isn’t so simple for resin prints, since they don’t generally soften with heat. Off course, you can also print the threads directly, screw a bolt into an un-threaded hole, or tap a hole. Following his usual rigorous testing process, [Stefan] from CNC Kitchen investigated various ways of adding threaded holes to resin prints.

After establishing a pull-out force on PLA using threaded inserts (205 kg) and tapped holes (163 kg), [Stefan] tested parts printed with Prusament Tough Anthracite resin. Un-threaded and tapped holes failed at 44 kg and 55 kg respectively, while printed threads were almost twice as strong, reaching 106 kg before breaking. Stephan also tried gluing inserts into the parts using resin and CA glue. The resin didn’t cure properly in the opaque parts (6 kg) while CA was comparable to plastic threads, failing at 52 kg.

Chart of results
TLDR: Print your threads for best results

[Stefan] also tested regular ELEGOO Translucent resin. The higher hardness of the cured resin allowed the parts to hold on to around 100 kg for un-threaded and tapped holes, while printed threads reached 120 kg. Threaded insert glued with resin did better on the transparent parts thanks to improved UV penetration, but were very inconsistent. Inserts glued with CA performed about the same as on the Prusament parts, failing at 56 kg.

In an attempt to improve the performance of the inserts [Stefan] printed some parts with stepped holes to match the geometry of the inserts, which had the advantage of preventing the insert from falling through during gluing. It only made a marginal difference on the Prusament parts but boosted the strength of CA-glued inserts on the ELEGOO resin to 82 kg. Two-part epoxy was also tried, which matched the un-threaded holes in strength.

So for resin parts you’ll probably be best served by just modeling the threads in CAD and printing them directly. If you need to be able to repeatedly screw and unscrew fasteners in a hole without stripping, threaded holes with CA or epoxy might be a better solution.

Continue reading “The Best Threaded Holes For Resin Parts”