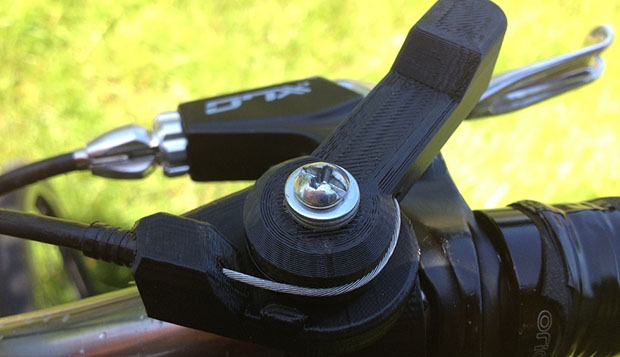
Fabricating Edible LEDs

fabricating-edible-LEDs

They’re edible, yes. But they don’t light up. That’s fine with us, since the process [Becky Stern] used to make these gummy candy LEDs taps into several techniques handy to have under your belt.

The first part shown in her video (embedded after the jump) is to make a mold for the candies. You probably have a few bags of LEDs in your parts bin. Those along with a trough made of foam core come together to create the form for the silicone mold. After mixing, pouring, and hardening, [Becky] peels the silicone off of the LEDs and sends it through the oven to make it food-safe. Mixing up the candy uses simple ingredients (gelatin, water, and ascorbic acid) but you’ll need to follow the methodology closely to get the taste and clarity you’re used to. Syringes are used to fill the tiny voids in the mold before adding leads which were 3D printed using PLA.

These will be a huge hit at your next hackerspace meeting!

Continue reading “Fabricating Edible LEDs”

Print Your Own Adjustable Lenses

[Christopher] is really going the distance with his liquid-filled 3D printed lens project. The idea is to create a bladder out of two pieces of clear plastic. It can then be filled with liquid at a variable level of pressure to curve the plastic and create an adjustable lens. He was inspired by the TED talk (which we swear we already covered but couldn’t find the post) given by [Josh Silver] on adjustable eyeglass lenses.

Don’t miss the video after the break. [Christopher] shows off the assembly process for one lens. Two 3D printed frames are pressure fit together to hold one piece of plastic wrap. Two of those assemblies are then joined with JB weld and some 3D printed clips that help to hold it. A piece of shrink tubing is used as a hose to connect a syringe to the bladder. By filling the lens assembly with water he’s able to adjust how it refracts light.

Continue reading “Print Your Own Adjustable Lenses”

Everything You Need To Build A Light-cured Resin 3D Printer

dlp-projector-resin-printer

[Rachel Levine] was one of the mechanical engineers on the team at the Rochester Institute of Technology who built this resin-based 3D printer. She wrote in to show off the fantastic work they’ve been doing. Their project website is daunting to take in at first, which shouldn’t be all that surprising since the concepts used here are fairly advanced. But give yourself a few minutes of blind clicking and you’ll begin to grasp the scope of this fantastic piece of engineering. The bad news is you’re not going to whip the thing together in a weekend. The good news is that if you’re determined to build one this should give you the lion’s share of the background you’ll need to make it happen.

The rig pulls a printed object up from the ooze on the build platform. They’re using resin that is cured with visible light. That’s why you see the level in the foreground; the bath needs to be a uniformed thickness so that it solidifies correctly when the light hits it from the underside. The build table is made of glass sandwiched between gaskets where it comes in contact with the frame, keeping the liquid in place while letting the DLP projector shine through. Check out the fast-motion build video after the break to see how each layer is exposed to light, then pulled upward to make room for the next. We estimate the build was around two hours of real-time and you can see that a technician replaces the extracted resin at regular intervals during the process.

DLP Projector based printers have been gaining in popularity. Check out this roundup of several offerings from last year.

Continue reading “Everything You Need To Build A Light-cured Resin 3D Printer”

Finally, A Machine That Makes Cheap 3D Printer Filament.

If there’s one problem with the RepRap, it’s the cost of filament. Sure, there’s also the computationally difficult problem of slicing 3D models, but a 5 to 10 times markup on turning plastic pellets into filament is the biggest problem. It’s even a bigger problem than the problems of compatibility and interchangeable parts that comes with everyone forking a ‘standard’ printer design dozens of times. The cost of filament, though, is the biggest problem, right up there with RepRap developers focusing nearly entirely on different printer designs instead of the software, firmware, and electronics that are also vitally important to the RepRap project.

Nearly a year ago, we caught wind of a competition to create a home-based filament manufacturing station that takes cheap plastic pellets available for about $5/kg and turns them in to 3D printer filament that usually sells for $50/kg. A winner for this competion has finally been announced. The winner, [Hugh Lyman] just won $40,000 for his home filament creation station, the Lyman Filament Extruder

The goal of the Desktop Factory Competition was to create a machine that produces filament suitable for 3D printers with a total build cost of under $250 USD. [Lyman] met the goal by using a few motors, 3D printed parts, a PID controller, and off the shelf auger drill bit (that’s the actual model and supplier he used, by the way) that is able to reliably churn out plastic filament.

If you want to build your own Lyman Extruder, all the plans are up on Thingiverse, but LulzBot, the awesome people who gave us a 3D printer, hope to sell a pre-assembled version of this extruder sometime in the future, hopefully with a chain guard around that sprocket.

Preserving Locomotives With 3D Laser Scanning And 3D Printing

[Chris Thorpe] is a model railroading aficionado, and from his earliest memories he was infatuated with the narrow gauge locomotives that plied their odd steel tracks in northern Wales. Of course [Chris] went on to create model railroads, but kit manufacturers such as Airfix and Hornby didn’t take much interest in the small strange trains of the Ffestiniog railway.

The days where manufacturing plastic models meant paying tens of thousands of dollars in tooling for injection molds are slowly coming to an end thanks to 3D printing, so [Chris] thought it would be a great idea to create his own models of these small locomotives with 3D laser scanners and high quality 3D printers.

[Chris] started a kickstarter to fund a 3D laser scanning expedition to the workshop where the four oldest locomotives of the Ffestiniog railway were being reconditioned for their 150th anniversary. The 3D printed models he’s able to produce with his data have amazing quality; with a bit of paint and a few bits of brass, these models would fit right in to any model railway.

Even better than providing scale narrow gauge engines to model railway enthusiasts around the world is the fact that [Chris] has demonstrated the feasibility of using modern technology to recreate both famous and underappreciated technological relics in plastic for future generations. There’s a lot that can be done with a laser scanner in a railway or air museum or [Jay Leno]’s garage, so we’d love to see more 3D printed models of engineering achievements make their way onto Kickstarter.

More Acetone-vapor Polishing Experiments

acetone-vapor-polishing-experiments

If you’re thinking of trying the acetone-vapor polishing process to smooth your 3D printed objects you simply must check out [Christopher’s] experiments with the process. He found out about the process from our feature a few days ago and decided to perform a series of experiments on different printed models.

The results were mixed. He performed the process in much the same way as the original offering. The skull seen above does a nice job of demonstrating what can be achieved with the process. There is a smooth glossy finish and [Christopher] thinks there is no loss of detail. But one of the three models he tested wasn’t really affected by the vapor. He thinks it became a bit shinier, but not nearly as much as the skull even after sending it through the process twice. We’d love to hear some discussion as to why.

There is about eight minutes of video to go along with the project post. You’ll find it after the jump.

Continue reading “More Acetone-vapor Polishing Experiments”

Soluble Support Structure Can Be Used With Any Extruder-based 3D Printer

One of the issues with extruder-based 3D printing is that it can be very difficult to print objects that have voids in them. You simply must have something to deposit the soft material on until it has a chance to harden. [Matt] found a solution which should work for any extruder-based printer (with one caveat we’ll get to in a minute). He prints a support structure out of HIPS then later dissolves it using Limonene. The image on the left shows the object soaking for 24 hours. The final project is seen beside it.

The only real problem with this technique is that it requires a second extruder. Since printers build objects by layers, switching material in a single print head isn’t an option. HIPS stands for High-Impact Polystyrene. It extrudes at the same temperature as the ABS (235C) and adheres well to a heated bed kept at 115C. ABS will be unaffected by the hydrocarbon solvent Limonene, except for the residual smell of citrus.