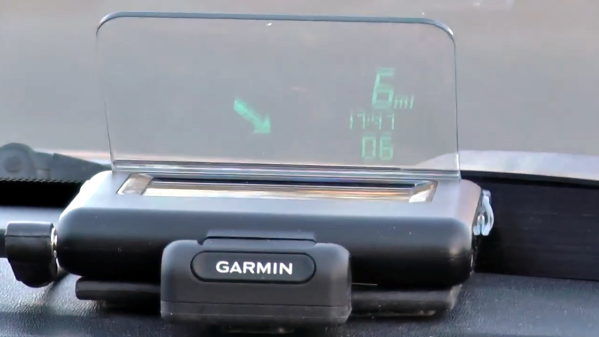
Accessible Arduino Mouse Helps

We enjoy access to cheap stuff because of the mass market for things like mice, keyboards, and cell phones. But if you need a device that doesn’t have mass appeal, you will have to pay a lot more if you can find it at all. However, with modern techniques like 3D printing and Arduino-like microcontrollers being cheap and simple to use, you now have the option to build that special one-of-a-kind device. Case in point: [Davy’s] mouse for people who have brain or nervous system disorders. This particular device is helping a 6-year-old who can’t manipulate a normal mouse.

The device uses an Arduino Pro and an MPU-6050 accelerometer and gyroscope. The original design uses machined aluminum, but 3D printing should work, too. There’s something wrong with the link to the design files in the post, but it is easy to find the correct link.

Continue reading “Accessible Arduino Mouse Helps”

Air Football Looks Pro

If you are an American, you’d probably think of [Silas Hansen’s] project as “air soccer” but most people will prefer air football. Either way, it is like air hockey but more of a football field feel. The project looks great — if you saw this on the shelves of the local toy store, you wouldn’t think anything of it. You can see a video of the game in action, below.

Unsurprisingly, the brains of the game are an Arduino. The case looks good thanks to laser cutting and 3D printing. A Roland printer produced the stickers that really dress the case up, but you could find another artistic way to do the decoration.

Continue reading “Air Football Looks Pro”

Your Vacuum Cleaner Follows You

There are several projects you can imagine where it would be useful to have a robot follow you. For example, we’ve always wanted luggage that would trail us at the airport and we’ve seen several coolers that will follow you. [Madmax95] apparently dream of having a medical cart following a patient, though, and that’s good too. But how do you do it? [Max’s] method was to strip down a Roomba and build a work table and electronics on it. An Arduino controls the motor and communicates with a PC. The PC reads video from a Kinect camera on the robot and uses special tracking software to follow the patient.

We could easily imagine all of this project except the tracking. That depended on a service called Nuitrack. There is a free version that only works for 3 minutes, but it costs if you want to use it practically. However, it would still be cheaper than rolling your own if your time has value.

Continue reading “Your Vacuum Cleaner Follows You”

An input device combining a joystick with several knnobs and buttons

Modular Multi-Input Macro Keypad Integrates Mouse And Joystick

While most computer users make do with just a keyboard and mouse, power users often have multiple additional input devices. Gamers use joysticks or dedicated mice, CAD engineers have specialized gadgets for manipulating 3D objects, while graphic designers might want programmable macro buttons to automate various tasks. [Sascha Nitsch] didn’t fancy cluttering his desk with a whole bunch of input devices and therefore decided to combine as many functions as possible into the CIMDIT: a Completely Insane Multi Device Input Thingy.

The main components making up the CIMDIT are a 3-axis joystick module, which can double as a 3D CAD mouse, and a set of buttons, knobs and sliders to enable various functions. One rotary encoder is used to choose an operating mode, while four others can be used as programmable inputs. A small OLED display shows which mode is currently selected, but can also be used to display notifications from various programs.

An Arduino Pro Micro provides a USB interface to a PC and reads out the various input units. The entire design is modular, so it can be customized to any desired combination of analog and digital inputs. [Sascha] made a neat 3D printed enclosure to hold the 3-axis module along with 26 buttons, five rotary encoders and one analog slider. KiCAD files for the PCBs and the FreeCAD source for the enclosure are available under an open-source license on [Sascha]’s Git repo.

The same thing applies to the software driving the CIMDIT, though adding functionality to it might turn out to be tricky: [Sascha] had to perform some serious code optimization to fit everything into the Arduino’s 32 kB of program flash. The Git repo also includes a convenient tool to create key mappings to be programmed into the controller, saving you from having to compose a binary file by hand.

Love macro keypads? Check out these cool examples with gesture detection, an e-ink display or simply beautiful wooden keys.

Rotary Phone MIDI Controller Still Makes Calls

[Kevin] has long wanted to do something musical with a vintage rotary phone and an Arduino, and has finally done so and committed the first of several experiments to HTML in a five-part series. He found a nice old British Telecom number, but it had been converted to plug and socket wiring to work on the modern system. Because of this, [Kevin] wanted to keep it completely functional as a phone. After all, it ought to work fine until 2025, when pulse dialing will no longer be supported in [Kevin]’s locality.

As you can likely understand, [Kevin] was keen to interface with the phone from the outside and leave the inside untouched. He used a sacrificial ADSL filter’s PCB to break out the socket, and added a pull-up resistor between the pin and 5 V.

Pretty quickly, [Kevin] figured out that when the phone is on the hook, it gives a constant high signal, where as the picking up the phone presents as a high signal going low, and dialing each number results in pulses of that quantity that alternate between high and low. Continue reading “Rotary Phone MIDI Controller Still Makes Calls”

Simple Arduino Build Lets You Keep An Eye On Pi

Are you a math aficionado in need of a new desk toy? Then do we have the project for you. With nothing more than an Arduino and a seven-segment LED module, [Cristiano Monteiro] has put together a little gadget that will slowly work its way through the digits of Pi forever…or until you get bored of looking at it and decide to use the parts for something else.

On the hardware side, we really can’t overstate how simple this project is. A common four-digit LED display is connected up to an Arduino Nano, which is then plugged into the computer for power. [Cristiano] is using a breadboard here, but you could just as easily use four female-to-female jumpers to connect the two devices together. We suppose this would be a pretty good project for anyone who’s looking to get some practical experience with PCB design as well.

The real magic is in the software, which [Cristiano] has been kind enough to release under the MIT license. Calculating Pi on such a resource-constrained chip as the ATmega328P is far from ideal, but by porting over a C++ algorithm developed by [Xavier Gourdon] and [Pascal Sebah] for their paper Computation of the n-th Decimal Digit of π with Low Memory he was able to pull it off, albeit slowly.

Now if you’ve got slightly better hardware, say a pair of Xeon processors and 96 GB of RAM, you could calculate Pi out to a few trillion digits for fun, but it wouldn’t look as cool as this little guy blinking away.

Continue reading “Simple Arduino Build Lets You Keep An Eye On Pi”

Fumik: An Arduino Wall Drawing Robot Jellyfish

If you’ve ever wanted to build a large format plotter but didn’t have the floor space, maybe put it up against the wall and make it cute. That’s the idea behind Fumik, the wall-drawing robot. As you might expect, the little device is just a motion base with a pen. We hope there’s paper against the wall since not everyone wants computer-generated art on their drywall.

The maximum size is apparently 5 m wide by 3 m tall, plenty of room to express yourself. The controller is an Arduino Mega, and stepper motors with a CNC shield drive the whole assembly. Interestingly, the motor and electronics are all onboard the jellyfish itself, rather than the wall.

The device only holds one pen at a time, but you can draw with one color and then manually change the pen. The files on GitHub are good, but you’ll need to intuit some of the mechanics from the videos. However, since it uses off-the-shelf hardware, it should be pretty easy to figure it out. This looks like a cheap and cheerful wall plotter, and the results speak for themselves.

We have seen similar wall plotters. More than once, even.

Continue reading “Fumik: An Arduino Wall Drawing Robot Jellyfish”