Designing For The Small Grey Screen

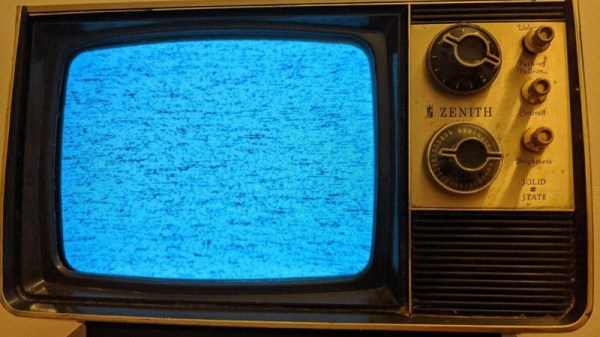
With the huge popularity of retrocomputing and of cyberdecks, we have seen a variety of projects that use a modern computer such as a Raspberry Pi bathed in the glorious glow of a CRT being used as a monitor. The right aesthetic is easily achieved this way, but there’s more to using a CRT display than simply thinking about its resolution. Particularly a black-and-white CRT or a vintage TV has some limitations due to its operation, that call for attention to the design of what is displayed upon it. [Jordan “Ploogle” Carroll] has taken a look at this subject, using a 1975 Zenith portable TV as an example.

The first difference between a flat panel and a CRT is that except in a few cases it has a curved surface and corners, and the edges of the scanned area protrude outside the edges of the screen. Thus the usable display area is less than the total display area, meaning that the action has to be concentrated away from the edges. Then there is the effect of a monochrome display on colour choice, in other words the luminance contrast between adjacent colours must be considered alongside the colour contrast. And finally there’s the restricted bandwidth of a CRT display, particularly when it fed via an RF antenna socket, which affects how much detail it can reasonably convey. The examples used are games, and it’s noticeable how Nintendo’s design language works well with this display. We can’t imagine Nintendo games being tested on black-and-white TV sets in 2022, so perhaps this is indicative of attention paid to design for accessibility.

While they require a bit of respect due to the presence of dangerous voltages, there’s a lot of fun to be had bringing a CRT into 2022. Get one while you still can, and maybe you could have a go at a retro cyberdeck.

The LED tree itself , filmed in the dark - a myriad of small orbs glowing mictures of green, blue and warm white

Kaleidoscope – Feelings Turned Into LED Tree

In 2020, [Eddie] found himself with a few hundred RGB LEDs left after a pandemic-interrupted project, and a slew of emotions he wanted to express – so he turned to the language of hardware, and started sculpting his feelings into an art project. He set out to build an LED tree around a piece of wood he picked for its cool shape, and trying out a long-shelved idea of his, while at it – using different resistors to mix colors of the RGB LEDs. The end result, pictured above, has earned “The Most Important Device” spot in our recent Sci-Fi contest, fair and square.

Initially, he wanted to use ATTiny microcontrollers and PWM all the lights in parallel. Having built an intermediate prototype, a small LED flower, he scrapped the idea due to technical problems, and then simplified it by hard-wiring RGB LEDs with randomly selected colors instead. As for the glowing orbs themselves, he made these just by pouring hot glue into silicon orb molds, a simple technique any of us could repeat. After 90 hours of work between him and an assistant he hired, the LEDs were wired up, each with random resistors connected to green and blue LED colors, and some warm white LEDs added into the mix.

He wanted to mostly use blue and green colors, as symbols of a world revived and revitalized – something we can’t help but keep our fingers crossed for. Before putting it all together, they wouldn’t know which colors each of the LEDs would power up in – part of the charm for this art piece, and no doubt a pleasant surprise. In the end, it turned out to be a futuristic decoration that we’re glad a camera could capture properly! If you like what you see, the build logs linked above have a bit more insights into how it all came together.

LED-adorned plants are fun projects that bring joy for a long time after you’ve finished them. You can easily make a LED tree out of what you have on hand, and if you get real fancy, you can create an intricate bonsai, too. And, if you’re ever interested to experiment with castellations, you can design yourself some PCB cube flowers!

This project was an entry into the 2022 Sci-Fi Contest. Check out all of the winning entries here.

Photo rail setup for stop motion

Stop-Motion Angels In The Light Field

Baseball jokes aside, holograms have been a dream for decades, and with devices finally around that support something like them, we have finally started to wonder how to make content for them. [Mike Rigsby] recently entered his stop-motion holographic setup into our sci-fi contest, and we love the idea.

Rather than a three-dimensional model or a 2d picture with pixels, the Looking Glass light field display supports a series of images as quantized points (hence light field). As you move around an object, images are interpolated between the frames you do know, giving a pretty convincing effect. In a traditional stop motion animation, you need to take anywhere between 12-24 frames to equal about one second of animation. Now that you need to take 48 pictures for one frame, over 1152 pictures for just one second of animation. Two problems quickly appear, how to take photographs accurately from the same position every time and how do you manage the deluge of photos sensibly. [Mike] started with a wooden stage for his actors. A magnet was mounted to the photo rail carriage, and a sensor allowed it to detect that it was in the same spot. An Arduino controls the rail, reads the magnet via a sensor, and controls the camera shutter. The DSLR he’s using can’t do that many frames per second, but that’s a problem for another sci-fi contest.

Holographic-ish displays are finally here, and they’re getting better. But if a display isn’t your speed, perhaps some laser-powered glasses can be the holographic experience you’re looking for?

This project was an entry into the 2022 Sci-Fi Contest. Check out all of the winning entries here.

A square PCB with a Raspberry Pi Pico mounted in the middle

Identify Radioactive Samples With This DIY Gamma-Ray Spectrometer

If you’re a radiation enthusiast, chances are you’ve got a Geiger counter lying around somewhere. While Geiger counters are useful to detect the amount of radiation present, and with a few tricks can also distinguish between the three types of radiation (alpha, beta and gamma), they are of limited use in identifying radioactive materials. For that you need a different instrument called a gamma-ray spectrometer.

Spectrometers are usually expensive and complex instruments aimed at radiation professionals. But it doesn’t have to be that way: physics enthusiast [NuclearPhoenix] has designed a hand-held gamma spectrometer that’s easy to assemble and should fit in a hobbyist budget. It outputs spectral plots that you can compare with reference data to identify specific elements.

A PCB with a sensor wrapped in black tape
The scintillator and sensor are wrapped in black tape to block out ambient light.

The heart of the device is a scintillation crystal such as thallium-doped sodium iodide which converts incoming gamma rays into visible light. The resulting flashes are detected by a silicon photomultiplier whose output is amplified and processed before being digitized by a Raspberry Pi Pico’s ADC. The Pico calculates the pulses’ spectrum and generates a plot that can be stored on its on-board flash or downloaded to a computer.

[NuclearPhoenix] wrote a convenient program to help analyze the output data and made all design files open-source. The hardest part to find will be the scintillation crystal, but they do pop up on auction sites like eBay now and then. We’ve featured an Arduino-based gamma spectrometer before; if you’ve always wanted to roll your own scintillators, you can do that too. Continue reading “Identify Radioactive Samples With This DIY Gamma-Ray Spectrometer”

Fireball-Flinging Figurine Feeds Fiction

If you’re writing a screenplay or novel, there will likely be points along the way at which you can’t get enough encouragement from friends and family. While kind words are kind, acts such as [scubabear]’s can provide a push like no other. By commissioning another 3D designer friend to model a character from the first friend’s screenplay so he could print and animate it, [scubabear] fed two birds with one scone, you might say.

Designer friend [Sean] modeled the mighty Braomar in Maya and Z-brush, and [scubabear] did test prints on a Formlabs Form2 as they went along to keep an eye on things. Eventually, they had a discussion about making space for wires and such, so [Sean] took to Blender to make Braomar hollow enough for wires, but not so empty that he would collapse under the stress of being (we presume) the main character.

Braomar stands upon a sigil that changes color thanks to an RGB LED ring in the base that’s driven by an Arduino Nano. A single pixel in the fireball is wired through Braomar’s body and flickers with the help of an addressable LED sequencer board.

Our favorite part of this build has to be the power scheme. Not content to have a wire running out from the base or even a remote control for power-draining concerns, [scubabear] used disc magnets in the base to switch on the 9 V battery when Screenplay Friend rotates it.

Of course, if you need inspiration to even thing about beginning to write a screenplay or novel, maybe you should lead with the maquette-building and then construct a story around your creation.


This project was an entry into the 2022 Sci-Fi Contest. Check out all of the winning entries here.

Linux Fu: The Infinite Serial Port

Ok, the title is a bit misleading. Like most things in life, it really isn’t infinite. But I’m going to show you how you can use a very interesting Linux feature to turn one serial port from a microcontroller into a bunch of virtual ports. In theory, you could create over 200 ports, but the reality is you will probably want to stick with fewer.

The feature in question is what’s known as pseudoterminal or sometimes a pty or pts. These special files were made to feed data to programs that expect to accept data from a terminal. The files provide two faces. To the client, it looks like any other terminal device. To the creator, though, it is just another file. What you write to that file goes to the fake terminal and you can read anything that is sent from the program connected to the terminal. You use these all the time, probably, without realizing it since running a shell under X Windows, for example, doesn’t attach to a real terminal, after all.

You could, of course, do the same trick with a composite USB device, assuming you have one. Also assuming you can find a working driver and get it working. However, many microcontrollers have a serial port — even one with a USB converter built-in — but fewer have full-blown USB hardware. Even the ones that do are often at odds with strange drivers on the PC side. Serial ports work and work well even on the simplest microcontrollers.

The Plan

The plan is simple enough. A Linux program listens to a real serial port and watches for special character sequences in the data stream. Those sequences will allow you to switch data so that the data stream will go to a particular terminal. Data coming back from the terminals will go to the real serial port after sending a sequence that identifies its source.

Continue reading “Linux Fu: The Infinite Serial Port”

A Kurzweil K2500 piano

Patching The Kurzweil K2500 Synthesizer

Despite being a computer with some extra chips, synthesizers today are still quite expensive. They used to cost far more, but we tend to think of them as instruments instead of computers. And just because it is an instrument doesn’t mean someone like [Peter Sobot] can’t crack it open and patch the OS inside.

The synth in question is a Kurzweil K2500, released in 1996 with a Motorola 68000. Rather than directly start pulling out parts on the kitchen table, [Peter] began by doing some online research. The K2500 operating system is still available online, and a quick pass through Ghidra showed some proper instructions, meaning the file likely wasn’t encrypted.

He found the part of the code that reads in a new firmware file and checks the header and checksum. Certain functions were very high in memory, and a quick consultation of the service manual yielded an answer: it was the volatile RAM. With that tidbit, [Peter] was able to find the function that copied chunks of the new ROM file to RAM and start decoding the file correctly. [Peter] changed a few strings, made sure the checksums were correct, and he was ready to flash. The actual tweaks that [Peter] are made are left up to the reader, but the techniques to get a working decompiled build and a viable ROM image to flash apply to many projects. One benefit is now the K2000 simulates correctly in MAME due to his spelunking. He has his flashing script up on GitHub for the curious.

Ghidra is perfect for this kind of thing. We’ve seen people tweaking their water coolers with it. It opens to door towards tweaking anything to your liking.