Pitch Sequencer Turns Tascam Tape Deck Into Instrument

The cool thing about magnetic tape is that by varying the speed at which you play it back, you can vary the pitch of the output. [Issac] decided to take advantage of this, executing a fancy digitally-controlled pitch mod on his Tascam Porta 02 tape deck.

The build uses a Raspberry Pi Pico, which employs PWM to control the speed of the tape drive’s motor. This is achieved with the use of an NPN transistor driven by the PWM output of the Pico. This allows accurate control of motor speed, and thus pitch.

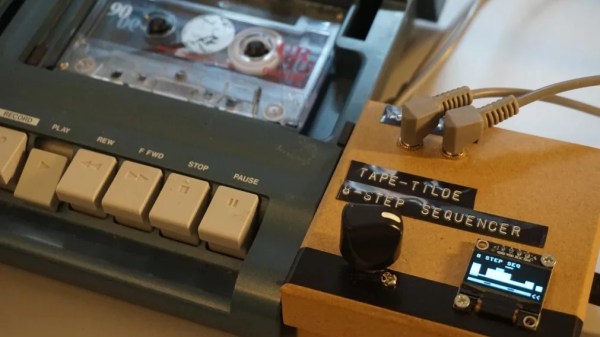
With that sorted out, the project was fleshed out with an OLED screen and a rotary encoder. These allow various patches or scripts to be run on the Pico, controlling the motor speed of the tape player in various ways. With a bit of work, [Issac] was also able to create a function that converted MIDI note values into PWM values that determine various motor speeds.

The natural thing to do next was to put in a tape with a looping sample at a set pitch, and then vary it in a sequence controlled by the Pico. The 8 steps of the sequence can be manually set with the rotary control, and in future, [Issac] even plans to add a real MIDI input, allowing the system to act as a monophonic synth.

If you prefer other routes to pitch shifting shenanigans, check out this project. Video after the break.

Continue reading “Pitch Sequencer Turns Tascam Tape Deck Into Instrument”

Easy Network Config For IoT Devices With RGBeacon

When you’re hooking up hardware to a network, it can sometimes be a pain to figure out what IP address the device has ended up with. [Bas Pijls] often saw this problem occurring in the classroom, and set about creating a simple method for small devices to communicate their IP address and other data with a minimum of fuss.

[Bas] specifically wanted a way to do this without adding a display to the hardware, as this would add a lot of complexity and expense to simple IoT devices. Instead, RGBeacon was created, wherin a microcontroller flashes out network information with the aid of a single RGB WS2812B LED.

In fact, all three colors of the RGB LED are used to send information to a computer via a webcam. The red channel flashes out a clock signal, the green channel represents the beginning of a byte, and the blue channel flashes to indicate bits that are high. With a little signal processing, a computer running a Javascript app in a web browser can receive information from a microcontroller flashing its LEDs via a webcam.

It’s a neat hack that should make setting up devices in [Bas]’s classes much easier. It needn’t be limited to network info, either; the code could be repurposed to let a microcontroller flash out other messages, too. It’s not dissimilar from the old Timex Datalink watches which used monitor flashes to communicate!

When Sticks Fly

When it comes to hobby rotorcraft, it almost seems like the more rotors, the better. Quadcopters, hexacopters, and octocopters we’ve seen, and there’s probably a dodecacopter buzzing around out there somewhere. But what about going the other way? What about a rotorcraft with the minimum complement of rotors?

And thus we have this unique “flying stick” bicopter.  [Paweł Spychalski]’s creation reminds us a little of a miniature version of the “Flying Bedstead” that NASA used to train the Apollo LM pilots to touch down on the Moon, and which [Neil Armstrong] famously ejected from after getting the craft into some of the attitudes this little machine found itself in. The bicopter is unique thanks to its fuselage of carbon fiber tube, about a meter in length, each end of which holds a rotor. The rotors rotate counter to each other for torque control, and each is mounted to a servo-controlled gimbal for thrust vectoring. The control electronics and battery are strategically mounted on the tube to place the center of gravity just about equidistant between the rotors.

But is it flyable? Yes, but just barely. The video below shows that it certainly gets off the ground, but does a lot of bouncing as it tries to find a stable attitude. [Paweł] seems to think that the gimballing servos aren’t fast enough to make the thrust-vectoring adjustments needed to keep a stick flying, and we’d have to agree.

This isn’t [Paweł]’s first foray into bicopters; he earned “Fail of the Week” honors back in 2018 for his coaxial dualcopter. The flying stick seems to do much better in general, and kudos to him for even managing to get it off the ground.

Continue reading “When Sticks Fly”

Caulking Gun Becomes Useful Press Tool For Fuel Line Fittings

The simple caulking gun is really useful when you’re working on some bathroom repairs or squirting construction adhesives about the place. However, with a few simple mods, it can become a great help in the mechanic’s workshop too.

It’s a great tool for cleanly pushing fittings into nylon fuel line.

This build consists of a series of 3D-printed parts that can readily be adapted to a garden-variety caulking gun. First up are a pair of fuel line clamps which are fastened together with nuts and bolts, The nylon fuel line is inserted between these, and the bolts are tightened up to hold the line firmly in place at the end of the caulking gun. The fitting to be installed into the line is then placed on the caulking gun’s plunger. It’s then a simple matter of pulling the trigger on the caulking gun to slowly press the fitting into the nylon line.

It’s a great hack which creates a useful linear press with just a few cents of PETG filament. If you find yourself doing a one-off fuel line job on a modern car, this could be just the tool you need. Parts are available on Thingiverse for those eager to print their own. The design is made for 3/8ths inch line, but could readily be modified or recreated to suit other diameters.

3D-printed tools can be useful in all kinds of ways, even in heavy-duty applications like press tooling. It often doesn’t have the same longevity of traditional metal tooling, but for small one-off jobs, the price saving is often more important than the hardiness of the tooling itself. If you’ve whipped up some great 3D-printed tools of your own, don’t hesitate to drop us a line!

Hackaday Prize 2022: Vintagephone Links The Past To The Present (and Future)

Brrrrrrrring! Movies and TV are one thing, but the siren song of a rotary phone ringing in the same room as you is one of those sounds you carry forever. Not old enough to remember them? Ah, so what? There’s no reason to lose these beauties to the annals of time. In fact, we think more old phones should be repurposed so that present and future generations can experience the finger-hookin’ good time of the rotary dial and the high-voltage peal of those brass bells.

That’s exactly what [Giulio Pons] has done with Vintagephone — turned a rotary phone into a digital assistant with an analog interface. He’s reused all the good bits like the rotary dial, the bells, the handset, and the hang-up switch and connected them up to a Wemos ESP8266 development board with a mini motor driver shield and a voltage booster to ring the bells.

When it’s all said and done, [Giulio] will be able to set an alarm by dialing in the time, ring a number to get the current time and date, and ring another number to get the weather forecast. Reminds us of our childhood pastime of calling Time and Temperature to get outside verification that time had, in fact, passed inside the house on those boring rainy days.

Follow along with [Giulio] as the Vintagephone comes to life in the logs, which already have some great instructions for doing a similar number to an old phone you may have lying around. You can find the code on GitHub.

Got some old tech lying around? Teach it some new tricks and enter the Reuse, Recycle, Revamp round of the 2022 Hackaday Prize!

Robot arm in Blender

Animate Your Robot In Blender

You’ve built a robot crammed full of servos and now you settle down for the fun part, programming your new dancing animatronic bear! The pain in your life is just beginning. Imagine that you decide the dancing bear should raise it’s arm. If you simply set a servo position, the motor will slew into place as fast as it can. What you need is an animation, and preferably with smooth acceleration.

You could work through all the math yourself. After half an hour of fiddling with the numbers, the bear is gracefully raising it’s arm like a one armed zombie. And then you realize that the bear has 34 more servos.

render of industrial robot type arm with pedestal, base, upperarm and lowerarm and IK ball

Fortunately for everybody who’s done the above, there’s Blender. It’s all about creating smooth motion for animations and computer graphics. Making robot motion with Blender is, if not easy, at least tolerable. We made a sample project, a 3-axis robot arm to illustrate. It has a non-moving pedestal, rotating base, upper arm, and lower arm. We’ll be animating it first in Blender and then translating the file over to something we can use to drive the servos with a little script.

Now, Blender is notorious for a difficult user interface. The good news is that, with revision 2.9, it moved to a much more normal interface. It still definitely is a large program, with 23 different editors and literally thousands of controls, but we’ll only be using a small subset to make our robot move. We won’t teach you Blender here, because there are thousands of great Blender tutorials online.  You want to focus on animation, and the Humane Rigging series is particularly recommended.

Continue reading “Animate Your Robot In Blender”

3D Printing A Carburetor Is Easier Than You Probably Think

We’ve all been there. You see a cool gadget on the Internet to 3D print and you can’t wait to fire up the old printer. Then you realize it will take 8 different prints over a span of 60 hours, chemical post-processing, drilling, exotic hardware, and paint to get the final result. [Peter Holderith’s] carburetor design, however, looks super easy.

If you have experience with real-world carbs, you might wonder how that would work, but as [Peter] points out, carburetors are very simple at the core — nothing more than a venturi. All the extra pieces you think of are for special cases and not necessary for basic operation. We doubt, though, that you could really use the thing in its current form in your car. There are no mounts and since he printed it in PLA, it seems like a hot engine would be a bad idea. However, it does work well with water and an electric blower.

[Peter] mentions that with some more work and the right material, he has no doubt he could create a working practical carb. We think he’s right. But even in this form, it is a great educational project for a budding car enthusiast — like the old transparent V8 engine models, maybe.

Speaking of transparent, we’ve seen — or maybe not seen is a better phrase — a see-through carburetor that is also a good demonstrator. If you could perfect a 3D printed carb, it would make conversion projects a lot easier.