Lego Drawing Machine Draws Block Shapes Best

Lego-drawing machine

Loving to draw but deathly afraid of pen ink, [Marcel] came up with a little drawing machine made out of Lego that will do it for him. It’s not a very complicated build but it does have several different components arranged such to complete a task, and that in itself is cool. Oh yeah, just kidding about the “afraid of pen ink” thing.

RC Car Servos are used to drive the pen in the X and Y directions. These servos only have a 180 degree range of motion which is not enough to move the pen very far. To increase the pen’s travel distance, [Marcel] attached a large gear to the servo which rotates a much smaller gear that rides on a rack gear attached to the bed. A Lego hinge takes the place of a Z axis and is used to set the height of the pen that is strapped to the machine via rubber band.

In order to make the machine draw, the user moves an analog joystick. The changing resistance values of the joystick’s potentiometers are measured by an Arduino. The Arduino then moves each servo to the appropriate position using PWM. If you’d like to know how to do this, check out the Knob Tutorial.

If you’re not ready to l’eggo your Lego drawing machines, check out this super complicated creation or this arm emulator that draws the Mona Lisa.


A Simple Commodore 64 Cart Dumper

c64

While [Rob] was digging around in his garage one day, he ran across an old Commodore 64 cartridge. With no ROM to be found online, he started wondering what was stored in this ancient device. Taking a peek at the bits stored in this cartridge would require dumping the entire thing to a modern computer, and armed with an Arduino, he created a simple cart dumper, capable of reading standard 8k cartridges without issue.

The expansion port for the C64 has a lot of pins corresponding to the control logic inside these old computers, but the only ones [Rob] were really interested in were the eight data lines and the sixteen address lines. With a little bit of code, [Rob] got an Arduino Mega to step through all the address pins and read the corresponding data at that location in memory. This data is then sent over USB to a C app that dumps everything in HEX and text.

While the ROM for just about every C64 game can be found online, [Rob] was unlucky enough to find one that wasn’t. It doesn’t really matter, though, as we don’t know if [Rob] has the 1541 disk drive that makes this cart useful. Still, it’s a good reminder of how useful an Arduino can be when used as an electronic swiss army knife.

Upgraded Nerf Gun Keeps Track Of Your Ammo

[Paul] and his buddy [Jonathan] recently had a zombie themed Larp event to go to, so in the spirit of making the experience more realistic, they decided to upgrade their Nerf N-Strike Stryfe gun.

They started by cracking open the gun and making note of the available space for a few bells and whistles. Luckily, thanks to traditional plastic injection molding practices — there’s lots of room!

Upgrades include a magazine sensor, a jam sensor, a trigger sensor and a voltmeter to make the gun a little bit smarter. A knockoff Arduino Pro Mini takes in all these inputs and outputs it to a 7-segment LED display for easy visibility. Our favorite part is the ammo sensor, which keeps a tally of how many shots you’ve used. It’s simply an IR photo-diode and IR transistor in a Darlington configuration, connected to the GPIO interrupt pin on the fake Arduino.

Continue reading “Upgraded Nerf Gun Keeps Track Of Your Ammo”

Visualize Vroom With This RGB LED Tachometer

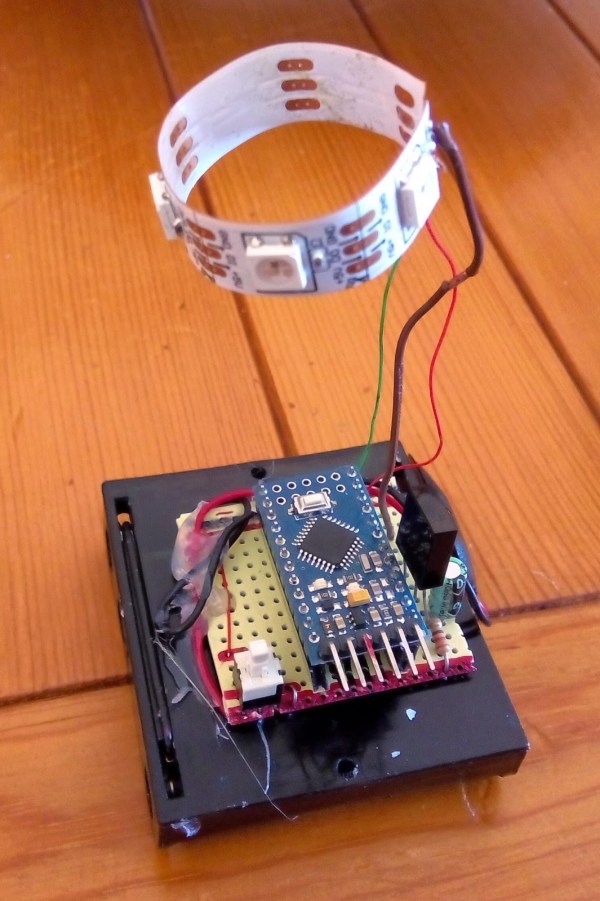
[Pete Mills] recently bought the all-new Ford Fiesta, which offers impressive fuel economy over that of his Jeep. He soon figured out that he has real time access to a wealth of engine and chassis data through Ford’s OpenXC platform and used it to build blueShift, a neopixel tachometer. The car already has a tach, but this one is more visual, can be seen in periphery, and is just plain fun.

In case you hadn’t heard, the OpenXC platform is Ford’s consumer key to the kingdom of OBD2 treasures. It unlocks the magic through its Vehicle Interface, which plugs into the OBD2 port and translates the CAN bus messages to OpenXC format. These messages are packaged into JSON format and can be sent over Bluetooth or Ethernet/Wi-Fi to an Android, Python, or iOS device.

[Pete] went with Bluetooth and used a BlueSMiRF with an Arduino Pro Mini. He derives power from the car’s on-board USB port, but has future plans to use the OpenXC VI port. blueShift reads the RPM data and displays a green trail as the engine revs up. At the peak revolution, it shows a red LED. This one is sticky and will persist for the lesser of three seconds or the time elapsed to a new positive RPM. [Pete] is also reading the headlight status of the car. As soon as they come on, the RGB LEDs dim to avoid blinding him at night.

[Pete] wanted to make an enclosure more finished-looking than a Tupperware box. He nearly detoured into 3D-printer design, but ended up putting together a Prusa i3v and came up with this RAM mount-compatible enclosure. His fantastic write-up and code are on his blog, but you can make the jump to see a short demo and a full explanation video. You can also make smart brake lights or even create art with OpenXC.

Continue reading “Visualize Vroom With This RGB LED Tachometer”

C64 Emulator For The Arduino Due

c64

Almost a year ago, [miker00lz] started a thread on the Arduino forums telling everyone about a 6502 emulator and BASIC interpreter he wrote for an Arduino Uno. The chip inside the Uno isn’t a powerhouse by any means, and with only 2KB of RAM it’s far less capable than just about any computer from the 70s. Arduino works on a lot of different chips, though, and after a few months, [Jan] turned an Arduino Due into a Commodore 64 emulator.

[Jan]’s code isn’t limited to the DUE, and can be used with any chip with enough memory. If you’re feeling fancy, you can connect a TFT display for all the vintage goodness of PETSCII graphics, all while running a faster BASIC than the very stripped down EHBASIC.

Because the emulator is using software to talk to the outside world, it should be possible to use this project to interface with the cooler chips found in Commodore machines – SIDs for one, but also the cartridge port for some vintage Ethernet goodness. It’s not even limited to Commodore machines, either: the POKEY chips found in Atari 8-bit micros are seriously underutilized in the chiptune and demoscene, and having modern hardware to play with these chips couldn’t hurt in the slightest.

Continue reading “C64 Emulator For The Arduino Due”

HammerPong Game Takes Pong To New Heights

large scoreboard with lots of flashy lights

[Jason] is back at it again with another new twist on the technically sophisticated and advanced game of Pong. Fashioned in a ‘Chuck E. Cheese’ style platform, the two players stand side by side each other with large foam hammers. A wack sends the 32 bit ARM powered dot skyward and then back down to the other player, where another wack will send the dot back whence it came. A brightly lit scoreboard keeps track of how many dots slip by.

[Jason] is a veteran of pong inspired games, but putting the HammerPong game together brought with it some new challenges. After being unable to squeeze a few MDF panels into his car, and fighting off flies, yard debris and pet dander that were trying to attach themselves to his freshly painted artwork, [Jason] managed to get his project completed.

The HammerPong is powered by an Arduino Due that controls six WS2812 LED strips and runs the background code. Various latches, shift registers and power transistors control the lights and scoreboard. Be sure to check out the linked project for more detail, and take a look at the video demonstration after the break.

Continue reading “HammerPong Game Takes Pong To New Heights”

The Rabbit H1 Is A Stationary Mouse Replacement

rabbit h1

[Dave] has some big plans to build himself a 1980’s style computer. Most of the time, large-scale projects can be made easier by breaking them down into their smaller components. [Dave] decided to start his project by designing and constructing a custom controller for his future computer. He calls it the Rabbit H1.

[Dave] was inspired by the HOTAS throttle control system, which is commonly used in aviation. The basic idea behind HOTAS is that the pilot has a bunch of controls built right into the throttle stick. This way, the pilot doesn’t ever have to remove his hand from the throttle. [Dave] took this basic concept and ran with it.

He first designed a simple controller shape in OpenSCAD and printed it out on his 3D printer. He tested it out in his hand and realized that it didn’t feel quite right. The second try was more narrow at the top, resulting in a triangular shape. [Dave] then found the most comfortable position for his fingers and marked the piece with a marker. Finally, he measured out all of the markings and transferred them into OpenSCAD to perfect his design.

[Dave] had some fun with OpenSCAD, designing various hinges and plywood inlays for all of the buttons. Lucky for [Dave], both the 3D printer software as well as the CNC router software accept STL files. This meant that he was able to design both parts together in one program and use the output for both machines.

With the physical controller out of the way, it was time to work on the electronics. [Dave] bought a couple of joysticks from Adafruit, as well as a couple of push buttons. One of the joysticks controls the mouse cursor. The other joystick controls scrolling vertically and horizontally, and includes a push button for left-click. The two buttons are used for middle and right-click. All of these inputs are read by a Teensy Arduino. The Teensy is compact and easily capable of emulating a USB mouse, which makes it perfect for this job.

[Dave] has published his designs on Thingiverse if you would like to try to build one of these yourself.